A bad mast bearing isn't subtle; it practically screams for help. When you hear that distinct grinding or squealing noise during lifts, or feel a jerky, binding motion that tells you something's wrong, you know it's time to get your hands dirty. A proper diagnosis from the start ensures you're chasing the right problem and not just throwing parts at a symptom, hoping one sticks.
Diagnosing a Failing Mast Bearing
Before you even think about cracking open the toolbox, you need to be dead certain what you’re up against. This isn't about guesswork. It’s about reading the signs the machine is giving you so you can fix it right the first time and get back to making money.
Think of yourself as a detective on the job site. Your first clues are always sound and feel. Run the mast up and down, first empty and then with a light pallet. Is it smooth, or does it stutter and catch? That jerky movement is often the signature of a bearing cage that’s given up the ghost, letting the rollers pile up instead of rolling freely.
Listening to the Iron
That grinding sound isn't just noise; it’s the sound of money leaving the budget. It's raw metal-on-metal wear, a clear sign that a bearing's internal components have disintegrated. It’s a completely different sound from a hydraulic whine or a simple chain creak, and a good tech knows the difference. Try to pinpoint where the noise is loudest as the carriage passes a specific point in the mast.
I’ve seen guys chase a "bad bearing" for hours only to find a loose bolt or a chunk of pallet wood jammed in a channel. Isolate the noise. A mechanic's stethoscope is great, but even a long screwdriver pressed to your ear can help you find the source. Don’t start tearing things apart until you're certain.
After the listening tour, it's time for a close visual inspection. Grab a good flashlight and get your eyes deep inside the mast channels. You’re hunting for the classic signs of failure:
- Metal Shavings: Look for fine, glittery metal dust or even small flakes collecting at the bottom of the mast channels. This is literally ground-up bearing, and it's a dead giveaway.
- Uneven Wear: Check the face of the mast rails. Do you see shiny, grooved lines where a collapsed bearing has been digging in? This points to a severe failure that might mean more than just a bearing replacement.
- Visible Damage: Get a direct look at the bearings themselves. Are the outer races cracked? Are seals missing? Can you see rollers that are loose or cocked at an angle?
Pinpointing the Guilty Party
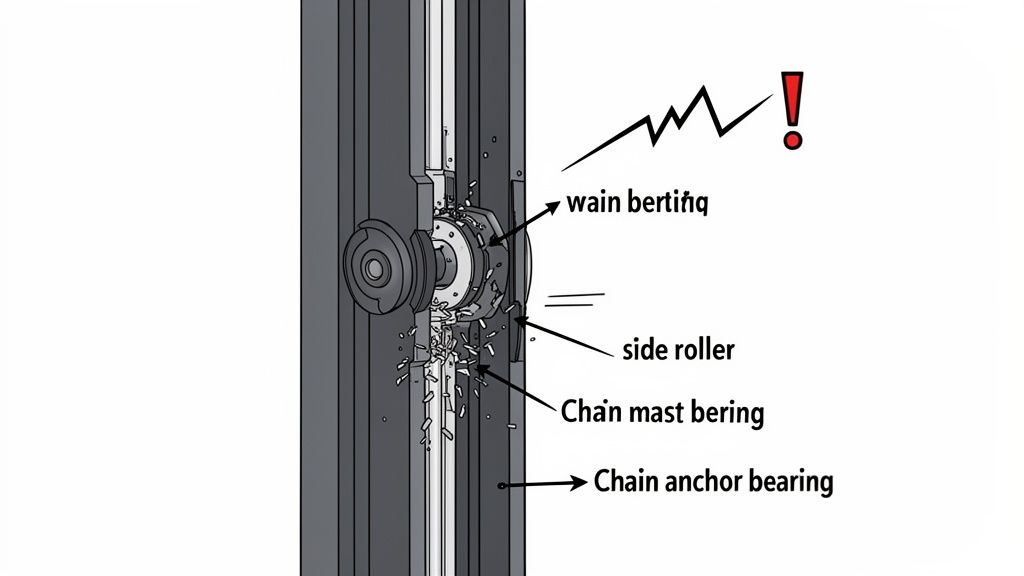
A forklift mast has multiple types of bearings, and you have to identify which one is causing the trouble. Don't just order a generic "mast bearing" and hope for the best. You need to know if you're dealing with the main load rollers, the side thrust rollers, or the chain sheave bearings.
To figure this out, watch the carriage carefully as it moves. Excessive side-to-side play or rocking usually points toward failed side rollers. If the carriage seems to dip or sag under load, your main load rollers are the likely culprits. Issues with the chain anchor or sheave bearings often show up as a pulsing or jerking motion specifically in the lift chains themselves.
Understanding why the bearing failed is just as important as knowing what failed. Sure, a bearing can fail from old age, but it's often a symptom of a bigger problem. Was it starved of grease? Is a mast rail bent from an impact? Is the operator constantly shock-loading the forks? If you don't find and fix the root cause, you'll be doing this exact same Toyota forklift mast bearing replacement again in six months. That’s a callback you don’t want, and this diagnostic step is what separates a parts-changer from a real technician.
Assembling Your Real-World Toolkit
Forget the pristine tool list you'd find in a dealer's service manual. Out here, on a greasy shop floor with a machine that needs to be running yesterday, you need a toolkit built for reality, not theory. The right preparation is what separates a four-hour job from a two-day nightmare. So let's get into what you actually need to drag out of the box for a Toyota forklift mast bearing replacement.
This job is about more than just sockets and wrenches. It’s about having the right leverage and the right kind of persuasion on hand. When a bearing has been seized in a mast channel for 8,000 hours, a standard ratchet set just isn't going to cut it. You're going to need some muscle.
Start with the heavy hitters. You’ll want a solid set of pry bars—not the flimsy ones, but thick, forged steel that won't bend when you put your entire body weight into it. You also need a good dead blow hammer. Leave the claw hammer in your truck; its hardened steel face can easily chip or mushroom the very metal you're trying to save. A dead blow delivers a firm, non-rebounding impact that persuades stubborn parts to move without destroying them.
Your Essential Arsenal Checklist
This isn't an exhaustive list, but it's the core of what I grab every single time. Having this stuff ready before you start means you aren’t scrambling and cursing mid-job.
- Metric Socket & Wrench Set: You'll need a full range, usually from 10mm up to 24mm or even larger, depending on the specific Toyota model. Deep sockets are an absolute must for getting to those recessed retainer bolts.
- Heavy-Duty Snap Ring Pliers: Seriously, get a good set with interchangeable tips. The cheap ones will flex and send a snap ring flying across the shop—a part you will never, ever find again.
- Bearing Puller Kit: A three-jaw puller is your best friend here. Just make sure it’s sized correctly for the bearings you're tackling. Trying to improvise with pry bars is a fantastic way to mangle the bearing housing or the mast channel itself.
- Brass Drift or Punch Set: When you need to tap a stubborn bearing race out, a soft brass punch is non-negotiable. It prevents you from gouging the steel mast and causing an expensive headache.
Beyond the hard tools, don't forget the right consumables. A can of quality penetrating oil (not just standard WD-40, get something that actually creeps) and a tub of high-pressure lithium grease are completely non-negotiable.
More Than Just Bearings: Getting Parts Right
Here's where so many jobs go completely sideways. You can't just order the bearing. The dealer's parts diagram, if you can even get your hands on a current one, shows a dozen little pieces around that bearing for a very good reason. Any time you pull a bearing, you absolutely must replace the seals and any retainers you had to remove.
A new bearing paired with an old, hardened seal is a guaranteed failure. You're just inviting dirt and moisture right back into the assembly you just spent hours cleaning. Don't be the guy who tries to save twelve bucks on a seal only to cause a thousand-dollar comeback repair.
This is where the dealer's wait times become the real enemy. They'll have the bearing in stock but will casually tell you the seal is on backorder for two weeks, while your machine sits dead in the water. That forklift isn't making a dime waiting for a tiny piece of rubber. It's exactly why I stopped relying on them years ago.
A reliable parts supplier is your most important tool, period. You need a place that understands you're losing money every single hour that lift is down. This is where you find high-quality, precision-fit alternatives to OEM parts. At Flat Earth Equipment, we have the sensors, solenoids, and filters you need to bypass those dealer wait times and get your equipment earning its keep. It’s about getting back to work, not waiting in line.
Executing the Mast Takedown
Alright, tools are laid out and the machine's diagnosed. Now for the real work—the part where you get your hands dirty and bring this mast down. This isn't a delicate operation, but it demands your full attention. One mistake here isn't just a do-over; it's a trip to the ER or worse.
We're going to break this down into practical, repeatable moves that keep you safe and get the job done right the first time.
First thing's first: safety. I can't stress this enough. An unsecured mast is a guillotine waiting to drop. Before you even think about loosening a bolt, you need to properly block and chain the mast stages. Don't ever rely on the hydraulics; a blown hose is all it takes for gravity to win.
Use heavy-duty hardwood blocks between the mast rails to prevent them from collapsing. Then, secure the stages together with a Grade 80 or higher chain and binder. Double-check everything. For a deeper dive, review our essential forklift safety protocols, which are crucial for jobs like this.
With the mast secured, you can focus on getting to the heart of the problem—the bearings. Getting everything apart is a methodical process. Rushing just leads to lost parts and damaged components, turning a straightforward job into a costly mess.
Stripping Down the Front End
Before you can touch the mast bearings, the carriage and forks have to come off. Start by lowering the carriage until it rests securely on your blocks. This should release all tension from the lift chains. This is a critical step; trying to disconnect a tensioned chain is just asking for trouble.
Once the chains are slack, you can pull the anchor pins. Keep these organized and clean them up. Now, disconnect any hydraulic lines running to the carriage, like those for a side-shifter or fork positioner. Be ready with caps and plugs to stop fluid loss and keep contaminants out of the system. A little dirt in a hydraulic line now will absolutely destroy a pump later.
With everything disconnected, the carriage and forks can be carefully removed. This is a heavy assembly, so use another forklift or a proper lifting device. Don't try to be a hero and manhandle it. Once it's out of the way, you finally have a clear view of the main and side roller bearings you're here to replace.
This workflow visualizes the key stages before the heavy lifting even begins, making sure you have what you need on hand.
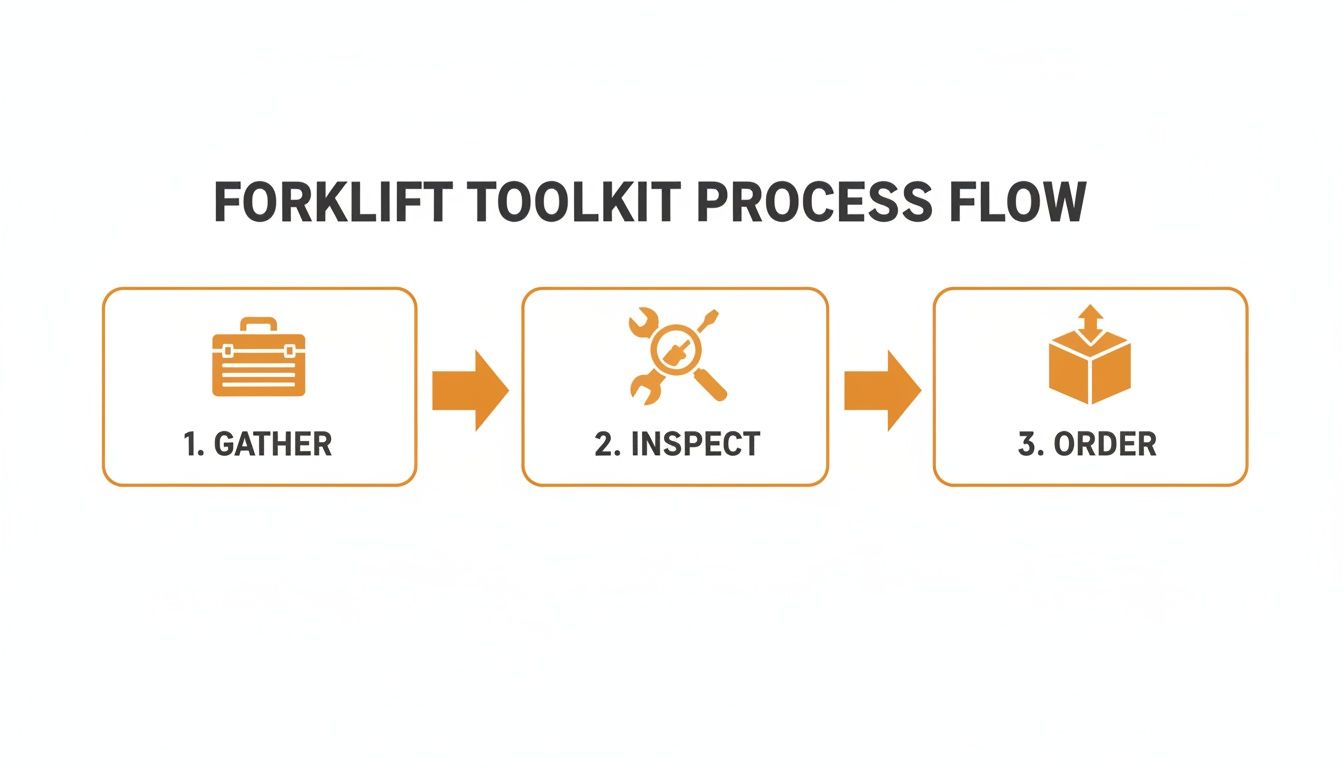
This simple Gather, Inspect, Order process prevents that classic mistake of tearing down a machine only to find you’re missing a critical part or tool. It saves you from a world of unnecessary downtime.
Wrestling with Seized Bearings
Now for the fight. Those old bearings have likely been pressed in for thousands of hours, subjected to heat, moisture, and immense pressure. They won't want to come out. This is where patience and the right technique separate the pros from the amateurs. Brute force alone will get you a gouged mast channel and a much bigger bill.
Start by removing any snap rings or retainer plates holding the bearing in place. Then, liberally apply a high-quality penetrating oil. Let it sit and do its work—at least 15-20 minutes. While you wait, clean up the surrounding area.
The biggest mistake I see is guys reaching for the biggest hammer they can find right away. That's how you crack a mast rail or mushroom the carrier housing. You have to be smarter than the steel. Persuasion over brute force, every time.
If penetrating oil isn't enough, it's time for a little heat. Use a propane or MAPP gas torch to apply controlled heat to the housing around the bearing, not the bearing itself. The goal is to expand the housing just enough to break the rust and corrosion bond. Heat it evenly, and don't get it glowing red-hot.
Once it's heated, a few sharp taps with a dead blow hammer on a brass drift—placed against the outer race—should start to move it. Work your way around the bearing to walk it out evenly. If you try to drive it out from just one side, it will get cocked and jam itself in tighter.
The Toyota forklift mast bearing replacement process is a routine but technical procedure. It often involves using a hammer and tire lever to carefully remove worn bearings while protecting the critical spacers that maintain proper alignment. You can find plenty of field repair videos online that show these specialized techniques in action.
Throughout this entire disassembly, pay close attention to shims. These thin metal plates set the bearing clearance, and they are incredibly easy to lose or mix up. Keep the shims from each bearing assembly separate and clearly labeled. Putting them back in the wrong spot during reassembly will lead to binding or excessive play, and you'll be tearing it all down again. Take pictures with your phone as you go; it's cheap insurance against a major headache later.
Precision Reassembly for Lasting Results
Getting the old bearings out was the dirty work. Now comes the part that separates a lasting repair from a premature failure you'll be dealing with again in a few months. Putting it all back together isn't just reversing the steps; it's about precision. Rushing this stage is a guarantee you’ll be doing this job twice.
Before a single new part goes in, you need to play clean-up crew. Grab a scraper and a wire brush and get every last bit of old grease, rust, and road grime out of the mast channels and carriers. A clean surface is non-negotiable for a professional job.
Once it's spotless, inspect every inch of the metal where the old bearings were seated. Look for galling, cracks, or grooves worn into the steel from the old, failed bearing. Even a small burr can prevent the new bearing from seating perfectly, leading to immediate binding and a swift death for your brand-new parts.
Installing New Bearings the Right Way
This is where the biggest mistakes happen. Whatever you do, never use a hammer to pound a new bearing in by its inner race or cage. You'll destroy it before it ever lifts a pound. The only way to do this right is with controlled, even pressure.
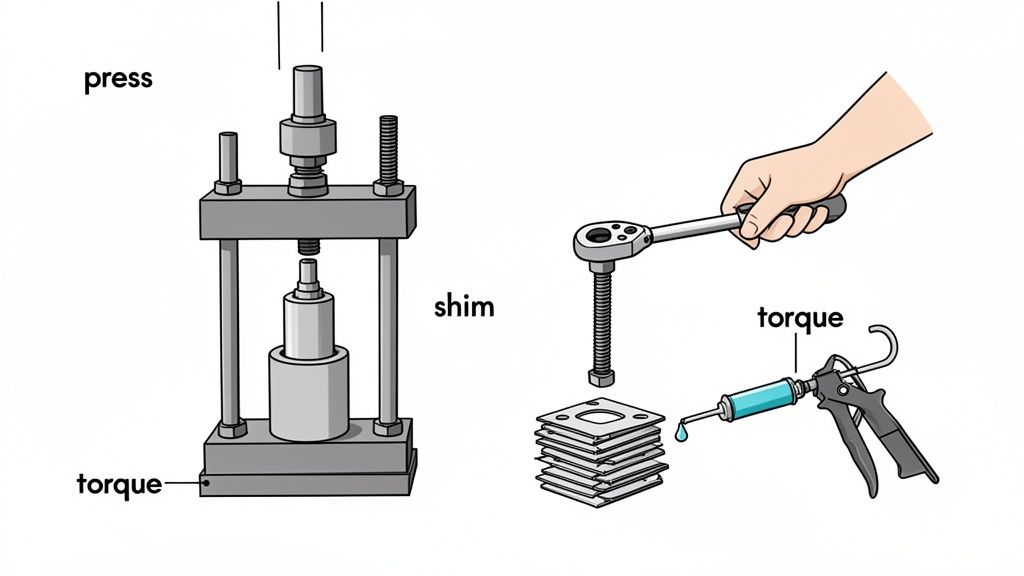
Ideally, you'll use a hydraulic press. It ensures the bearing goes in perfectly straight and seats completely every time. If you don't have a press, a large bench vise and a socket that is the exact same diameter as the bearing's outer race will get the job done. This applies force only to the strongest part of the bearing, protecting the delicate rollers and cage inside.
Select the correct installation method based on what you have in the shop:
- Hydraulic Press: The gold standard for perfect, even installation.
- Bench Vise & Socket: A solid field method. Use a socket that matches the outer race diameter precisely.
- Brass Drift (Last Resort): If you absolutely must tap it in, use a soft brass drift and work your way around the outer race with light, even taps. Never use a steel punch.
I've seen guys ruin a $200 bearing with a $20 claw hammer because they were in a hurry. That's not being a tech; it's being a liability. Take the extra five minutes to find the right socket or use the press. It's the difference between a one-year fix and a ten-year fix.
Grease, Shims, and Torque Specs
The type of grease you use matters immensely. Don't just grab any old tube from the gun. You need a high-pressure, high-tack grease specifically designed for heavy loads and washout resistance. A cheap general-purpose grease will get squeezed out or washed away after the first rainstorm, leaving your new bearings to die a slow, painful death.
With the bearings seated, it’s time to deal with the shims. This is where your careful organization during disassembly pays off. Reinstall the shims exactly as they came out. These thin metal plates set the clearance, ensuring the rollers have just enough room to move freely without being sloppy. Getting this wrong will cause either binding (too tight) or excessive play (too loose), both of which will destroy the bearing.
Once the shims are in and the retainer plates are on, it’s time to torque the bolts. Don’t just hit them with the impact until they stop turning. Look up the correct torque specification for your specific Toyota model and use a calibrated torque wrench. This ensures even clamping force and prevents the bolts from backing out under vibration.
The global forklift mast market reached USD 4.7 billion in 2024, a number that shows just how critical these machines are to keeping supply chains moving. This huge scale highlights the growing need for reliable, fast access to quality replacement parts and technician support, letting us bypass dealer delays and keep fleets operational. You can explore more about these industry trends and their impact on material handling operations by reviewing the full market analysis.
Final Checks Before Lowering the Hoist
With everything torqued down, the last steps are setting the lift chain tension and running the mast through its paces. Reconnect the lift chains and adjust them until they have equal tension, with just a bit of slack as specified in the service manual. Uneven chains will cause the carriage to twist, putting destructive side loads on your new bearings.
Finally, cycle the mast up and down several times—first with no load, then with a light load. Watch and listen. The movement should be perfectly smooth and whisper-quiet. If you feel any binding or hear any grinding, stop immediately and find the problem. Don't let it leave the shop until it runs like new. This final check validates all your hard work on the Toyota forklift mast bearing replacement.
Post-Repair Checks to Avoid Callbacks
Just because your tools are put away doesn't mean the job is over. This last part—the validation—is what separates a pro-level repair from a frustrating, money-losing comeback. It's about making sure your hard work holds up and stopping the next failure before it even has a chance to start.
First things first, cycle the mast without any weight on it. Run it all the way up and all the way down, a few times. Listen carefully. Are you hearing anything? A click, a pop, a stutter? Anything other than dead silence and smooth travel means you stop right there. Don't let that machine leave your bay until you've figured it out.
Putting It to the Test
Once the mast passes the no-load check, grab a light pallet—something around a quarter of the forklift's rated capacity. Now, repeat the test. Cycle the mast up and down again. Sometimes, a problem will only rear its ugly head when there's a bit of strain on the system.
Keep a close eye on the chains. Make sure they're tracking evenly. Listen for any groans from the new bearings as they settle in and take on the weight. The movement should be seamless. If you see any hesitation or jerky motion, you might have a shim problem or a tight spot that needs looking at. This simple loaded test is your final QC check before you hand the keys back.
This isn't just about double-checking your own work. It's about protecting it. You just sank hours into a precision Toyota forklift mast bearing replacement. The last thing you want is an operator to destroy all that effort in a single shift because of bad habits. Prevention is the final, and most crucial, step of the job.
The Real Bearing Killer: Operator Abuse
Now for the tough talk. The real enemy of mast bearings isn't wear and tear; it's bad habits. No bearing on earth, no matter how perfectly you install it, can stand up to a hostile operator.
The number one killer is shock-loading. This is what happens when an operator rams the forks into a pallet at speed or drops a heavy load like a ton of bricks. That jolt sends a massive shockwave straight through the mast rollers, blowing way past their design limits. It’s like a mechanical punch to the jaw.
Another classic is side-loading—using the forks to push or shove pallets sideways. This puts incredible lateral stress on bearings that were only ever designed to handle vertical loads. It's a guaranteed way to destroy your fresh repair work.
To give these new bearings a fighting chance, you need to arm your operators with a simple, 60-second inspection routine.
- Daily Mast Check: Before starting a shift, they should slowly raise and lower the mast, just listening for any new or unusual noises.
- Look for Weeping: Teach them to spot grease being pushed out from behind the bearing seals. That's a classic sign of overload.
- Report Roughness: If they feel any binding, grinding, or roughness, they must report it immediately. Trying to "work through it" is what turns a small issue into a catastrophic failure.
When you build these habits, you transform a painful, reactive repair cycle into predictable, manageable maintenance. It’s about creating a culture of respect for the iron. There's a reason the forklift mast roller bearings market is a big deal, projected to hit an estimated $450 million by 2025. These parts are absolutely critical. You can discover more insights about the scale of this specialized market and see why they play such a vital role in all material handling operations.
Common Questions From the Field
Out in the field, you hear the same questions over and over. There’s no time for fluff from a service manual or dealer runaround; you just need straight answers to get the machine back to work. Here’s the real talk on what I hear most about a Toyota forklift mast bearing replacement.
You get a lot of questions about how long these parts are supposed to last. The truth is, there's no magic number on the calendar.
How Often Should I Replace Forklift Mast Bearings
Forget a fixed schedule. It all comes down to operating hours, the grit of the work environment, and whether your operators respect the iron or beat it into submission. A forklift in a dusty lumber yard is going to chew through bearings way faster than one moving pallets in a clean warehouse.
Instead of guessing, get your eyes on them every 250 hours.
- Check for any slop or play in the mast.
- Listen for that tell-tale grinding noise under load.
- Look for fine metal dust in the mast channels.
A well-greased bearing that's treated right can last thousands of hours, but a neglected one won't survive a season.
Are Aftermarket Bearings as Good as OEM Toyota Parts
Yes, they absolutely are—as long as you’re getting them from a supplier who actually knows heavy equipment. The keyword you need to care about is precision-fit. A cheap, no-name bearing you find online is a ticking time bomb. It’ll fail fast and might even damage the mast channel on its way out, turning a simple repair into a catastrophic failure.
I’ve seen it happen. A guy saves fifty bucks on a cheap bearing only to cause thousands in damage, all while the machine is down waiting for a dealer who couldn't care less. Don't be cheap, but don't be a sucker for the dealer's brand name either.
Quality aftermarket bearings from a trusted source like Flat Earth Equipment meet or exceed OEM specs without the ridiculous dealer markup and backorder delays. They understand that downtime is the real enemy. When you have questions, our team is here to help; contact us for technician-led support that understands the urgency of your work.
What Is the Biggest Mistake Technicians Make
It's not even close: ignoring safety. I've seen guys try this job without properly blocking and chaining the mast. That mast will drop in an instant, and it will crush anything and anyone in its path. It’s a fatal mistake.
The second biggest error is getting impatient and hammering a new bearing into place. You’re destroying the race before it ever lifts a single pound. Take the time to use a press or a socket that fits the outer race perfectly. Patience during reassembly is what saves you from doing the entire job all over again next month.
When you're fighting against the dealer "Laptop Mafia" and their endless backorders, Flat Earth Equipment has your back. We stock the high-quality sensors, solenoids, filters, and bearings you need to get your yellow iron running today, not next week. Stop waiting for a Regen cycle that never ends and get the parts you need by visiting us at https://flatearthequipment.com.