When your forklift starts acting up, a proper Toyota 4Y engine tune up kit is your first line of defense. Forget the dealer's service bay and their diagnostic laptop. We're talking about getting your hands dirty and fixing it yourself, right where it sits. A complete kit is your battle plan for getting that machine running like it just rolled off the line, without waiting for some suit to tell you what's wrong.
What a Real Toyota 4Y Tune Up Kit Contains
Let's cut the crap. You're looking for a Toyota 4Y engine tune up kit because your machine is running rough, guzzling fuel, or just feels tired. A forklift that can't start or lift its rated load is just a very expensive paperweight, and downtime is the enemy. This isn't about shiny parts; it's about getting the job done.
The market is flooded with cheap, knock-off kits that look the part but die in the field. Slapping in off-brand ignition parts is a surefire way to end up chasing a new misfire you didn't have before. The components in a professional-grade kit from a place like Flat Earth Equipment are engineered to work, period. They restore the precise timing and spark intensity the 4Y engine demands to get back to work.
Before you start turning wrenches, let's break down exactly what you should be looking for in a quality kit. These aren't just suggestions—they're the essentials that separate a quick field fix from a permanent breakdown.
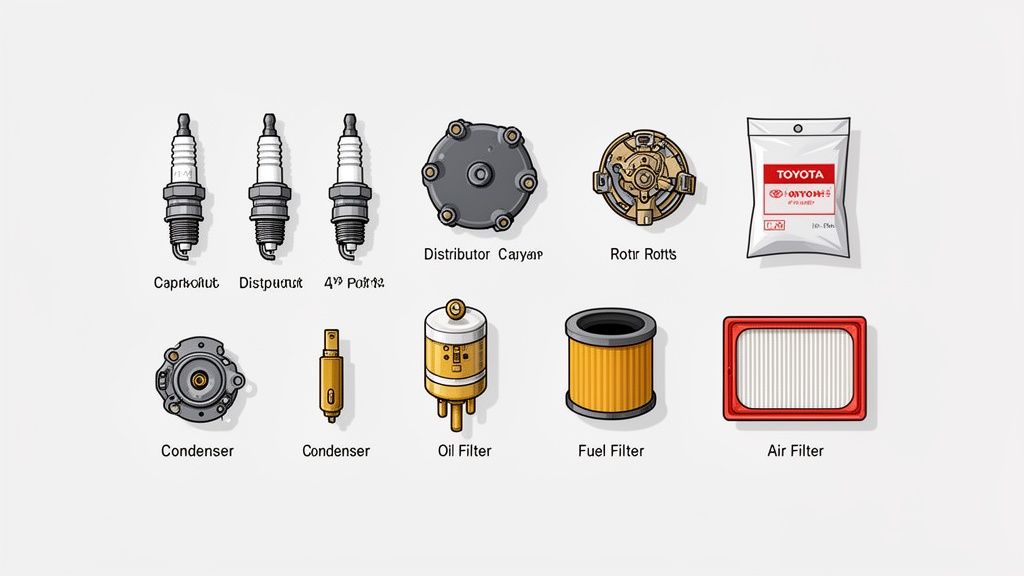
Your Essential Toyota 4Y Tune Up Kit Checklist
| Component | What It Does And Why It Fails | My Field Tip |
|---|---|---|
| Spark Plugs | Delivers the spark to ignite the air/fuel mix. Worn electrodes or incorrect heat range leads to fouling, weak spark, and misfires. | Always use the correct heat range for the 4Y. A plug that's too "hot" can cause pre-ignition and piston damage. Don't guess. |
| Distributor Cap | Directs high voltage from the coil to the correct spark plug wire. Cracks, carbon tracking, and terminal corrosion cause spark to jump to the wrong place. | Insist on a cap with brass or copper terminals. The cheap aluminum ones corrode fast, leading to a sputtering engine under load. |
| Distributor Rotor | Spins inside the cap, distributing the spark to each terminal. The tip burns away over time, creating a wider gap and a weaker spark. | The rotor tip and cap terminals wear together. Always replace them as a set to maintain the correct air gap for a strong spark. |
| Ignition Points | A mechanical switch inside the distributor that triggers the coil to fire. The contact surfaces wear and pit, causing inconsistent timing and a weak spark. | A quality set ensures a crisp, clean break. You're not saving money if the cheap set burns out in 100 hours. |
| Condenser | Absorbs excess voltage to prevent the ignition points from arcing and burning out prematurely. Failure leads to rapid point degradation. | Think of it as cheap insurance for your points. If you're replacing the points, you must replace the condenser. No exceptions. |
These ignition components are the heart of the tune-up. A weak, inconsistent spark is the root of almost every 4Y performance problem I've ever seen.
I’ve seen it a hundred times on JCBs with finicky electronics and it's the same here. A tech saves twenty bucks on a cheap tune-up kit and then spends the next two days trying to figure out why the forklift runs worse. Don't be that guy. Get the right parts from Flat Earth Equipment the first time.
Filters: The Unsung Heroes of Engine Life
While the ignition parts get all the attention, the filters are what keep the engine from eating itself alive. This 4Y works in the same dusty, grimy environments as my yellow iron—warehouses, lumber yards, you name it. Its survival depends on clean air, fuel, and oil.
A good kit will include high-grade filters designed for industrial abuse, not just a rebranded car filter. This means heavy-duty filter media that traps fine dust without choking the engine. The fuel filter needs to be robust enough to handle dirty fuel without collapsing, and the oil filter absolutely must have the correct bypass valve pressure for the 4Y’s oiling system. Skimping here is a guaranteed way to pay for a much more expensive repair down the road.
Prepping Your Workspace and Your Tools
A proper tune-up starts long before you ever lay a wrench on the engine. It doesn't matter if you're in a spotless shop or kneeling in the dirt next to a dead machine—a clean, organized approach is what separates a quick, successful job from a frustrating nightmare. This isn't just about being neat; it's about avoiding self-inflicted wounds that put you behind schedule.
My first rule, learned the hard way on a JCB backhoe covered in mud, is to clean the engine bay before you start. Grab a can of degreaser and a pressure washer or even just a stiff brush. Taking ten minutes to blast away years of caked-on grease and grime keeps that junk from falling into an open cylinder or your distributor housing. It’s a simple step that can save you from a catastrophic failure down the line.
The Right Tools for the Job
Having the right Toyota 4Y engine tune up kit is only half the battle; you need the right tools to use it. You can forget about those all-in-one mystery tool chests. For this job, you need specific gear to do it right and avoid breaking things.
Here’s the bare minimum I always have in my service truck for a 4Y tune-up:
- A Real Timing Light: Get one that’s bright enough to see in broad daylight. A dim, flickering light is totally useless when you're hunched over trying to find faded timing marks on a greasy engine block.
- Feeler Gauges: You absolutely need these for setting the ignition point gap and checking valve clearances. Don't even think about eyeballing it. Precision here is the key to a smooth-running engine.
- Spark Plug Gapper: A simple coin-style or wire gapper is all you need to ensure every plug has the exact gap specified for the 4Y. This is critical for getting a strong, consistent spark.
- Socket Set with Extensions: Some of those manifold bolts and especially the distributor hold-down clamp are tucked away in awkward spots. Having a few different extensions and a universal joint will save you a whole lot of cursing.
This isn't just about turning wrenches. It's about taking back control. The dealer wants you to think this is some dark art that only their "Service Master" laptop can perform. It's not. With the right parts from Flat Earth Equipment and the right tools, you own the machine—it doesn't own you.
Safety Isn't Optional
Finally, let's talk about not getting hurt. The 4Y is a simple engine, but it can still bite you. Before you even think about pulling a plug wire, disconnect the negative battery terminal. This is non-negotiable. It prevents accidental starts and protects the electrical components from shorts.
Always chock the wheels, even if the ground looks perfectly level. The last thing you need is a three-ton forklift deciding to roll away while your hands are deep in the engine bay. These basic precautions are what separate the pros from the amateurs. For a deeper dive, our guide on comprehensive forklift safety practices is a must-read for any serious technician.
Overhauling The Ignition System for a Strong Spark
A weak, inconsistent spark is the real villain behind almost every problem on a sluggish 4Y engine. It’s the reason for hard starts, terrible fuel economy, and that frustrating sputter when you try to lift a heavy load. This is where we get our hands dirty and bring the ignition system back to life—it's the absolute core of a proper tune-up.
Forget plugging in a laptop; this is real mechanical work that puts you back in control. The whole process is straightforward, but you have to be precise. A good Toyota 4Y engine tune up kit from Flat Earth Equipment provides all the matched components you need to nail this on the first try.
Distributor Cap, Rotor, and Points
First things first, pop the two clips holding the distributor cap on. Before yanking it off, pause for a second and note which terminal the number one spark plug wire connects to. A quick snap with your phone or a dab of paint pen will save you a major headache later.
Lift the cap straight off, then pull the rotor off its shaft. Now you’re looking at the ignition points and the condenser. You'll see two small screws holding the points assembly and one screw for the condenser. Back them out, disconnect the little wire, and lift the old parts out.
Now for the most critical part of the job: setting the gap on the new points from your kit. You'll need to rotate the engine by hand until the rubbing block on the points rests on the highest point of the distributor cam lobe. Grab your feeler gauge and set the gap—the sweet spot is typically around 0.018 inches (0.45mm). It needs to be a snug fit, where the gauge drags just slightly as you pull it through. If that gap is too wide or too tight, it'll throw your timing and spark quality completely out of whack.
This simple workflow is the foundation for any job on this engine. Start clean, get the right tools, and always think about safety first.
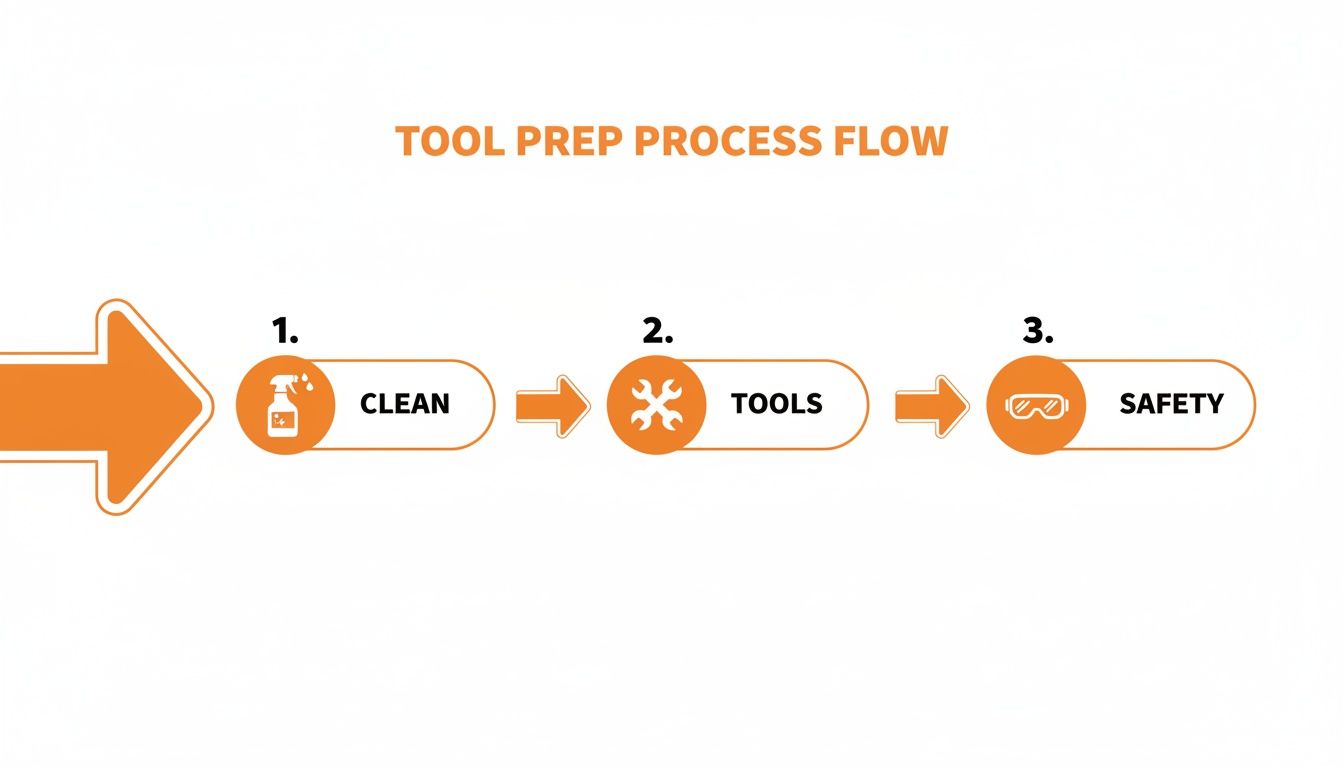
Treating this "Clean, Tools, Safety" flow as a discipline is what separates the pros from the amateurs. It stops you from making careless mistakes and ensures the job gets done right without creating new problems.
Reading and Replacing Spark Plugs
Next up, pull the old spark plugs. But don't just chuck them in the bin. The condition of the tips tells a story about what’s going on inside each cylinder.
- Dry and Sooty: This is a dead giveaway for a rich fuel mixture or a weak spark.
- Oily and Wet: Not a good sign. This points to bigger problems like worn piston rings or failing valve stem seals.
- White and Blistered: A classic symptom of the engine running too lean or having too much timing advance, which can burn a hole right through a piston.
Gap your new plugs to spec (usually around 0.032 inches or 0.8mm) and thread them in by hand first to make sure you don't cross-thread them. Finish them off with a torque wrench to about 13 ft-lbs (18 Nm). Overtightening is a rookie mistake that can damage the cylinder head and turn a simple tune-up into a massive repair job.
You're not just swapping parts; you're doing a health check. A five-second look at those old plugs can diagnose an issue that a dealer would charge you hundreds to find with their diagnostic computer.
Nailing the Ignition Timing
Finally, we get to ignition timing. This is where a lot of people mess up, but getting it right is what makes an engine purr. You’ll need to find the timing marks on the crankshaft pulley and the pointer on the timing cover. Give them a good cleaning so they’re easy to see.
The Toyota 4Y engine is a legendary 2.2-liter workhorse built for one thing: reliability. A tune-up kit is all about restoring that original, rock-solid performance. The end goal is to get the idle sitting perfectly at the factory spec of 550 rpm with the timing set to 7 degrees Before Top Dead Center (BTDC). Hitting these numbers can slash fuel consumption by up to 15%. For a deeper dive, you can explore more technical details about the powerful Toyota 4Y engine at AutopartsWD.com.
With the engine idling, aim your timing light at the marks. Loosen the distributor hold-down bolt just enough that you can turn the distributor body. Slowly rotate it until the timing mark on the pulley lines up perfectly with that 7-degree mark on the pointer. Lock it down by tightening the bolt, and you're done. You now have a crisp, powerful spark timed perfectly for peak efficiency.
And a final pro tip: if your battery is struggling to keep up during all this testing, check out our reliable industrial battery chargers to make sure you always have the juice you need.
Restoring Fuel and Air Flow for Peak Power
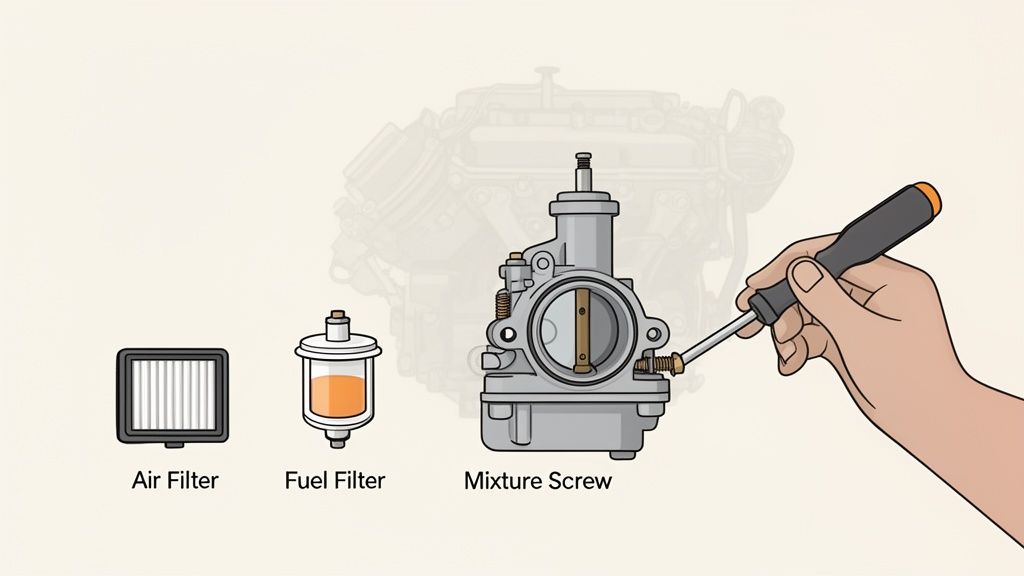
A perfectly timed spark won't do you any good if the engine is gasping for air or starving for fuel. You can have the best ignition components in the world, but with clogged filters, you’re just throwing money away on wasted gas and poor performance. Now we’re going to tackle the lungs of your 4Y, clearing the way for clean air and fuel—the real secret to power under load.
Any decent Toyota 4Y engine tune up kit from Flat Earth Equipment will come with new filters, and for good reason. They are the cheapest and easiest insurance you can buy against engine wear. Skipping them is like trying to run a marathon while breathing through a coffee straw. It just won't end well.
Stop Fuel Starvation with a New Filter
Let's start with the fuel filter. This little guy is often the hidden villain when an engine bogs down the second you try to lift a heavy pallet. It gets choked with rust, dirt, and whatever gunk was floating around in the bottom of a fuel can. Once that filter clogs, fuel pressure plummets, and the carburetor can't get what it needs.
Swapping it out is about as easy as it gets. Find the old filter in the fuel line, clamp the lines on both sides so you don't get a gasoline shower, pop the hose clamps, and slide the new one in. Just be sure to check for the flow arrow on the new filter's housing. Putting it in backward will block fuel completely and leave you wondering what went wrong.
I’ve seen guys on big JCBs spend hours chasing phantom electronic faults, convinced it’s the AdBlue system, only to find out a ten-dollar fuel filter was clogged solid. Always, always check the simple stuff first. A five-minute filter swap from Flat Earth Equipment can solve problems that a shop would charge you a fortune to diagnose.
Give Your Engine Clean Air to Breathe
Next up is the air filter, probably the single most important part protecting your engine from the dust and grit of a typical job site. A dirty air filter suffocates the engine. This forces it to run rich, which will foul the brand-new spark plugs you just installed and absolutely destroy your fuel economy.
Replacing it couldn't be simpler: unclip the air cleaner housing, lift out the old, grimy filter, give the inside of the housing a quick wipe, and drop in the new one. That one step ensures your engine is pulling in clean, unrestricted air—critical for efficient combustion and saving the cylinder walls from abrasive damage.
Fine-Tuning the Carburetor for a Smooth Idle
With clean air and fuel finally reaching the engine, it's time to dial in the carburetor. This isn't some kind of black art; it's just a matter of making small, careful adjustments and listening to what the engine is telling you. You're looking for two screws on the side of the carb: the idle speed screw and the air-fuel mixture screw.
- Idle Speed Screw: This one’s straightforward. It's a simple stop that prevents the throttle from closing all the way. With the engine fully warmed up, turn this screw clockwise to increase the idle RPM or counter-clockwise to lower it. You're shooting for a smooth, steady idle right around 550 RPM.
- Air-Fuel Mixture Screw: This adjustment is a bit more delicate. It fine-tunes the air-to-fuel ratio at idle. First, turn the screw in gently until it barely seats—don't crank on it. Then, back it out about 1.5 to 2 full turns as a starting point. Start the engine. From here, make tiny, quarter-turn adjustments. Listen for the engine speed to increase and smooth out. Turning it in too far (lean) will make it stumble; turning it out too far (rich) will make it run rough and smell like gas. Your goal is to find the "sweet spot" where the engine idles fastest and most consistently.
After you've found the perfect setting on the mixture screw, the idle speed will likely have changed. Go back to the idle speed screw and adjust the RPM back down to your 550 RPM target. Bouncing between these two adjustments a couple of times will lock in a rock-solid idle, give you a crisp throttle response, and restore the low-end grunt you need to get work done without sputtering.
Final Adjustments and Verifying Your Work
You’ve got all the new parts from your Toyota 4Y engine tune up kit installed, but don't close the hood just yet. This is where a good tune-up becomes a great one. We're talking about the final tweaks that make this engine purr, breathe right, and go the distance.
Skipping this part is like fighting a regen cycle on a new JCB—you did all the work, but you're still not back in business. You did the heavy lifting, now it’s time to button it up and make sure it’s sealed tight. Let's get into the valve clearances—the one thing most techs rush through, but the one thing that prevents that maddening ticking sound or, worse, a torched valve.
Setting the Valve Lash
Valve lash—that tiny gap between the rocker arm and the valve stem—is absolutely critical. If it's too tight, the valves can't fully close, causing a loss of compression and eventually burning out the valve seats. Too loose, and you'll get that classic, annoying "tick-tick-tick" at idle, which is the sound of your valvetrain slowly hammering itself into oblivion.
First things first, make sure the engine is completely cold. Pop the valve cover off. You'll need to turn the engine over by hand to get the piston for the cylinder you're adjusting to Top Dead Center (TDC) on its compression stroke. The easy way to tell you're there? Both rocker arms for that cylinder will be loose.
Now, it's time for the feeler gauges. These specs aren't suggestions; they're essential.
- Intake Valve Clearance (Cold): 0.008 inches (0.20mm)
- Exhaust Valve Clearance (Cold): 0.012 inches (0.30mm)
Gently slide the correct gauge between the rocker and the valve stem. You're aiming for a light drag, not forcing it in or having it fall through. If the gap is off, loosen the lock nut, turn the adjustment screw until the feel is just right, and then tighten the lock nut back down without letting the screw move. Go through this process for all eight valves, one by one.
With a full tune-up kit, you're not just replacing parts; you're restoring the engine's core functions. Valve clearances get set to 0.008 inches intake (hot) and 0.014 inches exhaust, spark plugs get torqued down properly, and timing chain checks help prevent the rare 5% failure rate from excessive wear. We've seen these kits cut emissions by a solid 20–25%, helping keep your fleet compliant with standards like 29 CFR 1910.178.
This isn't just about quieting down a noisy engine. Perfect valve lash is about pure efficiency. It guarantees the engine is breathing exactly as designed, squeezing out every last bit of torque.
For a deeper dive into this engine's lineage, you can get an in-depth look at the Toyota Y engine series and see why it's been such a workhorse.
The Final Shakedown
With the valve cover back on and all the bolts torqued to spec, it’s the moment of truth. Reconnect the battery, do a quick visual sweep to make sure you didn’t leave a wrench sitting on the intake, and fire it up.
Let the engine warm up to its normal operating temperature. The first thing you do is listen. Is the idle steady? Are there any odd ticks, hisses, or clunks you didn't hear before? Grab a flashlight and give everything a once-over, checking for any fuel or oil leaks. Pay close attention to the areas you just worked on, like the fuel filter connections and the valve cover gasket.
Finally, jump in the seat and feel it out. The throttle response should be sharp and instant—no coughing, sputtering, or hesitation. Drive it around the yard, maybe lift a heavy pallet, and confirm it has the grunt it’s supposed to have. This final check is your proof of a job well done. That forklift is no longer a problem on your maintenance list; it’s an asset ready to get back to work.
Common Questions About the Toyota 4Y Tune Up
Even with an engine as solid as the 4Y, things don't always go perfectly to plan. You've just spent the time installing your Toyota 4Y engine tune up kit, but something still feels off. It happens.
Let's walk through some of the most common issues I hear about from guys in the field. This isn't about guessing; it's about having a clear, methodical process to pinpoint the problem and get that machine running like it should.
Why Does It Still Run Rough After a Full Tune Up?
This is easily the most frustrating part of the job. You've swapped every part, torqued everything down, set the timing, and tweaked the carb, but the engine is still missing or sputtering. This feels just like when a JCB throws a code right after a new sensor is installed. Before you start throwing wrenches, let's look at the usual suspects. Nine times out of ten, it's something simple that got overlooked.
- Vacuum Leaks: This is culprit #1, hands down. An old, cracked vacuum hose is all it takes to completely throw off your air-fuel mixture. The easiest way to check is to grab a can of carb cleaner and give short, controlled sprays around the base of the carburetor and where any vacuum lines connect. If you hear the engine RPMs change, you've found your leak.
- Weak Fuel Pump: All the new filters in the world won't make up for a fuel pump that's on its last legs. If the engine fires up okay but then bogs down or dies completely under load, the pump might not be keeping up with the demand.
- Incorrect Firing Order: We've all done it. In the rush to get things back together, it's easy to mix up a wire. Take a second and double-check that your spark plug wires are routed to the distributor cap in the correct 1-3-4-2 sequence.
- Worn Distributor Shaft: If there's slop in the distributor shaft bushings, your point gap will constantly change. This causes the spark timing to wander all over the place, which is a classic cause of a rough, unstable idle.
Don't be too quick to blame the new parts you just got from Flat Earth Equipment. A tune-up often shines a bright light on a pre-existing problem that was masked by the old, worn-out components. Always start your troubleshooting with the simplest and cheapest fixes first, like those vacuum lines.
How Often Should I Do a Tune Up?
There's no single magic number that fits every machine. The service manual might give you a baseline in hours, but let's be honest—that's for perfect, clean-room conditions that don't exist in the real world. I always tell people to base it on how the machine is used and, more importantly, how it feels. A forklift running 12-hour shifts in a dusty lumber yard is going to need a lot more love than one that just moves a few pallets a day inside a clean warehouse.
My rule of thumb is to perform a full tune-up every 1,000 to 1,500 hours, or at least once a year, no matter what. But the engine will tell you when it's time. If it's getting harder to start, feels lazy under load, or you notice you're burning through more fuel, it's asking for attention. A proactive tune-up is always, always cheaper than dealing with a breakdown.
If you're managing a fleet and need a hand creating a maintenance schedule that makes sense for your operation, get in touch with our team for expert advice. We can help you dial it in.
What Are the Most Common Mistakes to Avoid?
I see the same handful of simple mistakes trip people up time and time again. Avoiding these will save you a world of headache and make sure your tune-up actually lasts.
- Over-tightening Spark Plugs: Just don't do it. Cranking down on a spark plug is the fastest way to strip the threads in an aluminum cylinder head. That turns a simple job into a nightmare repair. Use a torque wrench—it's what they're made for.
- Guessing on Gaps: "Eyeballing" the spark plug or point gap is a guaranteed ticket to poor performance and frustration. It takes seconds to use a proper feeler gauge. Precision is key here.
- Ignoring the Wires: You can have the best distributor and brand-new plugs, but if you're trying to send that spark through old, cracked, and brittle wires, you're going to have a weak spark. Give them a good inspection and replace them if they show any signs of deterioration.
When you're ready to stop waiting on the dealer and get a Toyota 4Y engine tune up kit that actually works, Flat Earth Equipment has the sensors, solenoids, and filters you need to bypass the wait times. Get the right parts shipped fast, so you can get back to work.