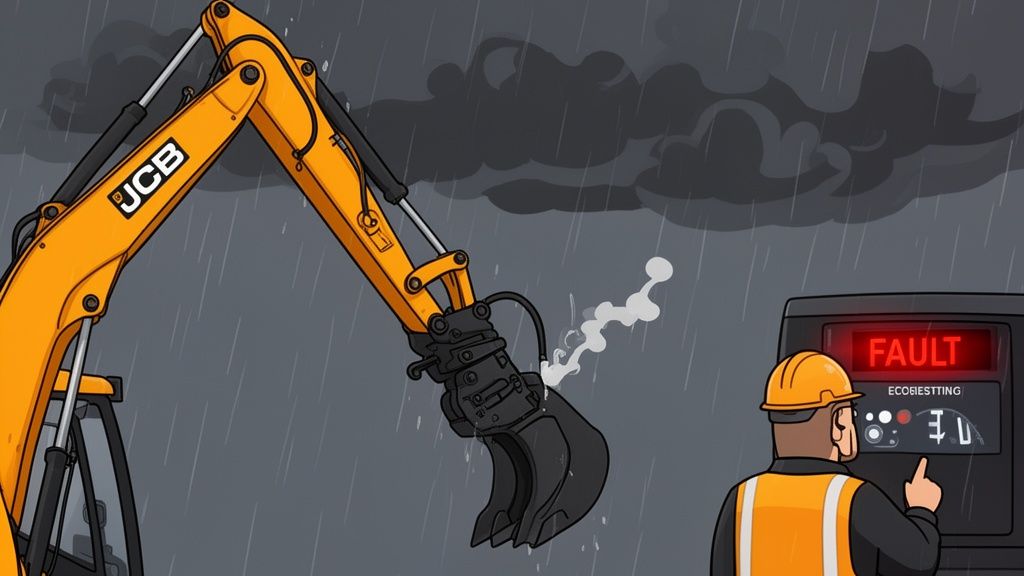
When your JCB quick hitch decides to play statue, it’s almost never some catastrophic mechanical failure. It’s a finicky electrical gremlin, the kind these machines are famous for. That dead switch on the dash or the infuriating blink of a fault light? They’re both pointing fingers directly at the quick hitch solenoid valve.
This is the exact kind of part dealers love to gatekeep. It's their golden ticket to a pricey service call, where they plug in their precious "Service Master" laptop just to confirm what you already figured out standing in the mud.
Why Your JCB Quick Hitch Is Stuck
Let's cut the crap. You're on the job, the clock's ticking, and you can't swap a bucket for a breaker. That stuck attachment isn’t just an annoyance; it's a direct threat to your deadline and your bottom line. Welcome to the modern reality of running "Yellow Iron"—the smarter the electronics get, the more ways they find to fail and put you on the sidelines.
The quick hitch solenoid is just a simple electromagnetic valve, but it’s the weakest link in the chain. It lives a hard life, exposed to mud, water, vibration, and constant pressure cycling. When it finally gives up, the machine’s ECU throws a code, locks out the function, and your controls go dead. The whole system is designed to force your hand and make you call the dealer.
The Real Problem With Modern Yellow Iron
Make no mistake, this isn't an accident; it's by design. From the junk AdBlue/DEF sensors that trigger a limp mode to these little solenoid valves, the whole system is built to be a black box. It’s a funnel that channels you straight toward the dealership's service bay, where they hold all the keys with their diagnostic software. They’re betting you don’t have the time or the tools to figure it out yourself.
But waiting around for a tech to drive out with a laptop is a sucker's game. Every hour of downtime is money bleeding from your pocket. That’s why learning how to perform JCB Quick Hitch Solenoid Valve Testing and Bypass procedures in the field isn’t just a "nice-to-have" skill anymore—it's essential for survival.
The goal is simple: regain control of your iron. By understanding how this valve works, you can diagnose the failure with a basic multimeter, bypass it to finish the day's work, and get a replacement from a real-world supplier like Flat Earth Equipment without ever talking to a service manager.
This reliance on electronic bits and pieces is only getting worse. The global market for hydraulic solenoid valves—the very category our JCB part falls into—is exploding. Valued at over USD 1.7 billion in 2024, it’s on track to hit USD 2.82 billion by 2034. As Statifacts.com highlights in their market analysis, this trend shows just how dependent our heavy equipment has become on these precise, yet fragile, electronic controllers.
Common Signs of a Failing Solenoid Valve
Before you even reach for a multimeter, you can often pinpoint the problem just by watching how the machine behaves. The symptoms are usually pretty clear and scream "electrical or hydraulic control failure."
Here's a quick reference guide to help you diagnose the problem in the field before you even grab a tool.
JCB Quick Hitch Failure Symptoms and Likely Causes
| Symptom You're Seeing | What It Probably Means | First Action to Take |
|---|---|---|
| Dead Switch in the Cab | Complete electrical failure. No power is reaching the solenoid. | Check the fuse first, then check for 12V or 24V power at the solenoid plug. |
| Flashing Warning Light on the Dash | The ECU has detected a fault (open or short circuit) and locked out the function. | Test the solenoid coil's resistance with a multimeter. It should be 5-15 ohms. |
| Solenoid "Buzzing" But the Hitch Won't Move | The coil is getting power, but the valve is stuck or there's a hydraulic issue. | Check hydraulic pressure to the valve. Could also be a weak coil unable to shift the spool. |
| Hitch Works Sometimes, Fails Others (Intermittent) | A classic sign of a failing coil, a bad connection, or water in the wiring. | Wiggle the connector while someone operates the switch. Check for corrosion in the plug. |
Most of the time, one of these symptoms will match what you're seeing perfectly. A quick electrical check will then confirm your diagnosis.
At Flat Earth Equipment, we see this stuff every single day. We get it—you can’t afford to operate on the dealer's timeline. That's why we stock the solenoids, sensors, and filters to get you back to work, shipping them right to your job site or shop. Forget the laptop lockout; it's time to take control and fix it yourself.
Your Field-Ready Diagnostic Toolkit
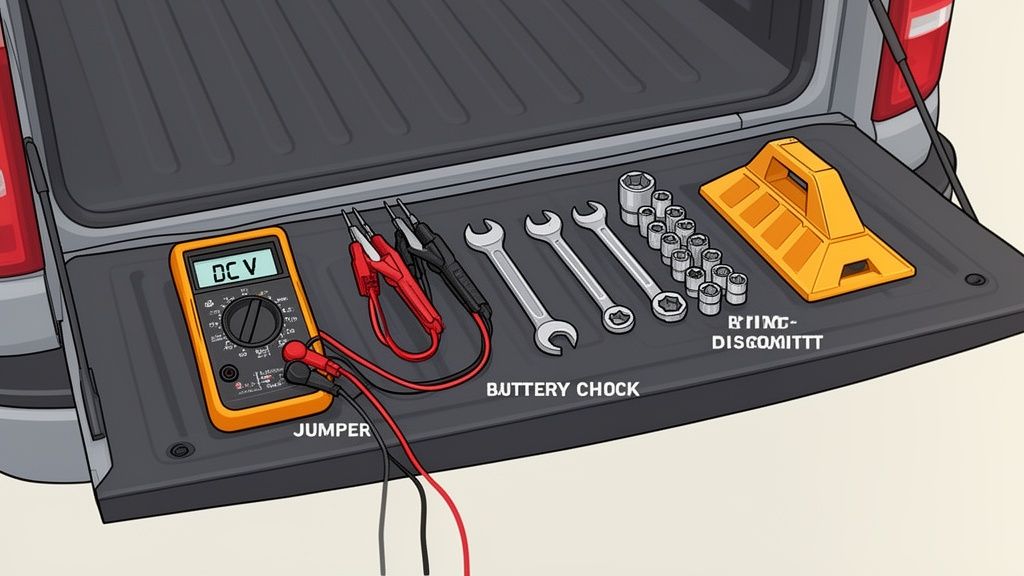
Before you even think about touching a wire, you need to have the right gear on your tailgate. We’re not talking about a full shop on wheels—just a handful of essentials that separate a quick fix from a day-long headache.
Trying to diagnose modern electronics without the proper tools is like working blindfolded. You'll just end up guessing, and guessing costs you time and money.
The centerpiece of this entire operation is a quality multimeter. Forget the cheap, giveaway meters from the hardware store; they are notoriously unreliable and will send you chasing phantom electrical gremlins all day long. A good meter with solid probes is your ticket to seeing exactly what the machine's electrical system is doing—or not doing.
Must-Have Tools for the Job
You don’t need a massive toolbox for this task. Most JCB quick hitch solenoids are accessible with basic hand tools. Here’s what you should have within arm’s reach:
- A Quality Digital Multimeter: This is non-negotiable. You’ll be living on the DC Volts (VDC) setting to check for power and the Ohms (Ω) setting to test coil resistance.
- Essential Wrenches & Sockets: You'll typically need a small set of metric sockets (8mm to 13mm) to remove any protective covers and a wrench for the solenoid retaining nut.
- Jumper Wires: A couple of simple, 14-gauge wires with alligator clips are invaluable. They let you apply power directly to the solenoid to confirm it works, bypassing the machine’s brain entirely.
- Wheel Chocks & Wood Blocks: Safety isn't optional. You need heavy-duty chocks for the tires and solid wood blocks to secure the attachment so it absolutely cannot move.
This small collection of gear is all it takes to perform a professional-level JCB Quick Hitch Solenoid Valve Testing and Bypass procedure right in the field.
Safety First Ground Rules
Working on heavy machinery is unforgiving. Hydraulic pressure can maim, and a dropping attachment can kill. There are no shortcuts here. Before you put a single tool on the machine, you need to follow this pre-flight checklist every single time. It's the only way a simple electrical test doesn't turn into a life-altering accident.
Think of it this way: the machine is actively trying to hurt you until you make it safe. Relieving stored energy—whether it's hydraulic, electrical, or gravitational—is the most important step of any repair.
The process is straightforward but critical. First, lower the attachment to the ground and chock it securely so it can't shift or pivot. Next, shut the machine off, cycle the controls back and forth to relieve any residual hydraulic pressure, then turn the key off and pull it out of the ignition.
Finally, disconnect the battery's negative terminal. This prevents any accidental shorts that could fry the ECU—turning a simple solenoid problem into a multi-thousand-dollar nightmare. A dead battery is a common job site headache, and keeping your equipment charged is crucial. You can find reliable information about maintaining your power supply with the right heavy-duty battery chargers to avoid getting stranded.
Once these steps are done, the machine is safe. You’ve removed the risk, and now you can focus on finding the root cause of the problem.
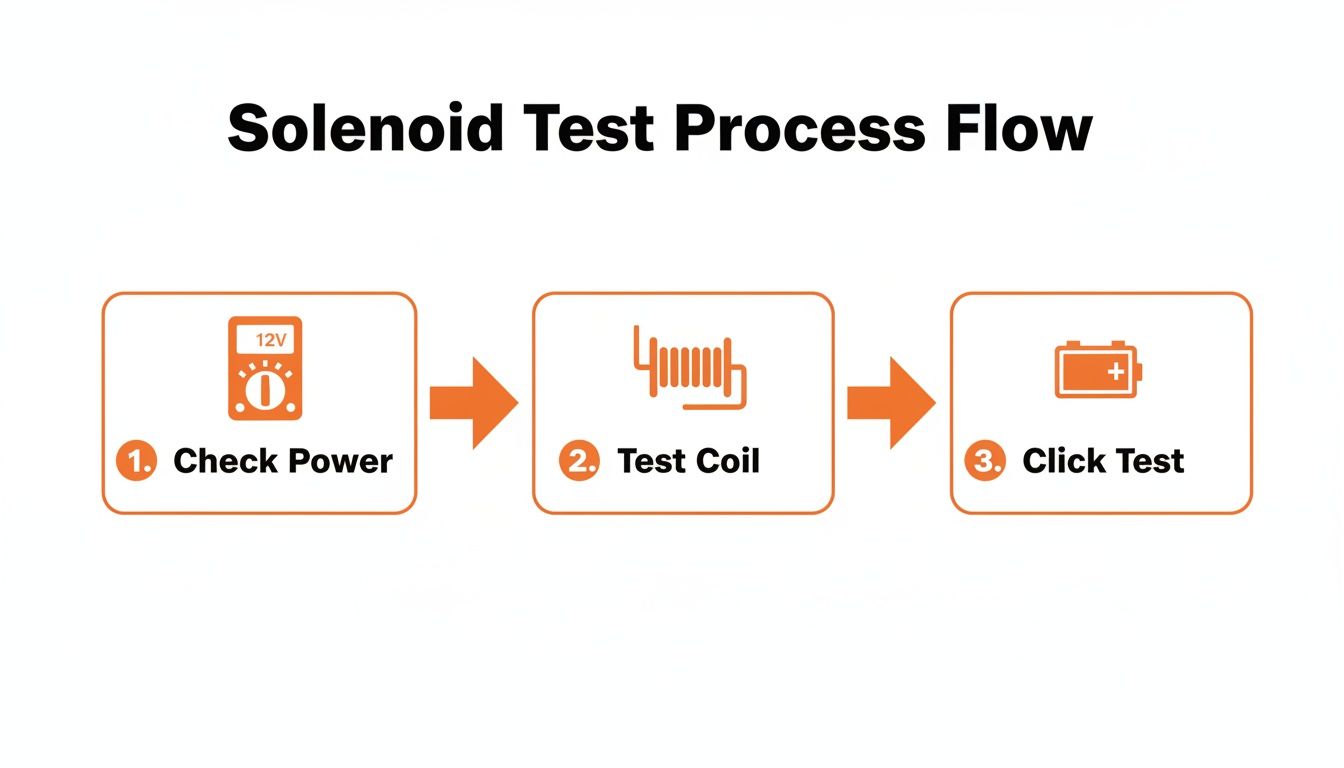
Field Testing The Solenoid Electrically
Alright, you've got your tools ready and the machine is safely chocked and locked out. Now for the moment of truth. This is where we figure out exactly what’s wrong with your quick hitch, right on the boom, with no need for a fancy dealer laptop.
The whole game here is about isolation. We need to answer three simple questions: Is the machine sending power to the valve? Is the solenoid coil itself electrically any good? And finally, is the valve's mechanical plunger seized up? Answer those, and you've found your problem.
Checking For Power At The Connector
First things first: is the machine even trying to operate the solenoid? A quick voltage check will tell you immediately if the issue is upstream—think fuses, switches, or the ECU—or if it's right here at the valve itself.
Go ahead and unplug the electrical connector from the solenoid. You might need a small flathead screwdriver to gently persuade the locking tab to release. With the machine-side connector in your hand, grab your multimeter and set it to DC Volts (VDC).
Get an assistant in the cab to turn the key to the 'on' position. Once they're ready, have them hit the quick hitch switch. Now, carefully touch your multimeter probes to the two pins inside that connector. You should see a solid reading matching your machine's system voltage—either 12V or 24V.
If you see that voltage pop up, great. The machine is doing its part and sending the signal. If you get zero volts, your problem lies elsewhere. It's time to start tracing the circuit backward, checking fuses and the switch. But if you've got power and the hitch still isn't moving, you've successfully narrowed it down to the solenoid.
Testing The Solenoid Coil For Resistance
Just because power is flowing doesn't mean the solenoid's coil can do anything with it. A coil is just a fine wire wrapped thousands of times to create a magnetic field. If that wire breaks or shorts itself out, the solenoid is dead in the water.
This is a job for the Ohms (Ω) setting on your multimeter. With the solenoid still unplugged, touch your multimeter probes directly to the two pins on the solenoid's coil. You're measuring the internal resistance of that winding.
A healthy JCB quick hitch solenoid coil should give you a reading somewhere between 5 and 15 Ohms. The exact number isn't super critical, but it has to be within that range.
- Open Loop (O.L.): If your meter screen shows "O.L." or an infinity symbol, it means the wire inside is broken. The circuit's open, so no current can flow. The coil is toast.
- Zero Ohms (0.0 Ω): A reading of zero, or very close to it, indicates an internal short. The wire's insulation has failed, letting the current take a shortcut. The coil is toast.
Any reading outside that 5-15 Ohm window is a definitive failure. This one test is often all you need to condemn the part and confidently order a replacement from a supplier who gets it, like Flat Earth Equipment.
It's no surprise these things fail. Construction gear is the primary consumer of hydraulic solenoid valves, and the market shows it. Recent analysis projects that construction applications will account for about 34% of the entire hydraulic solenoid market by 2037. With the U.S. and China showing growth rates of 4.8% and 5.2% respectively, the demand for reliable parts and solid diagnostic skills is only going up. You can dig into the numbers yourself in this detailed industry report.
The Final Verdict: The Click Test
The resistance test proves the coil is electrically intact, but it can't tell you if the mechanical part—the little plunger or spool inside—is seized with rust and gunk. The "click test" is the final piece of the puzzle.
For this, you'll need those jumper wires. Connect one wire from the positive terminal of the machine's battery to one of the pins on the solenoid. Take your second jumper wire, connect it to the negative battery terminal, and then momentarily tap it to the other pin on the solenoid.
You should hear a sharp, solid "CLICK" as the magnetic field pulls the internal plunger. That click tells you the coil works and the mechanicals are free to move. If it doesn't click (but you already confirmed it has good resistance), the valve is mechanically seized.
If your solenoid passes the voltage check, the Ohm test, and the click test but the hitch still won't work when it's all plugged in, you've got a rare one on your hands. It's likely a bad connection inside the plug or an intermittent ECU signal. But 99% of the time, one of these three tests will give you a clear pass or fail, pointing you straight to the solution.
Emergency Bypass To Get The Job Done
Alright, the multimeter doesn't lie. Your tests confirm what you already suspected: the quick hitch solenoid is toast. But you've got a truck waiting, the job is on the line, and you don't have time to wait for a part to show up from some backordered dealer inventory. This is exactly where knowing a proper emergency bypass separates the pros from the guys stuck making phone calls.
Let's be clear: this isn't a permanent fix. This is about getting the current attachment off, the new one on, and the machine back to making you money. It's a field-expedient solution to get you out of a serious jam. We'll walk through the two most effective ways to do it: a simple electrical bypass and a direct hydraulic override.
Before you jump into a bypass, you have to be 100% sure the solenoid is the problem. The testing workflow we just covered is your first move.
This process—checking power, testing the coil, and listening for the click—is your road map. It gives you the definitive diagnosis you need before trying to force the issue.
The Electrical Bypass Method
This is your go-to move if the "click test" from the last section told you the solenoid coil is good and the valve's mechanicals are free, but the machine's ECU or switch is on the fritz. In other words, the valve works; it just isn't getting the command from the cab. We’re about to give it that command directly.
Grab those jumper wires again. The goal here is to send battery power straight to the solenoid's pins, completely sidestepping the machine's stubborn computer and any faulty wiring in between.
- Connect one jumper wire from the battery's positive (+) terminal to one of the solenoid's pins.
- Connect the second jumper wire from the battery's negative (-) terminal to the other pin.
The second you complete that circuit, you should hear a solid "CLICK." That's the sound of hydraulic fluid flowing and the quick hitch pins unlocking. This method is fast and clean, but it only works if the solenoid coil itself has integrity. If you've got an open or shorted coil, this won't do a thing, and it's time to get your hands dirty with the hydraulics.
The Direct Hydraulic Bypass Method
Okay, this is the more heavy-duty option for when the solenoid is completely shot—electrically dead, mechanically seized, or both. We're going to manually force the valve to shift using an external hydraulic source.
Safety is everything here. High-pressure hydraulic fluid is no joke. It can inject itself right through your skin before you even know what happened.
Before you even think about touching a fitting, read our full guide on heavy equipment hydraulic safety protocols. Put on your gloves and safety glasses.
The JCB quick hitch valve block has two main pilot lines that control the lock and unlock functions. Your first job is to figure out which one is the "unlock" line. The easiest way is to carefully crack the fittings one by one until you see a small weep of fluid from the correct line when an assistant hits the switch (assuming it works intermittently).
Once you've found the unlock pilot line, you'll need an external pressure source. A simple hydraulic hand pump or a port-a-power is perfect for this.
This procedure is a controlled, manual override of a failed system. You are effectively becoming the machine's ECU, manually directing hydraulic pressure to shift the valve spool. It requires patience and a steady hand.
Attach your port-a-power to the unlock port on the valve block. A few slow, steady pumps will introduce just enough pressure—you usually only need a few hundred PSI for a pilot circuit—to physically shift the spool inside the valve. This action redirects the main hydraulic flow and retracts the locking pins.
Once the attachment is free, you can remove the port-a-power, cap the line, and get back to work. It’s not pretty, but it’s brutally effective. It proves that even when the electronics give up, a solid understanding of basic hydraulics can absolutely save the day. This bypass gets you moving so you can order a quality replacement from Flat Earth Equipment and schedule the permanent fix on your own time, not the dealer's.
Sourcing The Right Part Without The Dealer
That emergency bypass got you through the job, but let's be honest—it's a patch. A good one, for sure, but not a permanent fix. Now it's time to get the right part and solve this problem for good.
Your first thought might be to call the dealer, but you know how that goes. You’ll get hit with a hefty markup and then told the part is on backorder for weeks. Forget that noise. That’s where a real equipment supplier like Flat Earth Equipment comes in. We get that downtime is lost money, so we stock the parts you actually need to get your machine moving again.
First things first: you need to identify exactly what you're working with. Grab the old solenoid and give it a close look. There will be a part number etched or stamped somewhere on the metal body or the plastic coil connector. It might be faint and caked in grease, but it’s there. A little brake cleaner and a rag will usually reveal it.
OEM vs. Aftermarket: The Real Story
The parts guy at the dealership will swear that only their expensive OEM (Original Equipment Manufacturer) part will work. That’s a line they use to protect their profit margins, and frankly, it's just not true. A high-quality aftermarket part is often built to the exact same, if not better, specifications than the original.
Here's the honest breakdown:
- Durability: Our aftermarket solenoids are built for the harsh reality of a job site. They use tougher coil windings and high-grade seals to stand up to the vibration, moisture, and heat that killed your original part.
- Availability: While the dealer is waiting on a container ship from who-knows-where, we have these parts sitting on a shelf in one of our Western U.S. hubs, ready to ship out today.
- Cost: You get a part that meets or exceeds OEM specs without paying extra for the JCB logo on the box. It’s that simple.
Getting the correct part is everything. Cross-referencing the number you found on your old valve is the only surefire way to guarantee a perfect fit and proper function for your specific machine.
You’re not just buying a part; you’re buying uptime. The difference between a quality aftermarket supplier and the dealer is the difference between your machine running tomorrow or next month.
Get The Right Part The First Time
When you call us or check our site, you’re not talking to a random person in a call center reading from a script. The person on the other end of the line knows what a quick hitch solenoid is, what it does, and has probably seen a dozen failures just like yours. We can help you confirm your part number and make sure you're ordering the right component for your specific JCB model.
This is the anti-dealer approach. No gatekeeping, no runaround, just the parts you need, shipped fast.
If you're ready to order or just need a hand confirming the right part number, contact our team of technicians. We’ll get you sorted out without the headache. Stop waiting on the dealer's timeline and start working on yours.
Common Questions From The Field
Out on the job, you don't have time to flip through a hundred-page service manual written by engineers who've never seen mud. You need straight answers, right now.
I get calls all the time from guys knee-deep in a JCB quick hitch problem, just trying to get the machine moving again. Here are the most common questions—and the no-fluff answers—that come up.
My Multimeter Reads 12 Volts But The Solenoid Does Nothing
This is the most common head-scratcher out there. You’ve confirmed power is getting to the plug, but the hitch pins won't budge. This scenario almost always points to one of two things, and it really helps narrow down the problem fast.
First, your solenoid coil is probably fried. Even though your meter shows voltage, an internal break (an open circuit) or a short in the coil means it can't create the magnetic field needed to shift the valve. This is your cue to switch the multimeter to the Ohms (Ω) setting. A good coil will read somewhere between 5-15 Ohms; a bad one will show "O.L." or zero.
The second possibility is that the valve's mechanical spool is physically seized with rust, gunk, or debris. The electrical coil is trying to work, but it's just not strong enough to move a stuck plunger. A quick "click test" by directly powering the solenoid with jumper wires will tell you for sure. If you got a good Ohm reading but hear no click, the valve is jammed solid.
The New Solenoid I Just Installed Is Not Working
This one is incredibly frustrating, but it happens. You’ve done the diagnostic work, swapped in a brand-new solenoid from a trusted supplier like Flat Earth Equipment, and… nothing. Before you get angry and throw a wrench, let’s run through the most likely culprits.
The problem is almost never the new part itself. More often than not, the issue is hiding in the connector or the wiring harness leading to it. Check the pins inside the plastic connector—they can get corroded or pushed back just enough to make a poor connection.
Another classic cause is an intermittent fault in the machine's ECU or the cab switch. The ECU might be sending a "ghost" voltage that’s strong enough to show up on your meter but lacks the amperage to actually energize the coil. This is a tell-tale symptom of a failing electronic module—the kind of problem the dealer loves because it usually requires their proprietary "Service Master" laptop to diagnose.
When a new part doesn't fix it, stop looking at the part and start looking at what feeds it. The problem is almost always in the signal path—the wires, the plug, or the computer—not the brand-new component.
What Do My Multimeter Readings Actually Mean
Trying to remember what each electrical reading means when you're under pressure can be tough. Let's make it simple.
Below is a quick reference guide you can pull up on your phone while you're standing on the machine. It cuts through the jargon and tells you exactly what your meter is saying.
Quick Guide to Interpreting Solenoid Test Readings
| Test Performed | Expected Reading On A Good Solenoid | Bad Reading And What It Means |
|---|---|---|
| Voltage (VDC) at Connector | 12V or 24V when the cab switch is activated. | 0V: No power from the machine. Check fuses/switch. Low Voltage (e.g., 8V): Weak signal from ECU or bad wiring. |
| Resistance (Ohms) at Solenoid Pins | 5 to 15 Ohms (Ω). | "O.L." (Open Loop): The coil wire is broken internally. The part is junk. 0.0 Ω (Short): The coil is shorted out. The part is junk. |
| "Click Test" with Jumper Wires | A sharp, audible "CLICK" when power is applied directly from a battery. | No Click (with good Ohms): The valve's internal plunger is mechanically seized. Sparks but no click: You have a dead short. |
This little table covers 95% of the electrical issues you’ll ever face with a JCB quick hitch solenoid. If you understand these three simple tests, you can confidently diagnose the failure, perform a safe bypass, and order the right part without ever calling the dealer for help. You become the solution instead of waiting for one.
When you're done with guesswork and need the right solenoid delivered fast, Flat Earth Equipment has you covered. We stock the parts that keep you working, shipping them nationwide from our hubs right here in the West. Get the components you need and bypass the dealer headache by visiting us at https://flatearthequipment.com.