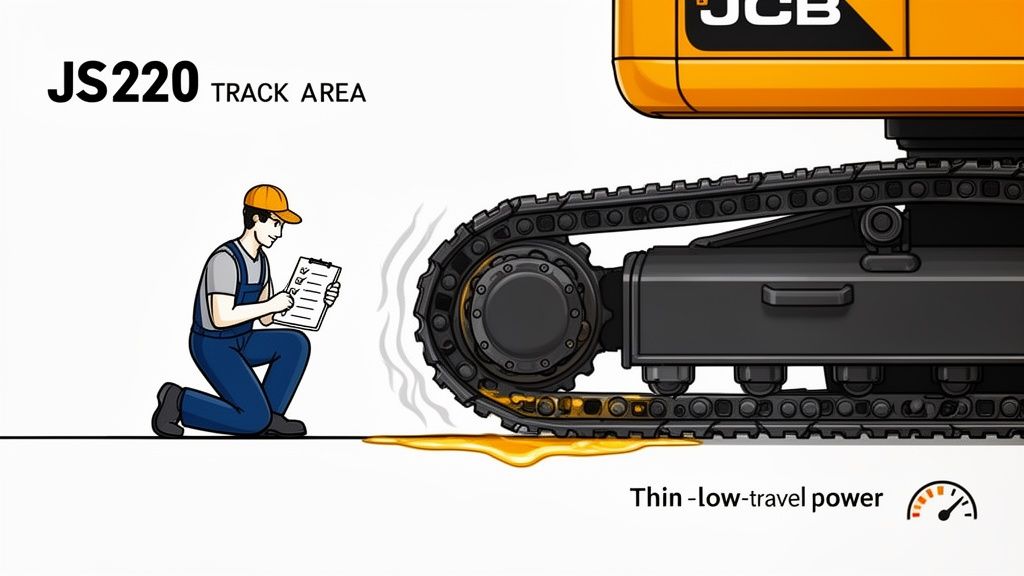
Before you even think about turning a wrench, a solid diagnosis out in the dirt is where you start, not by plugging in some dealer's laptop that's just looking for a reason to throw a code. The dead giveaway of a failing floating seal on a JCB JS220 is a heavy gear oil leak plastering the inside of the track and dripping right off the final drive housing. This isn't just a mess; it's a critical warning that your machine's uptime is on a very short clock.
Diagnosing Your Leaking JCB JS220 Final Drive
Let's make damn sure we're chasing the right problem. Sure, the dealership would love for you to haul the whole machine in for "diagnostics," but you and I both know that's not how it works out here. Time is money, and a proper field diagnosis is what separates a one-day fix from a week-long nightmare waiting on the wrong parts while your machine sits dead.
Fortunately, a failing floating seal isn’t subtle. It bleeds all over the place.
That unmistakable sheen of gear oil on your tracks is symptom number one. You’ll see it collecting dirt and grime, making a nasty mess of the whole undercarriage. This isn’t a simple top-off situation. It’s a clear sign that the precision-lapped metal faces of the seal aren't holding pressure anymore, letting that thick 80W-90 oil escape.
Symptoms of a Failing JS220 Floating Seal
Here’s a quick-and-dirty reference to confirm your floating seal is the culprit before you start tearing things apart.
| Symptom | What It Looks Like in the Field | Urgency Level (1-5) |
|---|---|---|
| Obvious Oil Leak | Gear oil coating the inside of the track, sprocket, and final drive housing. Puddles forming under the machine. | 5 (Immediate action required) |
| Loss of Travel Power | One track feels weak, sluggish, or struggles to turn, especially under load. The machine may pull to one side. | 4 (Internal damage is happening NOW) |
| Excessive Heat | The final drive housing on the leaking side is significantly hotter to the touch than the other side after operation. | 4 (Lubrication failure is imminent) |
| Grinding/Whining Noises | A metallic grinding or high-pitched whining sound coming from the final drive during travel. | 5 (Catastrophic failure is knocking) |
Seeing any of these, especially in combination, means it's time to get that seal replaced before things get much, much worse.
Beyond the Obvious Leak
While the oil slick is the biggest giveaway, a few other symptoms confirm your diagnosis and tell you just how bad the situation is.
- Loss of Travel Power: Does one track seem weaker than the other? As gear oil leaks out, the planetary gears inside the final drive are starved of lubrication. This causes a spike in friction and heat, which translates directly to a loss of torque at the sprocket.
- Excessive Heat: After running the machine for a bit, carefully check the temperature of the final drive housing. A failing drive will run noticeably hotter than the healthy one. That heat is an absolute killer—it cooks what little oil is left and dramatically accelerates wear on your bearings and gears.
- Grinding or Whining Noises: If you hear grinding, you're already in the danger zone. That sound means metal parts are making direct contact because of oil starvation. At this stage, you're not just looking at a seal replacement; you're likely staring down a full planetary gear set replacement, too.
Ignoring these warnings is the quickest way to turn a manageable repair into a catastrophic failure. A minor leak can rapidly escalate, and data on final drive failure curves shows how quickly it can become an $8,000+ repair bill.
The bottom line is simple: a leaking floating seal never gets better on its own. It's a ticking clock. The longer you let it go, the more damage it does to the internals, and the bigger the final bill will be. Fix it now, or pay for a new final drive later.
Prepping for the Job: Tools, Parts, and Safety
Let's be clear: swapping a floating seal on a JS220 track motor out in the field is serious work. If your service truck isn't set up for heavy iron, you're starting on the wrong foot. This job takes more than a basic socket set—it demands heavy-duty gear that can break loose components torqued to hell and back, often crusted with years of dirt and rust.
Before a single bolt comes off, get everything staged and ready. Nothing kills your momentum and extends downtime like stopping mid-job to hunt for the right socket or realizing you've got the wrong seal kit. This is where the pros separate themselves from the amateurs.
The Right Tools for the Job
Using the right tools isn't just about being faster; it's about safety and getting it right the first time. The last thing you want is a rounded-off bolt on a final drive cover because you tried to use a ¾-inch impact on a job that needs a full 1-inch drive. Here’s a rundown of what you absolutely need to have on hand.
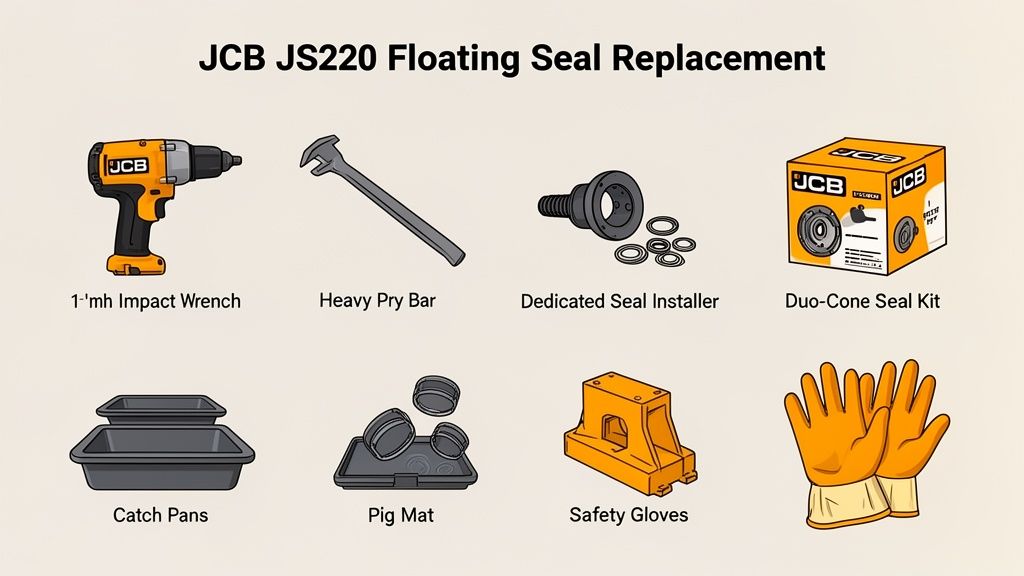
- 1-Inch Drive Impact Wrench: Don't even think about using anything smaller. Those final drive bolts are notoriously tight, and you'll need the brute force of a serious air or high-torque battery impact to get them loose without a battle.
- Heavy-Duty Sockets and Breaker Bars: A complete set of 1-inch drive sockets is a must. You'll also want a long breaker bar and a cheater pipe for the stubborn bolts that even the impact wrench gives up on.
- Large Pry Bars and a Sledgehammer: You'll need some serious leverage to separate the final drive from the machine frame and to split the housing. A good assortment of pry bars in different sizes is critical here.
- Dedicated Seal Installer Kit: This is non-negotiable. Trying to tap in a precision duo-cone seal with a hammer is a surefire way to destroy it. A proper installer tool guarantees both halves are seated perfectly square, protecting the delicate lapped metal faces.
- Hydraulic Port Plugs and Caps: The second you disconnect the hydraulic lines to the travel motor, they need to be capped. This prevents dirt and moisture from getting into the system and causing bigger problems—problems that usually end with the dealer and his laptop telling you it's your fault.
Essential Parts List
Waiting on parts from the dealer is a slow and expensive game. Order what you need ahead of time from Flat Earth Equipment so you can get the machine back to making money. They’ve got the sensors, solenoids, and filters you need to bypass those frustrating dealer wait times.
| Part Description | JCB OEM Part Number (Reference) | Why It's Critical |
|---|---|---|
| Floating Seal Kit (Duo-Cone) | 05/903823 | This is the core of the repair. It includes the two metal seal rings and two O-rings. |
| Final Drive Cover O-Ring | 813/00456 | A new seal is worthless if the main housing leaks. Never reuse the old, flat O-ring. |
| Drain/Fill Plug Seals | 813/00402 | These are cheap insurance against annoying leaks. Always replace the copper or bonded seals. |
| SAE 80W-90 Gear Oil | (As per spec) | You'll need about 5-6 liters of high-quality GL-5 gear oil to refill the final drive. |
Field Safety Is Not Optional
Working on a 22-ton machine is dangerous by nature. Complacency is what gets people hurt. Before you even touch the machine, make sure the site and the excavator are secure.
A greasy floor and a heavy part are a bad combination. I always lay down a few absorbent "pig mats" right where I'm working. They soak up the inevitable gear oil spill and give you a much surer footing when you're prying on heavy components.
First, park the machine on solid, level ground. Use heavy-duty blocking under the frame for support—never trust the hydraulics alone. Lower the boom and bucket to the ground for extra stability. Next, bleed off any residual hydraulic pressure by cycling the controls back and forth a few times with the engine off. Gear oil is going to spill, so have a large drain pan ready.
For more in-depth practices, our comprehensive guide on heavy equipment job site safety is a must-read. A professional approach to safety means you go home in one piece.
Tearing Down the Final Drive to Get to the Floating Seal
Alright, diagnosis confirmed and your tools are laid out. Now for the fun part—the heavy, greasy work of getting to the heart of the problem. This isn't a job for the faint of heart; it's about applying controlled force where it counts, right there in the dirt where the machine earns its keep.
The first big job is getting the final drive assembly off the machine. To do that, you've got to break the track, which can be a real fight if it's your first time. The plan is to split the track, then walk the excavator right off it, leaving the track stretched out on the ground.
Breaking the Track and Walking Off
First thing's first: find the master pin. It'll look slightly different from the others, maybe with a dimple in the center. That's your target. Before you swing a single hammer, release the track tension by backing out the grease zerk on the track adjuster until you've got plenty of slack.
Now, grab a heavy sledgehammer and a pin press (or a solid drift pin if you're old school) and drive that master pin out. It’s going to take some serious persuasion.
Once the pin is out, the track is officially broken. Climb back in the cab and carefully crawl the machine forward, leaving the track right where it lies. Go slow. A spotter here is a good idea to make sure nothing gets bound up.
With the excavator clear, get your blocking positioned securely under the carbody. The last thing you want is this machine shifting an inch while you're wrenching on it.
Removing the Final Drive Assembly
The final drive is bolted directly to the machine's frame with a series of massive, high-torque bolts. This is where a 1-inch impact wrench really proves its worth. But before you get to the bolts, you have to deal with the hydraulics.
- Hydraulic Hoses First: Your travel motor has two big hydraulic lines and a smaller case drain line. Clean the fittings and the area around them like you're prepping for surgery. Dirt is the enemy of any hydraulic system.
- Cap and Plug Everything: The second a hose comes off, cap it. Then plug the port on the travel motor. This is non-negotiable. One grain of sand can destroy thousands of dollars in components.
- Time for the Bolts: Now you can go after the main mounting bolts. They will be tight. Use your impact, and don't be afraid to grab a long breaker bar and a cheater pipe if you need more leverage. You'll have to put some muscle into it.
With the bolts out, the final drive is technically free, but it won't just fall off. It's weighing in at several hundred pounds and is probably seized in place with rust and grime. Use some heavy pry bars and maybe a few taps from a sledge on a wood block to work it loose. Make sure your lifting chains or a transmission jack are ready to take the weight the moment it breaks free.
Splitting the Housing to Expose the Guts
Get the entire final drive assembly onto a workbench or another stable surface. The first step is to drain any remaining gear oil. Expect it to be nasty, especially if the seal has been leaking for a while—you'll likely see a metallic shimmer from fine metal shavings.
The gear housing is usually a two-piece design, held together with a ring of bolts around its edge. Zip those bolts out, keeping track of their lengths if they vary. The cover should now separate from the main housing, though you'll probably need to pry carefully at the designated spots to break the gasket seal.
Lift the cover, and you'll see the first planetary gear set. Carefully remove the sun and planetary gears, laying everything out on a clean rag in the exact order and orientation you removed them. Don't lose any thrust washers or bearings.
Technician's Tip: Use your phone to take pictures at every single stage of disassembly. When you’re covered in grease with parts laid out everywhere, a visual reference of how it all goes back together is an absolute lifesaver.
Once you lift out the planetary gear carrier, you'll finally see it: the back of the hub and the failed floating seal. You're at the source of the leak.
A Word on Torque and Fasteners
When it's time to put all this back together, "good and tight" isn't a torque spec. Every bolt on this assembly has a specific value for a reason. Ignoring those values is just asking for another leak or, even worse, a catastrophic failure down the road.
JCB's own service manuals are very clear about this. Bolts in these high-stress areas need to be torqued correctly and then re-checked. They also recommend using a thread-locking compound like Loctite 262 on critical fasteners to prevent them from backing out due to vibration. It’s a small, cheap step that prevents massive headaches. You can find all the specifics in the official JCB JS220 Service Repair Manual.
Installing the New Floating Seal Without Mistakes
So you’ve done the heavy lifting and have the final drive guts spread out on your workbench. This is where the job shifts from brute force to surgical precision. A floating seal, also known as a duo-cone seal, is a high-precision component. If you mess this part up, all that work was for nothing. You'll be tearing it right back down in a few hundred hours, cursing the day you rushed it.
This process isn't complicated, but it is absolutely unforgiving. One stray piece of grit, a single scratch on a lapped surface, or a twisted O-ring, and the seal is junk before the machine even moves.
Do it right, do it once.
This quick overview shows the major steps to get the job done in the field.
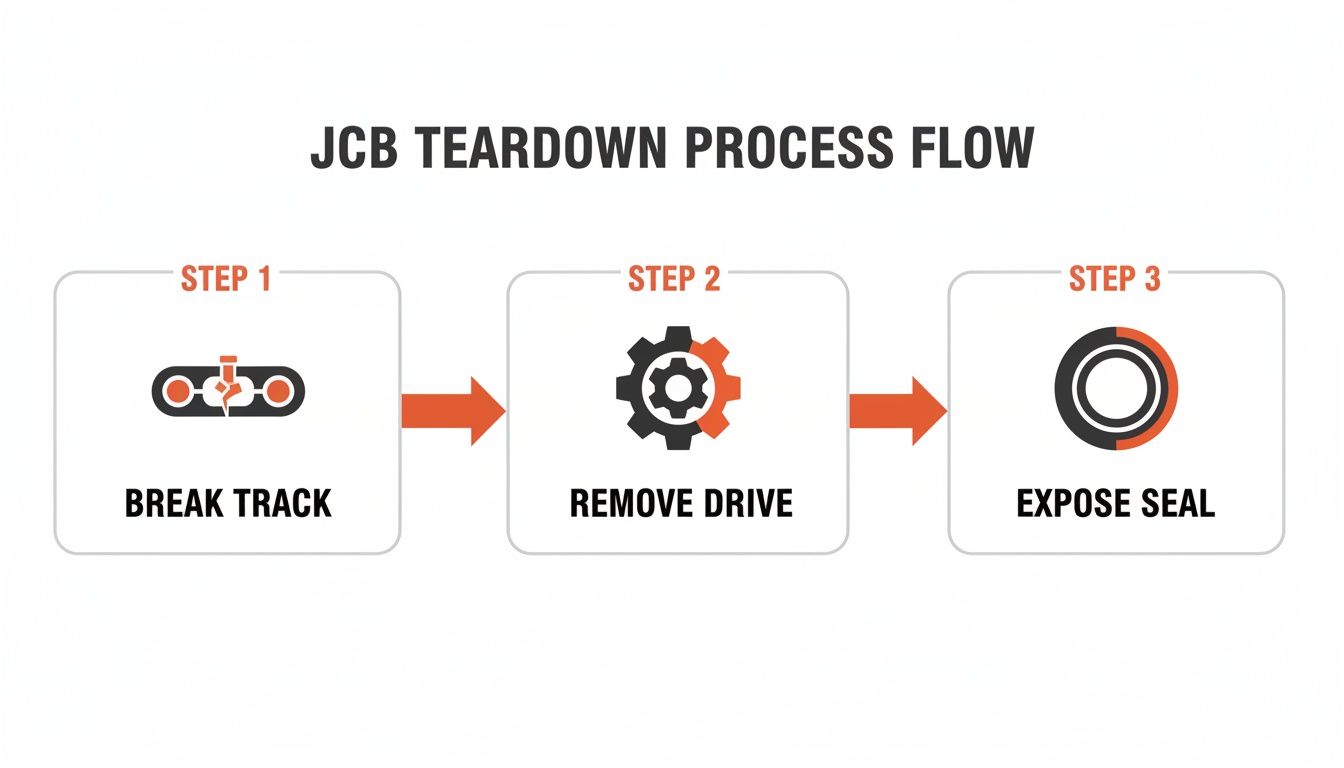
From breaking the track to finally exposing the seal, the teardown is a physical job that sets the stage for the meticulous installation to follow.
Removing the Old Seal Halves
With the planetary carrier out of the way, you can see the two halves of the old floating seal. One is pressed into the hub (or gear housing), and the other is pressed into the spindle (or main housing). They look simple, but popping them out without damaging the bores they sit in is crucial.
Forget the hammer and chisel. The best way is to carefully work a large, flat-head screwdriver or a small pry bar behind the metal ring. Gently and evenly pry it out, working your way around the circumference. It's tight, but it'll come out. Do the same for the other half. The big rubber O-rings will come out with them.
Cleaning the Seal Cavities to Perfection
This is the most critical step of the entire job. The machined bores, or cavities, where the new seal halves sit must be surgically clean. I’m talking cleaner than you've ever cleaned anything on this machine before.
Use a lint-free shop towel and a quality brake cleaner or solvent. Wipe out every last trace of old gear oil, dirt, and sealant residue. Inspect the machined surfaces with a bright light, looking for any burrs, nicks, or scratches. A deep scratch here can create a microscopic leak path for oil, and the new seal will fail. If you find a small burr, you can very carefully knock it down with a fine-grit Emory cloth, but be gentle.
I’ve seen guys ruin a brand-new seal because they didn't clean the bore properly. A tiny piece of grit gets trapped under the new O-ring, creating a high spot. The seal half sits crooked, the lapped faces don't mate perfectly, and it leaks from day one. Don't be that guy.
Installing the New Seal Halves
Your new floating seal kit from Flat Earth Equipment will have two perfectly matched metal rings and two large rubber O-rings. These metal rings have been lapped together at the factory to a mirror finish. Never separate them until the absolute last moment. Keep them in their protective packaging for as long as possible.
Before you even touch the new parts, wash your hands. Get the grease and grime off. Now, let’s get this thing installed without a single mistake.
- First, the O-Rings: Place one new O-ring into one of the cleaned cavities. Make sure it sits perfectly flat and is not twisted. A twisted O-ring will never allow the seal half to seat correctly.
- Seat the First Seal Half: Take one metal seal half and wipe it clean with a fresh, lint-free cloth. Using a dedicated seal installation tool, press the seal half squarely into the bore, right over the O-ring. The tool ensures even pressure and prevents you from cocking the seal. Press it until it bottoms out completely.
- Repeat for the Other Side: Do the exact same thing for the other half of the final drive housing. Install the O-ring, check for twists, and then press the second seal half into place with your installer tool.
Now you have the two halves of the final drive, each with a new seal half installed and facing the other. The final, critical moment is mating them together.
The Final Mating of the Seals
This is it—the point of no return. The lapped metal faces of the two seal halves must be perfectly clean and lubricated with a micro-thin film of clean oil just before they touch.
Grab another clean, lint-free cloth and meticulously wipe both metal faces. Put a few drops of clean gear oil on your fingertip and apply a very thin, even film to one of the seal faces. You just want to wet the surface, not drown it.
Now, carefully and squarely, bring the two halves of the final drive together. Once those two lapped faces touch, they must not be separated or rotated against each other. The thin film of oil creates a hydraulic lock and protects the surfaces as they mate.
Once they are together, you can proceed with reinstalling the planetary gears and bolting the housing back together. That perfectly clean, perfectly mated seal is what's going to keep thousands of dollars of gears and bearings alive for the next 5,000 hours. This is the difference between a professional repair and a costly comeback.
Floating Seal Installation Do's and Don'ts
Getting this right comes down to a few simple but non-negotiable rules. This table breaks down the critical actions that separate a successful, leak-free installation from a job you'll be doing all over again next month.
| Action | The Right Way (Do) | The Wrong Way (Don't) |
|---|---|---|
| Cleaning | Use lint-free rags and solvent to make the seal cavities spotless. | Give it a quick wipe with a greasy shop rag. |
| Installation Tool | Use a proper seal installer tool to press the seals in squarely. | Tap it in with a hammer and a block of wood. |
| Lubrication | Apply a micro-thin film of clean oil to the seal faces just before mating. | Install the seals dry or slather them in grease. |
| Handling | Keep the new seal halves in their package until ready; handle with clean hands. | Drop them on the ground or let them get covered in dirt. |
Pay attention to these details, and you'll end up with a repair that lasts. Cutting corners here is the fastest way to guarantee a failure.
Reassembly Testing and Final Checks
You’ve got the new seal in and the final drive housing is buttoned up. It’s a great feeling, but don't get cocky. Botching the reassembly is just as bad as messing up the seal install. Every bolt, gear, and connection has to be perfect, otherwise you’re just teeing up the next failure—one the dealer will be thrilled to charge you for.
Putting it all back together is pretty much the teardown in reverse, but now your focus is on absolute cleanliness and precision. You did take pictures with your phone during disassembly, right? Now’s the time to pull them up.
Reinstalling the Planetary Gears
Start by carefully setting the planetary gear sets back into the housing. Pay close attention to the orientation of every gear, bearing, and thrust washer; they need to go back in exactly as they came out. This isn't the stage of the job where you want to have "extra" parts left on the bench.
As you install the components, give them a light coat of fresh, clean gear oil. This isn't just for show—it provides that critical initial lubrication before the drive is filled and put under load. With the gears seated, you can seal up the housing.
Apply a thin, even bead of a quality RTV silicone or the specified gasket to the housing flange. Then, gently lower the cover into place. Start all the cover bolts by hand first to avoid cross-threading. Once they're all in, use a star or crisscross pattern to torque them down to the manufacturer's spec. Don't guess—use a torque wrench.
Bolting It All Back Together
With the housing sealed tight, the entire final drive assembly is ready to go back on the machine's carbody. This thing is heavy and awkward, so use a proper lifting device. Take your time lining up the bolt holes perfectly to avoid damaging the threads.
Once it's seated flush, apply a thread-locking compound like Loctite 243 to the clean threads of the main mounting bolts. Again, tighten them in a crisscross pattern before bringing them to their final torque spec. These bolts take all the drive torque and vibration, so leaving them loose is just asking for a catastrophic failure down the road.
Next up are the hydraulic lines. Make sure the fittings are spotless before you thread them in. Securely tighten the main travel motor hoses and the smaller case drain line to prevent any high-pressure leaks.
Filling with Oil and The Moment of Truth
Time to fill the final drive with fresh gear oil. Remove the top fill plug and the side level check plug. Slowly pump in the correct grade of gear oil—usually an SAE 80W-90 GL-5—until it starts to weep out of the side level hole. Let it settle for a minute, then top it off again before reinstalling and tightening both plugs with new O-rings or seals.
Now you can walk the machine back onto the track and get that master pin reinstalled. Once that's done, set your track tension correctly using the grease adjuster.
Field Pro-Tip: Before you fire up the engine, grab a can of brake cleaner and clean the entire final drive housing and the area around it. A perfectly clean surface makes it incredibly easy to spot any potential leaks from your new seal or the housing gasket. It’s a simple trick that eliminates any guesswork.
With everything buttoned up, it's time to start the engine. Let the hydraulics warm up for a few minutes at idle before you touch the controls. Then, slowly and carefully, engage the track you just repaired.
Final Operational Checks
Run the track forward and reverse at low speed for several minutes. Keep a sharp eye on the final drive housing. You're looking for any sign of weeping or dripping gear oil around the new seal or the main housing flange.
Listen, too. You shouldn't hear any grinding, whining, or clunking. A healthy, properly assembled final drive runs smooth and quiet.
After about five to ten minutes of low-speed operation with no load, shut the machine down. Carefully feel the final drive housing. It'll be warm, but it shouldn't be drastically hotter than the other side. A scorching hot final drive is a red flag for a serious internal problem, likely caused by improper assembly or a lack of lubrication.
The JCB JS220 is a 22-ton workhorse, and its hydraulic system operates under immense pressure. A huge number of premature equipment failures come from exceeding its rated pressure of 350 bar. By doing this repair right, you're directly extending the life of this critical component.
If all your checks are clear, your JCB JS220 track motor floating seal replacement is officially done. You’ve just bypassed the dealer, saved a pile of cash, and kept your machine earning. If you hit a snag or have questions, don't hesitate to contact our team of technicians at Flat Earth Equipment for some real-world advice.
Common Questions From The Field
I’ve spent more time than I can count with my boots in the dirt, tearing apart final drives just like this one. Over the years, you hear the same questions pop up from other techs trying to get through the same job. Here's some straight talk, no dealer fluff, to get you through the common hurdles.
Can I Reuse Any Old Bolts?
Absolutely not. Don't even think about it. The bolts securing the final drive and the gear housing are specifically designed for the massive stress and vibration they endure.
Reusing them is asking for a catastrophic failure down the road when one shears off under load. It's the cheapest insurance you can buy against a very expensive problem. Always use new, grade-appropriate hardware and apply Loctite as specified in the manual.
What Kind of Gear Oil Is Best?
Stick to the manufacturer's spec, which is typically a high-quality SAE 80W-90 or 85W-140 gear oil that meets API GL-5 standards. Don't cheap out here.
That final drive is a high-torque, high-pressure environment, and the wrong fluid will cook the bearings and gears in no time. You'll be tearing it apart again sooner than you'd like.
A common mistake is grabbing whatever gear oil is on the shelf. The additives in a proper GL-5 oil are designed for the extreme pressures found between planetary gear teeth. Using a lower-spec oil is a recipe for accelerated wear.
How Long Should This Job Take In The Field?
For a seasoned tech working alone with a well-equipped service truck, you should budget a solid 6 to 8 hours from start to finish.
If it’s your first time doing a JCB JS220 track motor floating seal replacement, or if you run into seized bolts, it could easily turn into a full day. The key is not to rush the cleaning and installation of the new seal itself—that's where you need to be meticulous.
My New Seal Is Leaking Right After Installation. What Did I Do Wrong?
This is the one that really stings, and it's almost always due to one of three things:
- You scratched or damaged the precision-lapped metal sealing surfaces during installation.
- You got dirt, grit, or even a hair between the seal faces when you put them together.
- One of the large O-rings that holds the seal in the bore got twisted or pinched.
Unfortunately, the only fix is to tear it down and start over with another new seal. There are no shortcuts once a new seal is compromised. As you become more familiar with these repairs, you'll learn more about our hands-on approach to keeping yellow iron running.
When you're ready to get the job done right without waiting on the dealer, Flat Earth Equipment has the high-quality seal kits and components you need, in stock and ready to ship. Get back to work faster.