When your JCB Fastrac’s suspension locks up solid and the dashboard lights up like a Christmas tree, you know it’s going to be a bad day. The dealer’s one-size-fits-all solution is always the same: haul it to their shop. That means crippling downtime you can’t afford and a repair bill that’s designed to hurt.
This guide is your field manual for fighting back. We're going to bypass the dreaded "Dealer Laptop" and fix this thing right where it sits.
Why Your Fastrac Suspension is Locked Out
Let's get one thing straight: a suspension fault on a modern Fastrac is rarely just a bad sensor. It's an electronic standoff between the ECU, the sensors, and the solenoids that control the ride height and stability. JCB electronics, especially on their newer machines with AdBlue/DEF systems, are notoriously finicky. This is just another symptom of that over-engineering.

When the computer sees a signal that doesn't make sense—even for a split second—it panics. It defaults to a rigid, safe mode to protect the machine (and itself), stopping you dead in your tracks like a failed Regen cycle. This is exactly why just swapping a part often does nothing; the root cause is still there, and the system needs to be told the new part even exists.
You're not just fighting a mechanical problem; you're battling an over-sensitive electrical system that demands perfection. The dealer loves this because their proprietary Service Master software is the gatekeeper to the all-important sensor calibration routine. They know that without it, you're just throwing expensive parts at a ghost in the machine.
The Evolution from Wrenches to Laptops
The game has changed. Think back to the first JCB Fastrac 100 series from the mid-90s. Diagnosis was mostly mechanical, with analog height valves and manual shimming. You could fix it with a wrench and some common sense.
Now, fast forward to the current 4000/8000 series. We're dealing with complex architectures that can throw dozens of chassis-related DTCs (C-codes). In fact, electronically controlled suspension issues can account for 10–20% of repeat electrical complaints, making fault-code literacy non-negotiable. You can get more insights into JCB's diagnostic systems over at Jaltest.com.
This guide is about giving you the knowledge to break that frustrating cycle. We’ll cover:
- Decoding C-Codes and U-Codes: Translating what the machine is actually telling you, not just the textbook definition.
- Field Diagnostics: Using basic tools to find the real problem, which is often a simple wiring issue.
- The Calibration Secret: Understanding why this step is non-negotiable for a lasting repair.
The goal is simple: get you back to work without waiting weeks for a dealer tech to show up. It’s about taking control of your own yellow iron and fixing it right where it sits.
Beating the Dealer at Their Own Game
Forget the endless wait times for dealer-supplied parts. The key to winning this fight is having a reliable source for the components you need now.
At Flat Earth Equipment, we stock the OE-spec sensors, solenoids, filters, and harness connectors you need to bypass the dealer. We get you the right parts fast so you can finish the job. This entire guide is built around that principle: diagnose it yourself, get the parts you need overnight, and perform the repair without ever making that dreaded call to the dealership.
Let’s get our hands dirty.
Interpreting Common Suspension Fault Codes
When your Fastrac throws a suspension code, it’s not trying to be cryptic; it’s screaming for help in the only language it knows. The ECU is a simple-minded boss—it expects a specific voltage signal from each sensor, and the second it sees a number outside its approved range, it throws a fit and locks everything down. Your job is to translate that fit into a real-world problem you can solve with a wrench and a multimeter.
Forget the dealer’s fancy diagnostic flowchart for a minute. Most of the time, the codes that cripple these machines are the same repeat offenders. We're talking about ride-height sensor codes bitching about an "implausible signal," pressure sensor faults that make no sense, and the dreaded network U-codes that tell you the computers have stopped talking to each other.
It's a frustrating game, but one you can win by understanding the patterns.
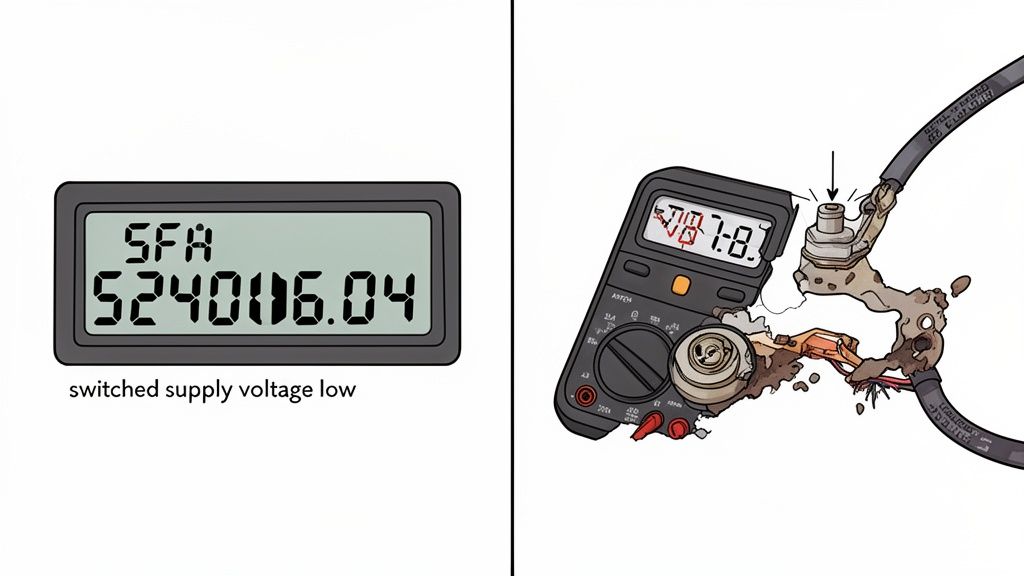
The Low Voltage Lie
Let's dissect a common killer code you’ll see on the dash: SFA 524016.04. The service manual will give you some useless, generic description like "switched supply voltage low." Your first instinct might be to start pricing out a new suspension solenoid bank, thinking the component itself has failed internally. That’s exactly what the parts department wants you to do.
But hold on. In the real world, out in the mud and dust, that code is almost never about the solenoid itself. It's a classic case of the system tattling on a deeper, simpler problem. Ninety percent of these "complex" electrical faults are just basic voltage issues you can find and fix in ten minutes.
Before you even think about cracking open a parts catalog, you need to go back to basics. A weak voltage supply makes every sensor and solenoid on that machine act erratically, leading the ECU to throw codes that send you on a wild goose chase.
The ECU is seeing the result, not the cause. It only knows that the voltage at the solenoid is too low. It has no idea why.
Your First Ten Minutes of Diagnostics
This is where you beat the dealer before they’ve even had their morning coffee. Instead of hooking up a laptop, grab your multimeter and start with the fundamentals. I can’t tell you how many times I’ve seen guys get ready to tear into a harness when the real problem was staring them right in the face.
- Check the Power Source: Are your battery terminals clean and tight? I mean shiny, bare-metal clean. A thin layer of corrosion is enough to create voltage drop under load.
- Test the Alternator: Is it putting out a steady 13.8-14.2 volts when the machine is running? A weak alternator will starve the entire system, and the sensitive suspension electronics are often the first to complain.
- Inspect the Harness: Look for the obvious. Follow the harness from the main frame to the axles. Is it rubbing raw against a bracket? Is a zip tie too tight, pinching the wires? Look for shiny spots on the loom—that's a tell-tale sign of friction.
This initial check is your most powerful tool. Voltage-related suspension faults are a constant theme. As detailed by experts at Eclipse Automotive, code SFA 524016.04 is triggered when the supply to a valve drops below 9.5 V, leading to weak power steering and a locked suspension. Their recommended fix starts with checking the battery and alternator before ever diving into complex diagnostics, which you can read more about in their breakdown of common agricultural vehicle fault codes.
By focusing on the electrical supply first, you eliminate the most common causes of these phantom codes. You fix the foundation before you start rebuilding the house. Only after you've confirmed you have clean, steady power should you even consider that a component might be bad. This approach saves you time, money, and the headache of ordering parts you don’t need. When you do need parts, you get them from a supplier like Flat Earth Equipment who will get them to you fast, not make you wait.
The Critical Role of Sensor Calibration
This is where the real work begins, and it’s a classic story. You’ve done the hard part—wrestled with corroded bolts, traced the wiring, and finally swapped out that faulty ride-height sensor. You clear the codes, fire up the machine, and that suspension warning light just stares right back, mocking you.
This exact moment separates the pros from the parts-swappers. It's also why the dealer thinks they have you cornered.
Your new sensor is working perfectly, but the Engine Control Unit (ECU) has no idea. It's like putting a new player on the field without telling the coach his name or position; the coach is just going to see an unknown and keep him on the sideline. The ECU is still running off the last known data from the old, failed sensor. It needs a formal introduction.
That introduction is called calibration. It’s the handshake between the new hardware and the machine's brain. Without it, the signals from your brand-new sensor are just meaningless noise, and the ECU will keep the suspension locked in a rigid, bone-jarring "safe mode."
Teaching the Machine its Zero Point
Think of sensor calibration as setting the machine's neutral position. You're not just installing a part; you're teaching the ECU what "level" actually looks like. This process is a non-negotiable step for any sensor that measures position or pressure in the suspension system.
This applies to several key components:
- Ride-Height Sensors: These tell the ECU the exact position of the suspension at each corner. Calibration establishes the baseline ride height from which all adjustments are made.
- Axle-Load Sensors: Crucial for stability, these sensors need to know what "empty" feels like so they can accurately calculate the load being carried.
- Steering Angle Sensors: On advanced models, this sensor informs the suspension ECU how to adjust for cornering forces. It needs a 'straight-ahead' reference point.
Skipping this step is a surefire way to end up with a machine that handles worse than before you started. It’s also a great way to waste a ton of money on parts you didn't need, blaming the new sensor when the real problem was a missed software step.
You must tell the ECU to save the new sensor's signal as its 'zero point.' This command is the key that unlocks the system and makes the repair stick. Otherwise, you’re just a guy who installed a part; you're not a technician who fixed the problem.
The Calibration Routine Unlocked
The dealer wants you to believe this is some dark art only achievable with their proprietary laptop. That's a myth designed to keep their service bays full. The truth is, with the right aftermarket diagnostic tool, you can perform this routine right there in your own shop or out in the field.
The procedure itself is surprisingly straightforward. First, you absolutely must ensure the machine is on perfectly level ground—no exceptions. Use shims if you have to. Any tilt will give the ECU a false reading, baking an error into the system from the start. While you're at it, double-check your work; our guide on equipment safety protocols covers the importance of a stable setup before interfacing with machine electronics.
Next, you'll connect your diagnostic tool and navigate to the suspension control module. Look for a function labeled "Calibration," "Ride Level Control Calibration," or something similar. Initiating this puts the ECU into a learning mode. The tool then commands the ECU to read the live voltage from the new sensor and save that specific value as its new baseline.
Across modern JCB Fastrac 4000-series tractors, performance is tightly linked to correct sensor calibration. Diagnostic tools like Jaltest explicitly list calibration as a key function for electronic suspensions, where reference values must be stored for the ECU to work correctly. Without this, the ECU may log multiple C-codes for implausible values and default to that rigid mode we talked about. This means simply installing a new sensor without running the calibration routine can leave the tractor stuck with permanent warnings. You can learn more about these specific diagnostic trouble codes and their relation to calibration.
Once the process completes—usually in less than a minute—you can clear the codes for good. The final step is a test drive over varied terrain to confirm the suspension is reacting properly. You'll know you got it right when the machine glides over bumps instead of crashing through them.
Essential Tools for Field Diagnostics
You don't need the dealer’s entire climate-controlled shop to fix a Fastrac suspension issue. The real work gets done in the field with the right gear in your service truck and the know-how to use it. Forget the rolling tool chests and proprietary nonsense; a few key items will get you through most jobs.
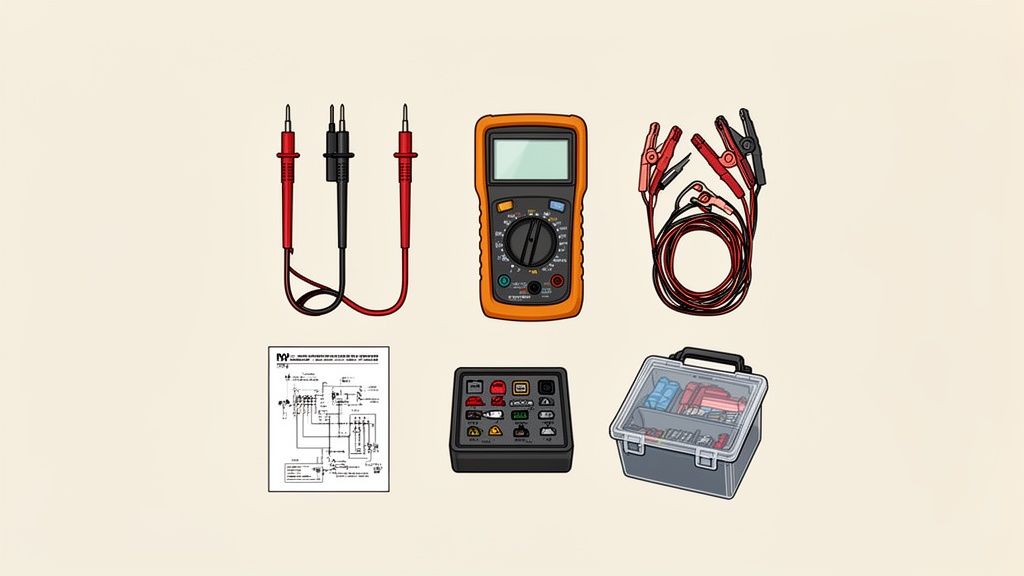
The one tool you absolutely can’t leave the shop without is a quality digital multimeter. Don't cheap out on this. You need one with sharp, reliable probes that can pierce insulation for an accurate reading without fumbling around. This is your number one weapon for tracing those sneaky voltage drops and verifying sensor continuity—the root cause of most "complex" electrical problems.
Of course, your standard hand tools are a given. But the next piece of kit is what really separates you from the dealer's apprentice: a proper diagnostic tool that goes beyond reading simple engine codes.
Choosing the Right Diagnostic Scanner
A cheap, generic engine code reader is useless here. The JCB suspension system runs off its own chassis ECU, and you need a scanner that can speak its language. The critical feature to look for is bi-directional command capability.
This means the tool can't just listen to the ECU; it has to be able to talk back to it. You need to be able to command solenoids to activate, read live data streams from the ride-height sensors, and—most importantly—initiate the JCB Fastrac Suspension Fault Codes and Sensor Calibration routine. Without that, you’re just guessing. Look for aftermarket scanners that specifically list support for JCB chassis or other agricultural equipment functions.
The right scanner pays for itself the very first time you perform a calibration yourself. That one avoided dealer visit, with its towing fees and absurd labor rate, puts you way ahead. It's an investment in your independence, not just a tool.
Your Field Service Arsenal
With a solid multimeter and a capable scanner, you've got the brains of the operation covered. Now, you just need to round out your kit with the essentials that make diagnostics in the dirt possible.
- Jumper Wires: A good set with alligator clips is invaluable for bypassing a suspect switch or supplying direct power to a component for testing.
- Wiring Diagrams: They can be as rare as an honest politician, but when you find one, it's gold. It turns a rat's nest of wires into a logical roadmap.
- Power Probe: This is a big step up from a basic test light. It lets you safely apply power or ground to a circuit, making it much faster to confirm if a component works or if a wire is broken somewhere.
And maybe the most critical tool isn't a tool at all—it's having a reliable parts supplier. Waiting a week for the dealer to get a sensor from the UK is a non-starter. That's a week of lost revenue.
That's why you need a supplier like Flat Earth Equipment in your contacts. We keep the OE-spec ride-height sensors, solenoid valves, and harness connectors on the shelf, ready for next-day shipping. While other guys are waiting for a callback from the parts counter, you’re already getting the job done. This strategy wins the battle against downtime, every single time. And to keep all this gear powered up, check out our guide on selecting robust battery chargers for your service truck to complete your field-ready setup.
A Practical Workflow for Field Diagnostics and Calibration
Alright, let's get down to brass tacks. You’ve got a Fastrac with a locked-up suspension, and every minute it sits is money burning. Forget the dealer's playbook that starts with "hook up the laptop." We're going to tackle this with a logical, field-tested workflow that solves problems instead of just creating new ones.
This is how you go from a fault code to a finished job, fast.
The first rule of field diagnostics is you don't clear the codes. Not yet, anyway. That fault code is the only clue the machine is giving you, so write it down or snap a picture of the dash. Note the exact symptoms, too. Is it leaning? Bouncing? Locked solid? This information is pure gold.
Once you’ve captured the evidence, it's time for a walk-around. This isn't just kicking tires; it's a mission. Get your eyes on every inch of that suspension.
The Ten-Minute Visual Sweep
Before you even think about grabbing a multimeter, look for the simple stuff first. You'd be amazed how many "complex" electrical issues are just physical damage hiding in plain sight.
Here's what to hunt for:
- Damaged Sensors: Look at the ride-height sensor arms. Are they bent, broken, or completely disconnected? Check the sensor bodies for cracks.
- Leaking Air Springs: Grab a spray bottle with soapy water and hit the air bags and lines. Look for bubbles that signal a leak, no matter how small.
- Chafed Wiring: This is a big one on JCBs. Trace the harnesses from the frame to the axles. Look for any spot where the loom is rubbing against metal, especially on suspension pivot points. A shiny spot on the plastic loom is a huge red flag for a future short.
This visual check isn’t just a preliminary step; it often reveals the entire problem. A wire rubbed raw against a frame rail will throw the same "implausible signal" code as a genuinely failed sensor. One is a five-minute fix with electrical tape and a zip tie, and the other is a $300 part. Find the rub before you buy the part.
Verifying Power Before Replacing Parts
Okay, the visual inspection came up clean. Now, and only now, do you grab the multimeter. At least half of all electronic faults are not component failures; they are power supply problems. The sensitive suspension ECU is the first to scream when voltage gets shaky.
Start with the fundamentals. Check your battery voltage at the terminals—it should be above 12.4V with the engine off. Fire up the machine and check the alternator output; you want to see a steady 13.8V to 14.4V. Anything less, and you've found your issue. The system is being starved of the clean power it needs to think straight.
If source power is good, move to the component that the fault code pointed to. Unplug its connector and use your multimeter to check for power and ground right at the connector pins. A solid ground is just as important as a good power feed. If you have both, the wiring harness is likely good. If not, you have a broken wire to trace. Only after confirming the component has good power and ground should you condemn the part itself.
To keep things logical in the field, we've put together a simple flowchart. This isn't rocket science—it's just a way to stop yourself from guessing and throwing parts at the problem.
Suspension Fault Troubleshooting Flowchart
| Phase | Action | Pro Tip | If Problem Remains |
|---|---|---|---|
| 1. Information Gathering | Record exact fault codes and symptoms. DO NOT CLEAR CODES. | Take a photo of the dash display. The code is your only starting clue. | Move to visual inspection. |
| 2. Visual Inspection | Perform a thorough walk-around. Check for bent sensors, chafed wires, and air leaks. | Use soapy water in a spray bottle on all air lines and bags to find tiny leaks. | Proceed to power verification. |
| 3. Power & Ground Check | Test battery and alternator voltage. Then, check for power and ground at the suspect sensor/solenoid connector. | A weak ground is as bad as no power. Wiggle the harness while testing to expose intermittent breaks. | Part replacement is now justified. |
| 4. Part Replacement | Replace the confirmed faulty component. | Source quality parts from us. A cheap sensor that fails in a month costs you more in the long run. | Mandatory calibration is next. |
| 5. Calibration & Test | Perform the ride height sensor calibration routine using a diagnostic tool. | The tractor must be on perfectly level ground for calibration to be accurate. | Conduct a thorough test drive. |
Following this path ensures you diagnose, not guess. It saves time, money, and a ton of frustration by focusing on the root cause instead of just the symptoms.
The Mandatory Calibration Sequence
You've done the hard work. You found a bad sensor, got a new one from us overnight, and bolted it on. If you stop here, you’ve failed. The job is not done until you perform the JCB Fastrac suspension fault codes and sensor calibration.
This is the final, non-negotiable step. The ECU has no idea you replaced the part. You must formally introduce the new sensor to the machine's brain.
The process is straightforward:
- Park on Level Ground: This is absolutely critical. Use shims if you have to, but the tractor frame must be perfectly level.
- Connect Your Diagnostic Tool: Navigate to the suspension or chassis control module.
- Initiate Calibration: Find the function labeled "Suspension Calibration" or "Ride Height Calibration" and start the routine.
- Follow the Prompts: The tool will walk you through it. Do exactly what it says. It's commanding the ECU to read the new sensor's baseline voltage and save it as the new "zero."
After the calibration successfully completes, clear all the fault codes. The final step is a proper test drive. Don't just drive it around the yard—take it over some rough ground and bumps to make the suspension work. This confirms the repair is solid and the ride is smooth.
If you have any questions about sourcing parts or troubleshooting an unusual issue, it's always worth reaching out for some technician-led support; you can find our contact information here at Flat Earth Equipment for that exact purpose.
Common Questions from the Field
Out here, talk is cheap. You need straight answers, not the runaround you get from the parts counter. Let's tackle the most common questions I hear from guys wrestling with a stubborn Fastrac suspension issue.
This simple decision tree helps visualize the diagnostic workflow. It’s all about a logical process: inspect, test, and then calibrate.
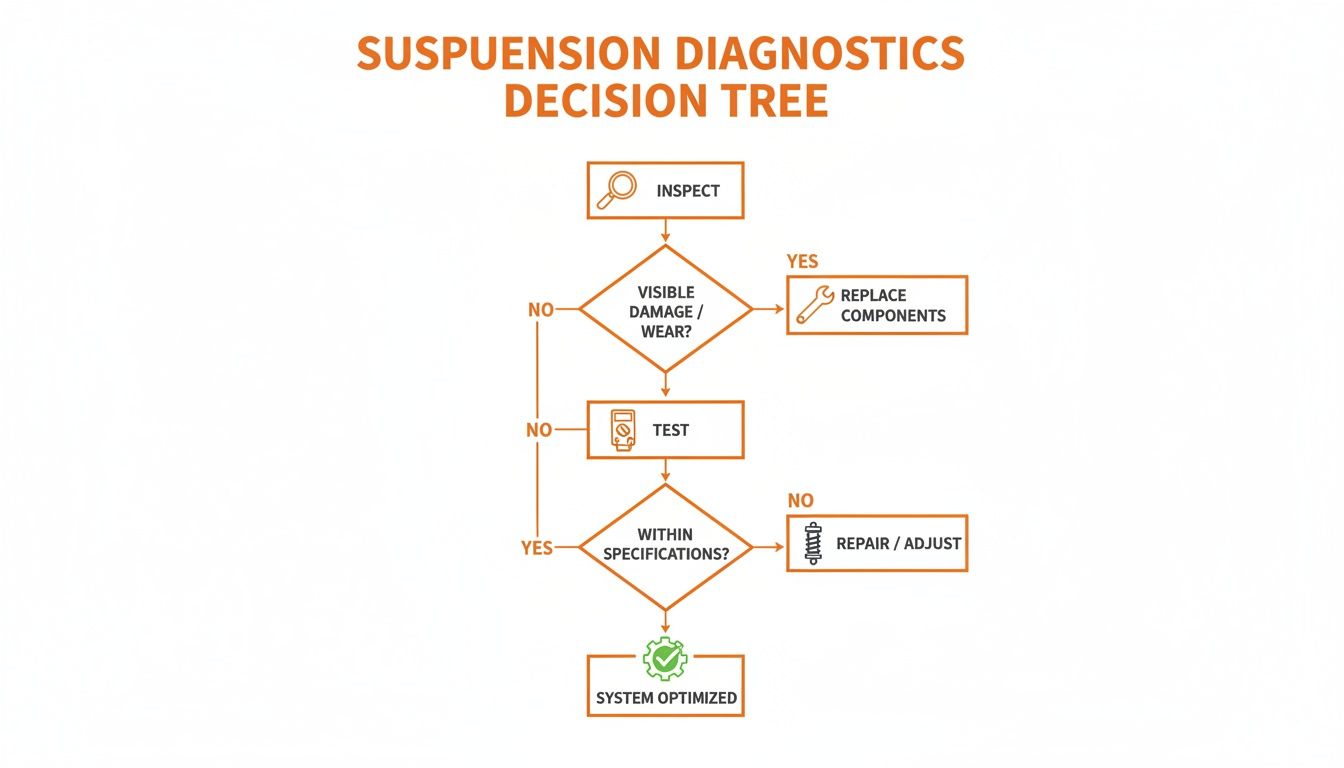
Following a workflow like this prevents you from just throwing expensive parts at a problem hoping something sticks. The key takeaway is that calibration is a mandatory final step, not an optional one.
Do I Have to Replace Air Springs in Pairs?
The dealer will always tell you yes, because it doubles their parts sale. The real answer is: it depends.
If one air spring failed from obvious physical damage—like getting punctured by debris—then replacing just the damaged one is perfectly fine to get you running again.
However, if it failed from age, cracking, and dry rot, the other one on that axle isn't far behind. To guarantee an even ride height and prevent future calibration headaches, replacing them as a matched axle pair is the smarter long-term fix. It avoids a callback in six months for the exact same issue on the other side.
Why Won’t My Diagnostic Tool Perform the Calibration?
This is a classic and frustrating problem. You’ve bought a scanner, it reads the JCB fault codes just fine, but when you hit the button for the calibration routine, nothing happens. This is a common limitation of basic, one-way diagnostic tools.
Many scanners can read fault codes but lack the bi-directional capability required to write commands back to the ECU. Initiating a calibration is a command, not just a reading. You need a professional-grade tool that specifically supports bi-directional controls for the JCB chassis ECU.
Don't get cheap on your scanner. The right tool that can perform the JCB Fastrac Suspension Fault Codes and Sensor Calibration will pay for itself on the very first avoided dealer visit. It’s the key to your freedom from their laptop.
An Intermittent Code Keeps Coming Back. Should I Worry?
Absolutely. An intermittent code is not a glitch; it's a warning. It’s the machine telling you that a bigger failure is on the horizon. Do not ignore it, even if the suspension seems to be working fine at the moment.
This is your early warning sign of a few common culprits:
- A sensor that’s right on the edge of failing completely.
- A wire in the harness that's just started to rub through its insulation.
- Moisture that's getting into a connector and causing a temporary short.
Chasing down these ghost codes now, while the machine is still operational, is infinitely easier than dealing with a complete system shutdown when you're miles from the shop and fighting a deadline. Find the problem while it’s small, before it becomes a catastrophe that stops the whole job.
When you're ready to stop guessing and start fixing, Flat Earth Equipment has the OE-spec sensors, solenoids, and connectors you need, shipped fast. Get the right parts and get back to work without the dealer markup or wait times. Explore our full inventory at https://flatearthequipment.com.