That damn regen light flashing on the dash again? A clogged AdBlue injector is the number one reason your JCB is throwing a fit and threatening to shut you down. This guide is a straight-to-the-point, no-BS approach for cleaning that Bosch Denoxtronic injector yourself. It's about beating the dealer at their own game and getting your machine back to making money, not sitting in a service bay.
Doing this right can fix the whole problem without buying a new part or waiting for some kid with a laptop to show up.
Why Your JCB Is Stuck in That God-Awful Regen Cycle
That blinking light and the countdown timer aren't just an annoyance—they're the first warning shot before the machine derates you into oblivion. When your JCB gets stuck in a never-ending regen cycle or, even worse, drops into limp mode, the machine is screaming that its emissions system is suffocating. And nine times out of ten, a dirty AdBlue injector is what’s choking it out.
The dealer will try to sell you a story about a complex electronic failure that only their proprietary "Service Master" laptop can solve. They'll mumble about sensors, modules, and ECUs, all while the diagnostic fees pile up before a single wrench is turned. The reality is usually much simpler and a lot more mechanical.
The real culprit is almost always urea crystallization. AdBlue, or Diesel Exhaust Fluid (DEF), is just a mix of urea and deionized water. When that stuff hits the heat of the exhaust, the water evaporates, leaving behind hard, white urea crystals. These crystals build up right inside the injector nozzle, completely blocking the fine mist the system needs to breathe.
From Small Crystals to Major Downtime
What starts as a tiny blockage quickly snowballs. The system's sensors realize they can't inject the right amount of DEF, so a fault code gets thrown. At first, it's just a warning light. Ignore it, and the machine will start begging for a regen. When that doesn't fix it, the ECU slashes the engine power—its last-ditch effort to keep the expensive SCR catalyst from getting cooked.
And that’s where you are now: a perfectly good engine held hostage by one small, clogged-up part. Every second that loader or telehandler sits idle, it's costing you money. The dealer’s solution? A multi-day wait for a mobile tech, a huge bill, and probably a new injector you didn't even need.
The Bosch Denoxtronic system has been at the heart of this since the 1990s, when Bosch first rolled out common rail diesel tech. This changed the game for JCB equipment, delivering better power, 20-30% fuel savings, and lower emissions. It’s the technology that makes Selective Catalytic Reduction (SCR) work in over 70% of new diesel construction machines worldwide, injecting precise doses of urea to turn up to 95% of NOx into harmless nitrogen and water. But that same precision is its biggest weakness when those crystals start to form. You can discover more insights about this automotive technology and its market impact.
Fault Codes vs. Real-World Symptoms
The fault codes are how the machine talks, but you've got to know how to translate computer-speak into what's actually happening on the ground. A dealer's laptop gives you the textbook definition, but a seasoned tech knows what it really means on a muddy job site.
Here's the real story behind the codes.
Fault Codes vs Real-World Symptoms
| JCB Fault Code | What The Dealer Laptop Says | What It Actually Means In The Field |
|---|---|---|
| P20EE, P20E8 | "SCR NOx Catalyst Efficiency Below Threshold" | "The injector is so clogged it can't spray enough DEF. The NOx sensors are freaking out." |
| P208B, P204F | "Reductant Pump Control Range/Performance" | "The pump is working overtime trying to push DEF through a blockage. Check the injector or filter first." |
| P2BA7, P2BA8, P2BA9 | "NOx Exceedance - Empty Reagent Tank / Incorrect Reagent" | "Could be bad DEF, but more likely a clogged injector is making the system think the DEF is bad." |
| P202A | "Reductant Tank Heater Control Circuit/Open" | "This is usually an electrical issue, but always check for crystallized DEF gunking up the connections." |
| U3000 | "Control Module: Internal Electronic Failure" | "Don't panic! This scary-sounding code can be triggered by a simple plugged injector causing bad readings." |
Don't let a fault code send you down a rabbit hole of replacing expensive sensors.
A blocked injector can trigger a whole cascade of misleading codes about NOx levels, DEF pressure, and SCR efficiency. Always start with the simplest, most common point of failure: the injector itself.
At Flat Earth Equipment, we see this exact scenario play out every single day. Good folks are stuck waiting on back-ordered parts from the dealership when a simple, one-hour cleaning could have them running. And when a cleaning isn't enough, we've got the sensors, solenoids, and filters you actually need to bypass the dealer wait times and get back to work.
Essential Tools for a Field Repair
Before you crack a line on that finicky Bosch Denoxtronic system, you need the right gear. Showing up with just a standard socket set is a rookie move that’ll land you in a world of stripped fittings and bigger problems. This isn't a clean shop; this is a field repair, and your toolkit has to reflect that.
Forget the dealer’s service manual for a second. We're talking about what actually works when you're covered in dust and losing daylight. The goal is to get this done fast, clean, and without creating new headaches.
The right tools keep a simple cleaning job from turning into an expensive replacement. One rounded-off DEF line fitting because you grabbed an open-ended wrench will ruin your day and force the call to the parts department you were trying to avoid.
Beyond the Basics: What You Really Need
Your standard toolbox is a starting point, but for this job, a few items are non-negotiable. Don’t improvise here; it will cost you.
Here’s the essential loadout:
- A set of flare nut or line wrenches: This is the most critical item. DEF line fittings are made of soft metal. A standard wrench will round them off in a heartbeat. A line wrench grips five sides of the nut, giving you the leverage you need without destroying it.
- A quality pick set: You'll need fine-tipped picks (straight, 90-degree, and hook) to gently chip away at the crystallized urea inside the injector nozzle. Don't use a screwdriver or a nail—you'll gouge the metal and ruin the spray pattern for good.
- Compressed air with a blowgun: Canned air works in a pinch, but a small compressor is better. You need this to blow out the injector after cleaning to ensure all moisture and loose crystals are gone.
- A squirt bottle of distilled water: Not tap water. Not creek water. Distilled water is crucial because it has no minerals to cause more clogs or damage the injector. This is your only cleaning agent.
Never, under any circumstances, use brake cleaner, carb cleaner, or any other aggressive solvent. These chemicals will destroy the delicate O-rings and plastic components inside the injector, guaranteeing a premature failure. You’ll turn a simple clog into a dead part.
Safety Gear Is Not Optional
I know, I know—we all get complacent. But AdBlue (DEF) is corrosive to skin, eyes, and certain metals. It might look like water, but it's a chemical you need to respect. A splash in the eye will send you to the ER, and letting it sit on your skin will cause a nasty chemical burn.
Your safety kit should include:
- Nitrile gloves: Don’t bother with cloth gloves; they’ll just soak up the fluid.
- Safety glasses or goggles: Goggles are better. They stop splashes from getting in around the sides.
- A handful of clean rags: For immediately wiping up spills on the machine or yourself.
Don't be the guy who ends up with a chemical burn because you were in a hurry. You're trying to fix the machine, not end up in the urgent care clinic.
The Step-by-Step Injector Cleaning Procedure
Alright, let's get our hands dirty. This is where the real work happens—out in the field, with the tools in your truck. We're not in a dealer's clean room with their "Service Master" laptop. This is the battle-tested process for pulling a Bosch Denoxtronic injector, cleaning it, and getting your machine back to work without a trip to the shop.
The whole game here is being methodical. Rushing this job is how you snap a fitting or damage the nozzle, turning a quick cleaning into a week-long parts delay. Take your time, follow the process. It'll save you a world of headache.
Step 1: Locating and Accessing the Injector
First, you gotta find the thing. On most JCB equipment, whether it’s a telehandler, backhoe, or excavator, the injector is mounted right into the exhaust pipe, just before the big SCR catalyst canister. Look for a small, cylindrical component with an electrical connector and a thin, hard plastic DEF line running to it.
It's often tucked behind heat shields. Don't try to fight it. Just remove what's in your way. Trying to work through a tiny gap is a great way to lose tools and bust your knuckles.
Step 2: Depressurize and Disconnect
That little plastic DEF line holds fluid at a surprisingly high pressure. If you just crack it open, you're getting a face full of corrosive AdBlue. You have to relieve that pressure first.
- Kill the Power: Make sure the machine’s master switch is off. The last thing you need is the DEF pump kicking on.
- Bleed the Pressure: Throw a rag over the DEF line fitting. Using your line wrench, slowly crack the fitting loose—just a quarter turn is usually enough. You’ll hear a slight hiss as the pressure escapes.
- Full Disconnect: Once the hissing stops, fully unscrew the fitting. Be ready for a small amount of DEF to dribble out. Now, unplug the electrical connector. There’s usually a small tab you need to press.
- Remove the Injector: The injector is held in by one or two small bolts. Pop those out, and the injector should pull straight out of its port in the exhaust. It might be snug from carbon buildup, so a gentle twist can help break it free.
This flowchart breaks down the essential gear.
Having the right tools isn't a suggestion—it's what separates a successful field repair from a costly mistake.
Step 3: The Multi-Stage Cleaning Process
With the injector in hand, you can see the enemy: a crust of white, hard urea crystals plugging the nozzle. Our goal is to dissolve this gunk without damaging anything.
Wipe down the exterior to get rid of any loose dirt. Now for the real work. The process is simple: disconnect, soak in a 10% alkaline solution for 30 minutes if you have it, or just hot distilled water if you don't. Rinse with more de-ionized water, and then test at 5-7 bar pressure if you have the gear. Following these steps can boost system reliability by as much as 35%, according to Bosch guidelines, and prevent the common 25% efficiency drop caused by contaminants.
Next, grab your pick set to gently chip away any large chunks of crystallized urea from the outside of the nozzle. Be extremely careful not to scratch or gouge the metal tip.
The goal here is finesse, not force. The spray pattern from this injector is a finely tuned mist. Any damage to the nozzle orifice will ruin that pattern and render the injector useless, even if it’s perfectly clean.
After the initial soak and picking, flush the injector from the inlet side—where the DEF line connects—with your squirt bottle of distilled water. This pushes any remaining dissolved crystals out through the nozzle instead of deeper into the injector body.
Finally, grab your compressed air and thoroughly dry the injector. Blow air through the inlet and all over the nozzle until you’re positive every drop of moisture is gone. Any water left behind will just cause new crystals to form the second the system heats up.
Step 4: Final Inspection Before Reinstalling
Before you put it back on the machine, give the injector a final, close inspection.
- Check for Cracks: Look for hairline cracks in the plastic housing.
- Inspect the Nozzle: Ensure the nozzle tip isn't melted or deformed.
- Examine the O-ring: Check the O-ring that seals the injector into the exhaust port. If it’s brittle, cracked, or flattened, replace it. A leak here will cause all sorts of new problems.
- Review Your Safety Protocols: Working with these systems always carries risks. For a complete overview of best practices, you can review our resources on OSHA-compliant safety procedures.
If you spot any physical damage, stop. The cleaning job is over, and it's time to order a replacement. No amount of cleaning will fix a cracked housing or a melted tip. Trying to reinstall a damaged injector is just asking for a repeat failure.
Getting It Back Together and Resetting the System—Without the Dealer Laptop
You've done the dirty work, and that Bosch injector is finally clean. But hold on, the job's not done. Getting the part clean is only half the battle. Now you have to reinstall it correctly and, more importantly, convince the machine’s stubborn ECU that the problem is actually solved—all without the dealer’s pricey "Service Master" laptop.
This is where most folks get tripped up. They do a perfect cleaning job, bolt it back in, and then pull their hair out when the same damn fault codes pop right back up. The machine doesn’t magically know you fixed it; you have to walk it through a process to prove the repair is solid.
This is the kind of insider knowledge that keeps you from making that defeated, four-figure call to the dealership for a simple reset. We're going to manually force the system through its own diagnostic checks.
Proper Reinstallation to Avoid New Problems
First, let's get the hardware right. A sloppy reinstallation will just create new leaks and fault codes.
Start by cleaning the injector port in the exhaust pipe with a small wire brush. Knock off any carbon or rust where the injector seats. You need a clean, smooth surface for a good seal.
Next, install a new O-ring on the injector. Don't even think about reusing the old one. It's cooked and brittle. A new seal costs a few bucks. A little dab of clean DEF fluid will help it slide in without tearing.
Carefully guide the injector back into its port and get the retaining bolts started by hand. Then, torque them to spec—usually around 8-10 Nm (70-90 in-lbs). Don't go full gorilla on it and snap a bolt.
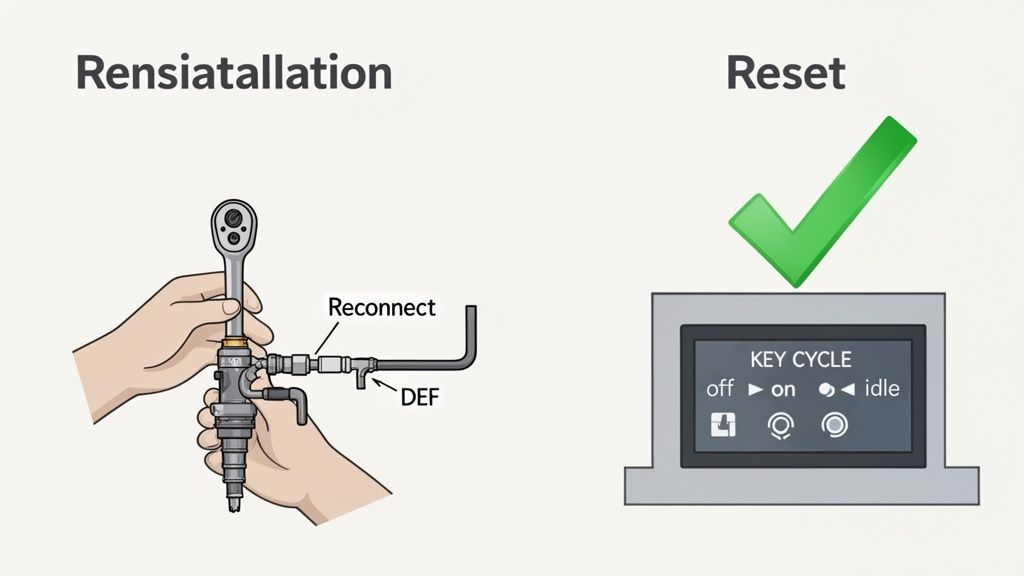
Finally, reconnect the DEF line and the electrical connector. You should hear a solid "click" when that electrical plug seats properly. Now you're ready to outsmart the electronics.
Forcing a System Relearn Without the Laptop
Here’s the part the dealer service department doesn't want you to know. The Bosch Denoxtronic system is built to constantly run self-tests. You can trigger these tests yourself and clear the ECU's "memory" of the old fault codes.
This forces the computer to re-evaluate the whole system with your freshly cleaned injector. It works on most JCB machines, but sometimes it takes a couple of tries.
- The Key Cycle Sequence: This is the most important part. With the master switch on, turn the key to the 'ON' position (don't start the engine) and leave it there for a full 60 seconds. You might hear the DEF pump prime. That's the ECU running its checks. After 60 seconds, turn the key completely off for another 60 seconds. Repeat this entire on/off cycle three to four times.
- The Idle Period: Once you've completed the key cycles, fire up the engine and just let it idle. Don't touch the throttle. Let it run for at least five minutes. During this time, the exhaust is heating up, and the NOx sensors are starting to get good readings.
- Kick Off a Manual Regen: If the fault lights are still glaring at you, start a parked (manual) regeneration from the machine’s display panel. This process gets the exhaust screaming hot, which is what the SCR system needs to perform a complete diagnostic test. A successful regen will often be the final step that clears those stubborn codes.
This whole sequence—key cycles, idling, and a forced regen—manually satisfies the exact same diagnostic "drive cycle" that the dealer's laptop would trigger. You’re just doing it the old-school way and saving yourself a hefty service bill.
If the codes vanish, congratulations. You just beat the system. If they're still there, you might have another issue, like a failing NOx sensor or a weak DEF pump. But more often than not, this manual reset is all it takes to get your machine out of limp mode.
And when you do run into a stubborn sensor that needs replacing, you can skip the dealer wait times and get the right part quickly from a solid supplier like Flat Earth Equipment.
Knowing When to Order a New Injector
I’m all for fixing it yourself. The whole point of this guide is to keep you out of the dealer’s service bay. But there’s a hard truth every good mechanic knows: sometimes, a part is just plain shot.
Knowing when to throw in the towel on a cleaning and get a new part on the way is what separates a smart tech from a guy who just wasted a whole afternoon.
You can clean an injector a dozen times, but if it's physically damaged or electrically dead, you're just polishing a paperweight. Trying to force a bad part to work only leads to more downtime, more fault codes, and another breakdown an hour after you thought you’d fixed it.
Telltale Signs of a Dead Injector
Before you even start cleaning, give the injector a hard look. There are a few dead giveaways that tell you a replacement is your only option.
Here are the career-ending injuries for a Bosch Denoxtronic injector:
- Visible Cracks in the Housing: Look for hairline fractures in the black plastic body. Heat cycles and vibration take their toll.
- A Melted or Deformed Nozzle: The tip of the injector should be a perfect cone. If it looks melted, distorted, or like it's been overheated, the spray pattern is ruined forever.
- Heavy Corrosion or Pitting: A little surface rust on the body is fine, but if the nozzle itself is heavily pitted or corroded, it’s toast.
These are the obvious ones. The sneaky failure is the one you can't see.
The Quick Electrical Check
The injector isn't just a nozzle; it's an electronic solenoid. When that coil inside burns out, the injector is dead, no matter how clean it is.
You can spot an electrical failure in about 30 seconds with a basic multimeter.
Set your multimeter to the resistance setting (Ohms, Ω). Touch the probes to the two electrical pins on the injector’s connector. A healthy Bosch Denoxtronic injector should show a resistance reading somewhere between 10 and 20 Ohms.
If you see a reading of "OL" (Open Loop) or infinite resistance, the coil is broken. If it reads close to zero, you have a dead short. In either case, the solenoid is fried. No amount of cleaning will bring it back.
This simple resistance check is your secret weapon. It’s a definitive test that takes seconds and can save you hours of wasted effort trying to clean a part that’s electrically dead.
In major markets, Euro VI and EPA standards demand these systems work perfectly, and poor injector maintenance can spike NOx emissions by up to 50%, according to studies on SCR efficiency. A simple maintenance plan—like flushing with distilled water and checking nozzles quarterly—can extend injector life by 30-40%.
That helps you avoid downtime costs that average a brutal $5,000 per day for a mid-sized JCB loader. You can find more analysis on diesel engine market trends to see the bigger picture.
When you find a dead injector, get a replacement fast. A supplier like Flat Earth Equipment is your best friend. Instead of waiting days for the dealer, you can get a precision-fit replacement injector shipped out the same day.
Downtime is expensive. When a part is gone, ordering a new one isn't giving up—it's making the best call for the job. If you're ever in doubt, get in touch with our tech support team for straight answers.
Common Questions from the Field
Out in the dirt, you don't have time for a 300-page service manual. You need straight answers to the problems you're facing right now. Here are the most common questions I get from other techs wrestling with a stubborn JCB AdBlue injector.
Can I Use Brake Cleaner on the AdBlue Injector Nozzle?
Absolutely not. Don't even think about it.
Those harsh solvents will destroy the delicate internal seals and plastics inside the Bosch injector. Using brake cleaner, carb cleaner, or any other aggressive chemical is a guaranteed way to cause a total failure.
Stick to distilled water. Anything else is just asking for trouble and will turn a simple cleaning job into a mandatory replacement.
Why Won't the Fault Code Clear After Cleaning?
This is a common one. You've done the work, but the light on the dash is staring back at you.
First, double-check your connections—the DEF line fitting and the electrical plug. If everything is tight, the machine's ECU might just need a few complete key cycles to re-run its diagnostic checks and recognize the fix.
The standard procedure is to turn the key on for 60 seconds, then completely off for 60 seconds. Repeat this process three or four times. This often forces the system to re-evaluate the sensors and clear the code.
If the code persists after a few key cycles and an idle period, the issue might be upstream. You could be dealing with a weak DEF pump that can't build enough pressure, or it could be that the injector's internal solenoid is faulty. A cleaning can’t fix an electrical failure.
How Often Should I Clean the AdBlue Injector?
In a perfect world, you'd inspect and clean it as part of your regular 1,000-hour service interval. This is especially true if the machine operates in high-heat or dusty environments.
Realistically, most operators wait for the fault codes. A good compromise is to pull the injector for a quick inspection during major service events. A five-minute look can spot crystal buildup and prevent a full-blown derate that shuts down your job site.
Is a New Injector Better Than a Rebuilt One?
Always go new if you can. The spray pattern and flow rate tolerances on these Bosch Denoxtronic injectors are incredibly tight.
Many so-called "rebuilt" units are just injectors that someone else cleaned, maybe slapped a new O-ring on, and resold without proper flow testing. You might save a few bucks, but you're taking a huge gamble. You risk having the same problem pop up again in 100 hours.
A new, precision-fit part from a reliable source ensures you're getting a component that meets factory specs. It gives you peace of mind that the job is done right the first time.
When a cleaning isn't enough and you need a new injector, sensor, or pump to get your JCB back to work, skip the dealer's long wait times and high prices. Flat Earth Equipment has the high-quality, precision-fit parts you need in stock and ready for same-day shipping. Get your machine making money again, faster. Check out our full line of JCB-compatible components.