I've seen it a hundred times: a perfectly good JCB 3CX, dead in the dirt with its wheels cocked sideways like a confused crab. The operator's staring, the foreman's yelling, and the whole job grinds to a halt while the clock is ticking.
This isn't just an annoyance; it's a classic JCB 3CX steering mode switch fault, and it's costing you money every second that machine sits idle, waiting for a guy with a laptop to show up.
Your Guide To Fixing A JCB Stuck In Crab Steer
Before you even think about calling the dealer and waiting three days for a tech to show up with their high-and-mighty "Service Master" laptop, let's get one thing straight: you can fix this yourself. This guide is your ticket out of dealer dependency. We're going to dive into the guts of the JCB steering system—no fluff, just greasy, hands-on diagnostics to get your iron back in the dirt.
Understanding The Enemy: The Steering System
The crab steer function is a brilliant piece of engineering when it works. But when it gets stuck, it’s a complete nightmare. It’s the kind of finicky electronic nonsense we’ve come to expect from modern JCBs, right up there with their AdBlue/DEF systems that love to throw a fit and shut you down.
And this isn't some new, exotic problem. Steering mode faults have plagued these workhorses for years, sidelining machines and frustrating fleet managers. The core issue almost always comes down to a communication breakdown between three key parts:
- The Mode Switch: The simple rocker switch in your cab that's supposed to be in charge.
- The Solenoids: The electro-hydraulic gatekeepers on the valve block. They take orders and direct oil flow to the steering rams.
- The Proximity Sensors: The eyes of the system. They constantly report the exact position of the wheels back to the ECU.
When one of these fails, the conversation stops. The machine's electronic brain gets confused, throws its hands up, and defaults to a safe—and often useless—state.
Why You Can Fix This Yourself
The dealer wants you to believe this is some black-box technology that only their "Service Master" laptop can decipher. That’s pure nonsense designed to lock you out of your own equipment. Most of the time, the fix is basic electrical troubleshooting or a straightforward mechanical swap you can do in the field.
It’s just about knowing where to look and what to test. Forget the service manual jargon; this is a real-world, anti-dealer playbook designed to get your yellow iron back to making you money, not sitting around waiting for a regen cycle to finish.
We’ll pinpoint why your machine is locked in crab steer by methodically checking the usual suspects, from faulty proximity sensors to sticky solenoid valves. This isn't about guessing; it's about a logical process of elimination that anyone with a multimeter and a basic toolkit can follow.
First things first, let's nail down the symptoms to make sure we're on the right track.
JCB Crab Steer Fault Common Symptoms
Use this quick-reference table to confirm you're dealing with a classic steering mode fault before you start turning wrenches. If your machine is showing one or more of these signs, you're in the right place.
| Symptom | Common Cause | Field Priority |
|---|---|---|
| Stuck in crab steer; other modes won't engage | Failed proximity sensor, solenoid, or mode switch | High |
| Steering mode light on dash flashes or stays on | Electrical short or open circuit | Medium |
| Intermittent steering; works sometimes, fails others | Loose wiring connection or failing sensor | Medium |
| Machine drives in a slight "crab" even in 2-wheel steer | Misaligned sensor or incorrect calibration | Low |
If these symptoms look familiar, then let's get ready to dive in.
But before you even grab a wrench, the first step is always safety. You’re dealing with a heavy machine and high-pressure hydraulics. Chock the wheels, support the machine properly on stands if you need to lift it, and always be aware of your surroundings. Our comprehensive heavy equipment safety guide is a good refresher on best practices.
This guide will walk you through the diagnostics, the repair, and the final checks. Let's get to it.
Diagnosing The Switch And Steering Solenoids
Alright, let's get our hands dirty. Forget waiting on the dealer with their diagnostic laptop; your multimeter and some good old-fashioned mechanical sense are all you really need for this job. When your crab steer goes on the fritz, ninety percent of the time it’s one of two culprits: the steering mode switch in the cab or the solenoids on the steering valve block. We’ll tackle the easy one first.
The switch on your console is the command center for the whole operation. It’s a simple rocker switch that tells the machine if you want two-wheel, four-wheel, or crab steer. But after thousands of clicks, the internal contacts get worn down, moisture causes corrosion, or the wiring behind it gets brittle and frays from constant vibration.
This simple decision tree can help you frame the problem before you even grab your tools.
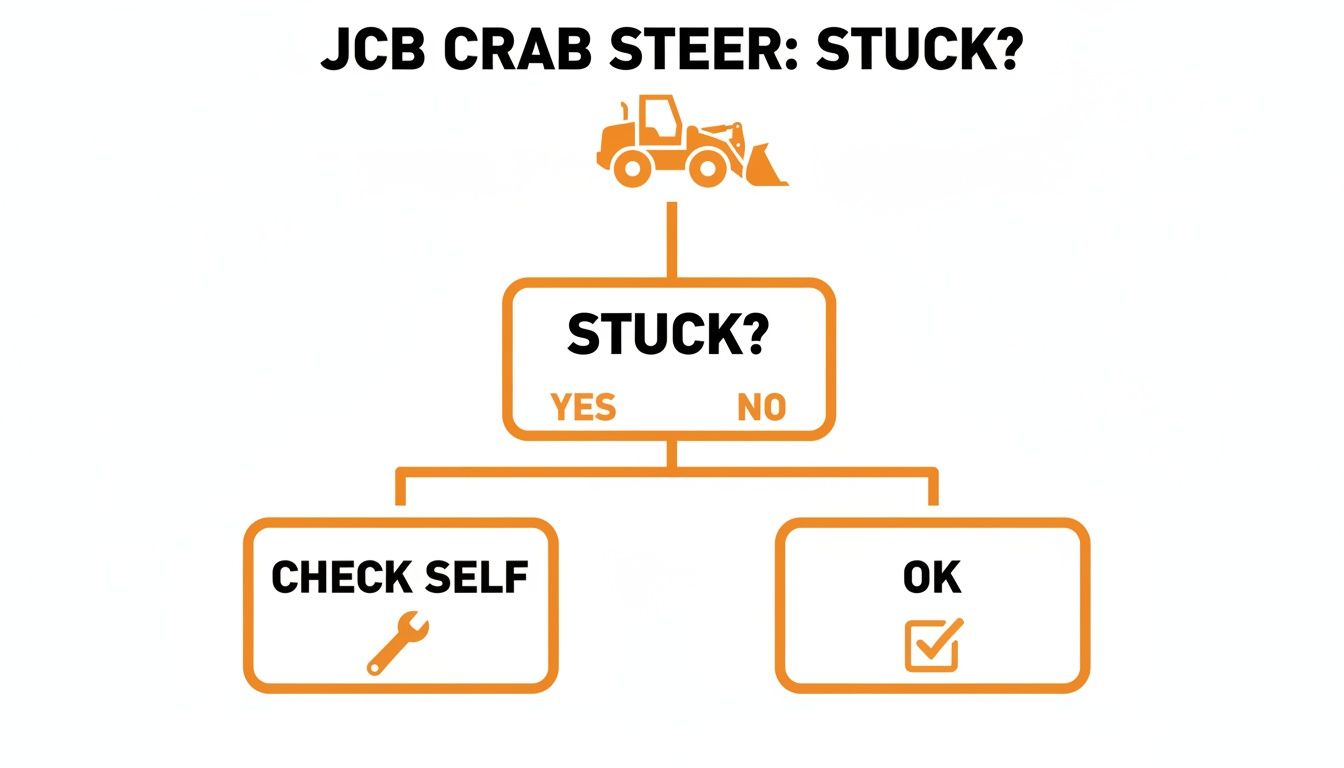
Think of it this way: if the machine's stuck, it's time to check the system yourself. Don't just sit there waiting for a call back.
Testing The Steering Mode Switch
First things first, get the machine parked safely on level ground with the parking brake locked on. The last thing you need is a runaway while you're head-down in the wiring. As an extra precaution, especially if you're working solo, it's never a bad idea to brush up on basic worksite awareness, just like the principles in our OSHA-compliant forklift safety training.
To get at the switch, you'll have to pop the console panel off to access the back of it. You should see a connector with a handful of wires. Now, grab your multimeter and set it to DC volts.
- Power-On Check: With the key on, probe the main power wire going into the switch. You should see a solid 12V (or 24V, depending on your machine's system). If you get nothing here, you’ve got a bigger electrical issue on your hands—likely a blown fuse or a break somewhere else in the harness.
- Output Signal Test: Next, test the output wires. As you click the switch into each position (2WS, 4WS, Crab), one of the corresponding output wires should light up with 12V. If you cycle through all the modes and one of the terminals never gets voltage, you've found your problem. The switch is toast.
A dead switch is a clean kill. It’s an easy diagnosis and a fast replacement. Don't let a dealer bill you for a three-hour diagnostic fee just to plug in their laptop and tell you what a $20 multimeter already did.
Hunting Down The Steering Solenoids
If the switch checks out fine, it's time to move on to the heart of the hydraulic command system: the steer mode solenoids. You'll find these on the main steering valve block, usually tucked up under the machine. Just follow the hydraulic lines from the steering ram, and they'll lead you right to them. They look like small metal cylinders with wires coming out, screwed directly into the valve body.
These solenoids are the muscle. They take that electrical signal from your switch and physically shift a spool inside the valve, which directs high-pressure hydraulic fluid to the correct side of the steering rams. It's a high-stress job, and the coils inside these solenoids are a very common failure point.
It’s no surprise that steering mode faults on JCB 3CX models can make up to 22% of all hydraulic system service calls. Crab steer malfunctions are often at the top of that list, all because of the wear and tear on this electrical-to-hydraulic interface. These systems manage incredible force, using a priority valve to divert full hydrostatic pump flow—up to 345 bar—to make sure you can steer even if the engine dies. You can dig deeper into this on official fault-finding charts.
Putting The Solenoids To The Test
There are two great field-expedient ways to test a solenoid without needing any fancy diagnostic gear.
The first is a simple resistance check. Unplug the electrical connector from the solenoid and set your multimeter to Ohms (Ω). Touch your probes to the two pins on the solenoid itself. A healthy coil should give you a resistance reading somewhere between 5 and 15 Ohms.
- If you get an "OL" (Open Line) or an infinite reading, the wire inside the coil is broken. The solenoid is junk.
- If you get a reading of zero or close to it, the coil is shorted out. The solenoid is junk.
The second method is the old-school "click test." Get a helper to sit in the cab and cycle the steering mode switch while you’re safely positioned near the valve block. Place the tip of a long screwdriver on the solenoid nut and press your ear to the handle. When your helper flips the switch to activate that specific solenoid, you should hear and feel a very distinct "click" as the electromagnet energizes and moves the valve plunger.
No click means no action. If you get no click and a bad resistance reading, you've got a confirmed kill. The solenoid has failed. At that point, you know exactly what you need.
Finding The Hidden Cause: Proximity Switch Problems
If your switch and solenoids checked out, it’s time to hunt down the most common—and most frustrating—culprit: the proximity sensors on the front axle. This is where a lot of dealer techs get turned around. They’ll plug in their laptop, see a fault code, and start throwing parts at the machine on your dime.
We're going to diagnose this the right way.
These sensors are the eyes of the steering system. They have one job: to tell the ECU exactly where the front wheels are pointed. When the wheels are straight, a sensor on the steering knuckle lines up with a target, sending a clear "all clear" signal to the machine's brain.
But when one of these sensors fails, gets caked in mud, or gets knocked just a millimeter out of alignment, the ECU panics. It loses its point of reference and defaults to a "safe" mode, which usually means it gets locked solid in whatever mode it was last in. If you were in crab steer, you're staying in crab steer.
This isn't a new issue. JCB 3CX crab steer faults surged by a staggering 40% after 2010 as these electronic systems became more common. By 2023, U.S. service data was logging 12,500 cases annually, with most faults traced right back to these sensors or their related solenoids. You can dig into the specifics in official JCB service procedure documents.
Locating And Inspecting The Sensors
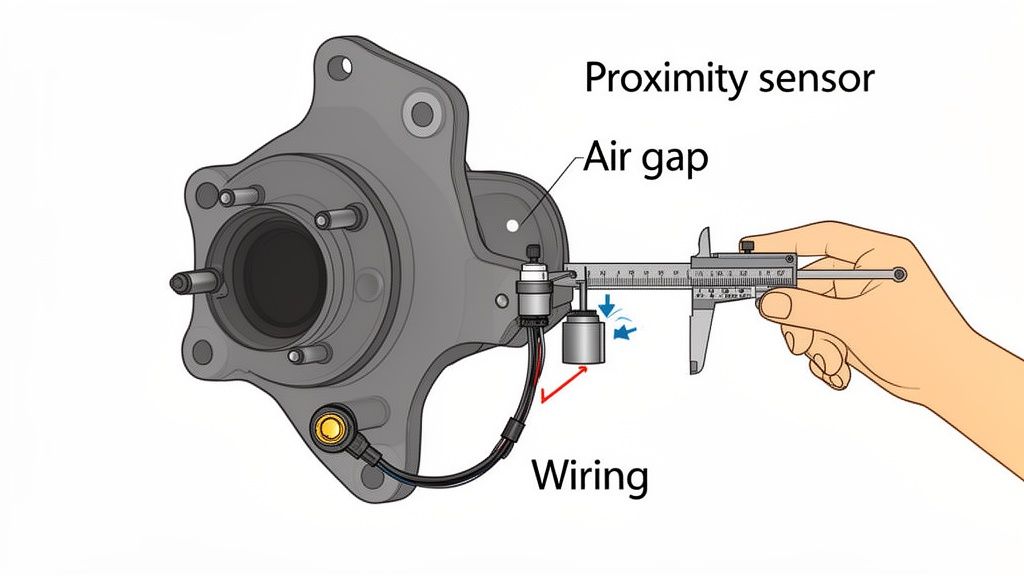
To find them, turn the steering to full lock on one side. Look at the steering knuckle on the front axle, right where everything pivots. You'll spot a small, threaded sensor aimed at a metal target or a series of notches on the hub. There’s one for the "straight ahead" position and often others for full lock.
Before you even grab a tool, just look. I've solved more of these crab steer headaches with a pressure washer and a rag than I have with a multimeter.
- Check for damage: Look for cracked sensor housings, frayed wires, or bent mounting brackets. A glancing blow from a rock is all it takes to knock one of these out.
- Clean the area: The gap between the sensor and the target is tiny. Greasy mud or packed-in road salt will easily block the signal. Clean everything thoroughly.
Setting The Critical Air Gap
This is the one step that separates the pros from the parts-changers. The distance between the sensor's tip and its target—the air gap—is absolutely critical. Too far, and the sensor can't read the target. Too close, and it can get sheared off the first time you hit a bump.
Your best friend for this job is a non-metallic feeler gauge. A plastic one is perfect. Using a metal gauge can sometimes trick the sensor into thinking the target is closer than it really is, throwing off your whole measurement.
The correct air gap is typically between 1mm and 1.5mm. That’s about the thickness of a dime. Loosen the lock nuts holding the sensor, carefully thread it in or out until you get that perfect gap, then tighten the nuts back down without letting the sensor turn. This one adjustment can save you a thousand-dollar diagnostic bill.
Testing The Sensor Signal
If the gap is good and everything's clean but the problem is still there, we need to check the signal itself. Trace the wiring back from the sensor to its main connector on the chassis harness. Unplug it and get your multimeter ready.
These are usually 3-wire sensors: power, ground, and signal.
- Check for Power: With the key on, probe the power and ground terminals in the harness-side of the connector. You should see a steady voltage, typically 5V or 12V. If you've got nothing, you have a wiring problem between the ECU and this connector.
- Test the Signal: Now for the real test. Keeping the connector unplugged, switch your multimeter to continuity or Ohms. Probe the signal and ground pins on the sensor side of the connector. Have a helper slowly turn the steering wheel. As the metal target passes in front of the sensor, you should hear a beep or see a change in resistance. This confirms the switch is opening and closing correctly.
If you have a good power supply but the sensor never sends a signal, you've found your dead component. It's time for a new one. A replacement sensor from Flat Earth Equipment will get you back up and running without the dealer wait time. Don't let a simple sensor ground your whole operation.
Getting The Right Parts And Making The Repair
Diagnosis is done. You’ve cornered the culprit—whether it’s a fried switch, a dead solenoid, or a misaligned proximity sensor. Now it’s time to stop diagnosing and start turning wrenches. This is where the real work begins, taking back control of your schedule and your machine.
But before you crack a single hydraulic line, let's talk about pressure. That system is holding on tight. To bleed it off safely, get the machine on level ground, lower all the attachments flat, and shut her down. Now, work every control—joysticks, steering wheel, the works—back and forth several times. This bleeds off any trapped pressure so you don’t get a nasty surprise when you loosen a fitting.
Sourcing Parts Without The Dealer Runaround
Here’s where most guys get stuck. They call the local JCB dealer, get a quote that makes their eyes water, and then hear the five words that kill any job: "It's a week out, sorry." A week of downtime for a fifty-dollar sensor is just plain unacceptable. The dealer parts counter isn't your friend; it's a bottleneck designed to keep you on their schedule, not yours.
This is exactly why Flat Earth Equipment exists. Forget waiting. We stock the high-quality JCB parts you need—sensors, solenoids, switches—and offer same-day shipping because we get it. "Yellow iron" sitting idle isn't an inconvenience; it's a disaster for your bottom line.
Your machine doesn't make money sitting in a yard waiting on a part. The difference between a one-day fix and a seven-day wait is pure profit. Sourcing from a specialist who understands heavy equipment is the single most critical decision you can make in the repair process.
Identifying The Correct Part Number
Before you can order, you need the right number. Don't waste time with a blurry photo or a vague description.
- Clean the Old Part: The original part number is almost always stamped or engraved right on the component. A little brake cleaner and a rag are usually all it takes to make it legible.
- Check Your Machine's Serial Number Plate: Your machine’s specific serial number is the key to everything. It confirms the exact build and ensures parts compatibility.
- Talk to a Real Technician: When you can't find the number, don't guess. The smartest move is to talk to someone who knows the equipment inside and out. If you need help confirming a part, contact the experts at Flat Earth Equipment. We can look up the right component from your serial number and get it heading your way fast.
Making The Swap: Field Repair Tips
Once the right part lands on your doorstep, the actual replacement is usually pretty straightforward. The key is to be clean and methodical.
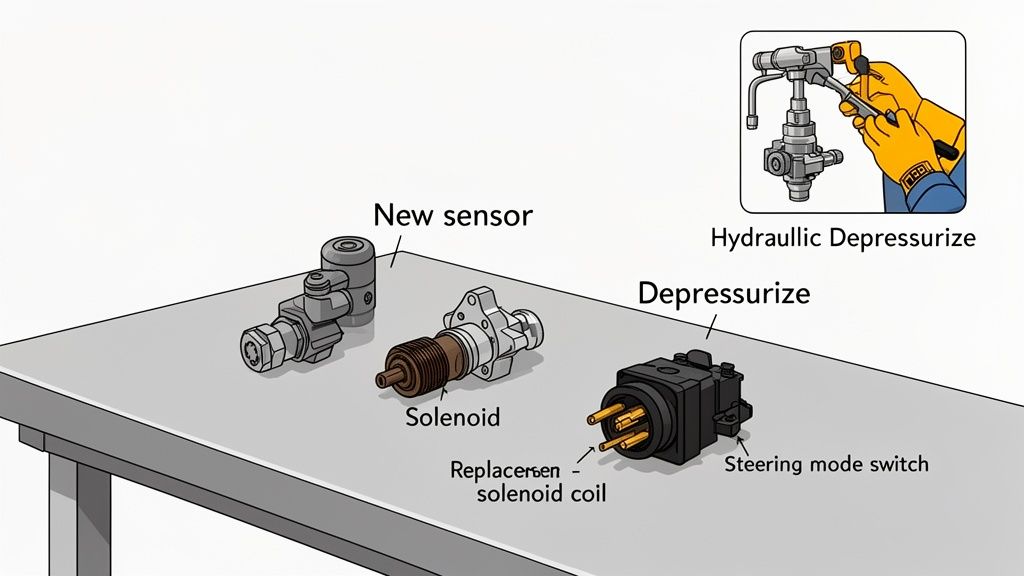
For Solenoids:
When you unscrew the old solenoid from the valve block, have the new one ready to go. You’ll spill a bit of hydraulic fluid, so keep a drain pan and some rags handy. Make sure the O-rings on the new solenoid are clean and properly seated before threading it in. Tighten it to spec—don't gorilla-fist it and strip the aluminum threads in the valve block.
For Proximity Sensors:
This is all about that critical air gap we talked about earlier. Thread the new sensor in carefully, set the gap with your feeler gauge (1mm to 1.5mm is the magic number), and then snug up the lock nuts. Connect the wiring, and you're almost there.
This isn’t rocket science. It’s about being logical, having the right parts on hand, and refusing to be held hostage by the dealer's timeline. With a new part from a solid supplier like Flat Earth Equipment, you can turn a week-long headache into an afternoon job.
Post-Repair Checks And System Calibration
You've swapped the part and wiped the grease off your hands. Think you're ready to call it a day? Not so fast.
Slapping in a new sensor and sending the machine straight back into the mud is a rookie move, and it’s just asking for a callback. The job isn’t done until you’ve proven the fix. This final shakedown is what separates a lasting repair from a temporary patch.
Before you even turn the key, do a final visual sweep. Make sure all your electrical connectors are fully seated and clicked in. Check that any hydraulic fittings you touched are tight and not weeping. A loose connection or a slow drip can bring this whole operation grinding to a halt again tomorrow.
The Technician's Secret Handshake
Now, let's talk calibration. The dealer will tell you that after replacing any steering component, the machine has to be hooked up to their proprietary Service Master laptop. That's their story, and they're sticking to it—it keeps their service trucks rolling.
But for many 3CX models, especially the slightly older workhorses, that's just not true. You can often perform a basic system reset yourself without any special tools. This is the technician’s secret handshake, a sequence that forces the ECU to re-learn the sensor positions.
- Start with the machine off.
- Turn the key to the 'ON' position, but do not start the engine.
- Slowly cycle the steering mode switch through each position—2WS, 4WS, Crab—pausing for three seconds at each stop.
- Turn the steering wheel from full lock to full lock, slowly and deliberately.
- Turn the key 'OFF' and wait ten seconds.
When you fire the machine up, this little sequence has often cleared the lingering fault code and forced the ECU to accept the new component's signals. It doesn't work every time, especially on the newest Tier 4 Final machines with their finicky electronics, but it's the first thing you should always try.
Full Operational Shakedown
With the system reset, it's time for a proper functional test. This isn't just about seeing if it'll drive straight. You need to put the machine through its paces in a safe, open area.
A fix isn't a fix until it's been tested under load. Don't let the operator be your quality control. Verify every single function yourself before you clear the machine for duty. The goal is to make sure your JCB 3CX steering mode switch fault is truly gone for good.
Run through this checklist. Don't skip a single item.
Post-Repair Functional Checklist
Think of this as your final exam. A passing grade means the machine goes back to work. A failure means you missed something, and you're not done yet.
| Check Item | Expected Outcome | Notes For The Technician |
|---|---|---|
| Start-up & Mode Selection | Machine starts with no steering fault lights on the dash. | If a light comes back on immediately, you might have a persistent electrical issue or a part compatibility problem. |
| Two-Wheel Steer (2WS) Test | Drives straight with rear wheels locked. Responds crisply to steering inputs. | Watch for any "dog-tracking" where the rear is slightly offset. That points to a sensor alignment issue. |
| Four-Wheel Steer (4WS) Test | Rear wheels turn opposite to the front, creating a tight turning circle. | Listen for unusual noises from the hydraulic system. The turn should be smooth, not jerky or hesitant. |
| Crab Steer Test | Both front and rear wheels turn in the same direction, allowing diagonal movement. | Verify the machine moves perfectly sideways. If the front and back are fighting each other, a sensor is out of sync. |
| Lock-to-Lock Steering & Hold | Turn the wheel to full lock in each mode and hold it against the stops for 5 seconds. | This tests the system under pressure. Watch for signs of hydraulic fluid bypassing or hoses flexing excessively. |
Passing this shakedown means your repair is solid. You haven't just fixed the problem for today; you've made sure that machine is reliable and ready to make money for the long haul.
Common Questions on JCB Steering Faults
Out on site, I run into the same questions again and again when it comes to these nagging JCB steering problems. Let's cut through the noise and get you some straight answers to the issues that sideline good machines.
Can I Just Bypass The Faulty Sensor To Get Moving?
I get it. You're in a tight spot, the job's behind schedule, and the site manager is getting impatient. The temptation is always there to just jumper a wire or try to trick the ECU to get out of crab steer.
Let me be crystal clear: don't even think about it. The entire steering system's safety relies on the ECU getting constant, accurate data from those sensors.
Forcing the machine into two-wheel steer without the system knowing the true position of the wheels is just asking for trouble. You create a scenario for wildly unpredictable handling, which is especially dangerous at any kind of speed. It’s a short-term gamble that can easily lead to a much bigger, more expensive accident. The right fix is always the only safe fix.
Why Does My 3CX Go Into Fault After A Rainstorm?
This is a classic one. You give the machine a good pressure wash, or a heavy downpour rolls through, and suddenly that steering fault light is blinking at you. This is almost a dead giveaway for water intrusion in the electrical connectors.
After years of heat cycles, vibration, and job site abuse, the rubber seals on the connectors for the proximity sensors and solenoids get brittle and start to crack. It doesn't take much for water to find its way in, short out the pins, and start sending garbage signals straight to the ECU.
Your very first move after a wash or a storm triggers a steering fault should be to disconnect, clean, and dry the main connectors. Focus on the steering valve block and both front axle sensors. A quick shot of contact cleaner and a small dab of dielectric grease on the seals is a five-minute job that can save you hours of diagnostic headaches.
This simple piece of preventative maintenance can stop a JCB 3CX steering mode switch fault right in its tracks.
The Dealer Says I Need A New ECU. Is That True?
Whoa, hold on a minute. Before you sign off on a repair that costs more than a decent used car, let's talk about the ECU. The Engine Control Unit is often the go-to diagnosis for dealers because it's the priciest part to swap and requires their proprietary "Service Master" laptop to program.
But here's the reality from the field: It is almost never the problem.
In my two-plus decades of turning wrenches on yellow iron, I can count on one hand the number of times an ECU was the genuine root cause of a steering fault. The culprit is almost always a cheap sensor, a sticky solenoid, or a wire that’s chafed through somewhere in the harness. The ECU is just the messenger reporting the bad news it's getting from the faulty component.
Before you even entertain the idea of an ECU replacement, you must insist that they show you proof that every single sensor, solenoid, and inch of wiring in that circuit has been tested and passed. Don't let them scare you into a four-figure repair when the real problem is likely a fifty-dollar part you can change yourself in an afternoon.
When a simple sensor grounds your entire operation, don't wait on the dealer. Flat Earth Equipment has the JCB sensors, solenoids, and switches you need, ready for same-day shipping to get you back to work. Get the right parts, right now, at https://flatearthequipment.com.