Dealing with a JCB P0107 atmospheric pressure sensor fault is almost always a straightforward field repair. It typically boils down to a bad sensor or some chewed-up wiring, not a nightmare ECU failure. The real key here is knowing how to bypass the dealer's long wait times by diagnosing and replacing the part yourself. With just a few basic tools from your truck, you can get your machine back to making money in under an hour.
Why That P0107 Code Is Killing Your Jobsite Productivity

You’re in the middle of a job, the dirt's flying, and then the dash lights up like a Christmas tree. Power drops, the engine derates, and your whole day grinds to a halt. The scanner spits out P0107. We’ve all been there.
The first call to the dealer is always the same story: "It'll be a week before we can even get a tech out there." They'll try to make you think it's some mysterious electronic gremlin that only their proprietary "Service Master" laptop can solve. That’s just not the case.
What P0107 Really Means in the Field
That code is the Engine Control Unit (ECU) screaming one thing: it’s seeing an impossibly low voltage from the atmospheric pressure sensor. Out here in the dirt, this isn't some catastrophic failure. The ECU is just flagging a dead signal wire—which means either the sensor itself has failed internally or a wire has been chewed, chafed through, or corroded.
Industry diagnostics show that once the sensor's signal voltage drops below 0.5–0.6 volts for just a few seconds, the ECU logs the P0107 code. It’s an electrical fault, plain and simple, and it's far more likely to trace back to the sensor or its wiring than a fried computer. You can learn more about the technical specifics of this diagnostic trouble code if you want to dig deeper.
This one tiny fault can kick off a chain reaction, locking your machine out of a critical DPF regen cycle or throwing it into a frustrating limp mode. It’s a cheap part causing a massive headache.
To put it in perspective, here's a quick breakdown of what you're seeing versus what's actually happening out on the iron.
P0107 Fault Code At a Glance
| Symptom | What It Means On The Job | Most Likely Cause (In Order) |
|---|---|---|
| Engine Derate / Limp Mode | Your machine can't dig, lift, or push; productivity is zero. | 1. Failed Sensor: The internal electronics have given up the ghost. |
| "Check Engine" Light | The ECU has logged a persistent fault that won't go away. | 2. Damaged Wiring: A wire is shorted to ground, chafed, or broken. |
| Failed DPF Regeneration | Your machine is screaming for a regen it can't perform. | 3. Corroded Connector: Moisture got into the plug, killing the signal. |
| Rough Idle / Poor Performance | The ECU is guessing, making the engine run like garbage. | 4. Bad ECU: Extremely rare. Don't even think about this until you've proven the other three are good. |
This table shows why you shouldn't panic. The most common causes are the easiest and cheapest to fix right where the machine sits.
The Field Technician's Takeaway: Don't let a P0107 code send you scrambling for a dealer appointment. This is almost always a simple, five-volt sensor circuit failure you can troubleshoot and fix with the tools you already have in your truck.
On JCB "Yellow Iron" like backhoes, telehandlers, and excavators, this sensor is a known weak point. The constant vibration, heat cycles, and exposure to mud and rain just take their toll. Instead of sitting around waiting on a dealer's backorder list, having the right part from Flat Earth Equipment on hand is the real fix.
A quality replacement sensor means you can diagnose and fix the problem in one shot, getting your iron back to making you money. This guide is your plan to do just that—fast, and without ever making that dreaded call to the shop.
The Essential Tools You Actually Need for a Field Fix
Forget what the dealer tells you about needing their fancy, fragile laptop to diagnose this machine. To get to the bottom of a P0107 code, you just need a handful of trusted tools from your truck. This isn't brain surgery; it’s about having the right gear to test a simple circuit without getting locked out by proprietary software like Service Master.
The most important weapon in your arsenal is a quality digital multimeter. This is non-negotiable. Trying to chase an electrical gremlin without one is like trying to frame a house with just a hammer—you're working blind. It’s the only way to definitively check for the correct voltage, find a short to ground, or confirm a broken wire in the harness.
Your Go-To Field Kit
Beyond the multimeter, the rest of the kit is pretty basic stuff you likely already carry. You don’t need a roll-around cart full of specialty tools, just the essentials to get into tight spaces and make a solid, permanent repair.
Here's what you should grab:
- Basic Socket and Wrench Set: You'll need this to remove the sensor itself. It’s usually held on by one or two small bolts.
- Pick and Probe Set: Absolutely essential for cleaning out connectors packed with dirt and checking for loose terminal pins without causing damage.
- Electrical Contact Cleaner: Don't use brake cleaner or anything else that leaves a residue. A quality contact cleaner will flush out corrosion and moisture without harming the plastic connectors.
- Wiring Repair Kit: Be prepared to find a frayed wire. A good kit includes a stripper, crimper, heat shrink, and an assortment of butt connectors. A solid, weatherproof repair is your goal.
You’re not just a parts changer; you're a troubleshooter. The multimeter tells you the story the machine can’t. Is the sensor getting its 5-volt reference from the ECU? Is the signal wire shorted to ground? These are the questions your meter answers, saving you from guessing and throwing away money.
The Most Important "Tool" Is the Right Part
Here’s the part that trips up most guys: you can do all the diagnostic work in the world, but if you don't have the replacement sensor ready to go, you're still dead in the water. Calling the dealer means you’re on their timeline, waiting for a part that might be on backorder for weeks. That's downtime you can't afford.
This is where you outsmart the system. Before you even head to the job site, have the right part in hand. At Flat Earth Equipment, we keep these JCB-compatible atmospheric pressure sensors, solenoids, and filters in stock and ready to ship overnight. Having the sensor on hand turns a multi-day ordeal into a one-trip, one-hour fix.
You diagnose the problem, confirm the sensor is dead with your multimeter, and swap it out right then and there. No waiting, no return trips, and no lost revenue. And while you're getting your machine running, remember that working safely is just as crucial. You can review some fundamental job site safety practices to keep everything running smoothly. Fixing the machine fast is the priority, but doing it without getting hurt is the only way to win.
How to Pinpoint the Exact Cause of the P0107 Fault
Alright, you've got the right tools and maybe even have the new sensor from Flat Earth Equipment on standby. Now, let's stop guessing and find the actual reason that P0107 code is plaguing your machine.
Throwing parts at a problem is a dealer move—and a great way to waste time and money. We're going to use your multimeter to make that sensor and its wiring tell us exactly what’s wrong.
This isn't some dark art. It's a simple process of elimination that works every time, whether you’re on a 3CX backhoe knee-deep in mud or a Loadall telehandler perched on a hill.
Step One: Finding the Sensor
First thing's first—you have to find the atmospheric pressure sensor. On most JCBs, you’ll find it mounted somewhere on or near the intake manifold. It's usually a small, black plastic sensor with a three-wire connector.
It needs a clear reading of the air pressure outside the engine, so it's typically positioned before any turbochargers. Don't just start yanking on wires. Take a second to clean the area around it with a rag; you don't want a bunch of grit falling into the intake when you pull the sensor later.
This diagnostic flowchart lays out the exact testing sequence we're about to follow. It simplifies the process, showing you how to move from one test to the next to isolate the problem.
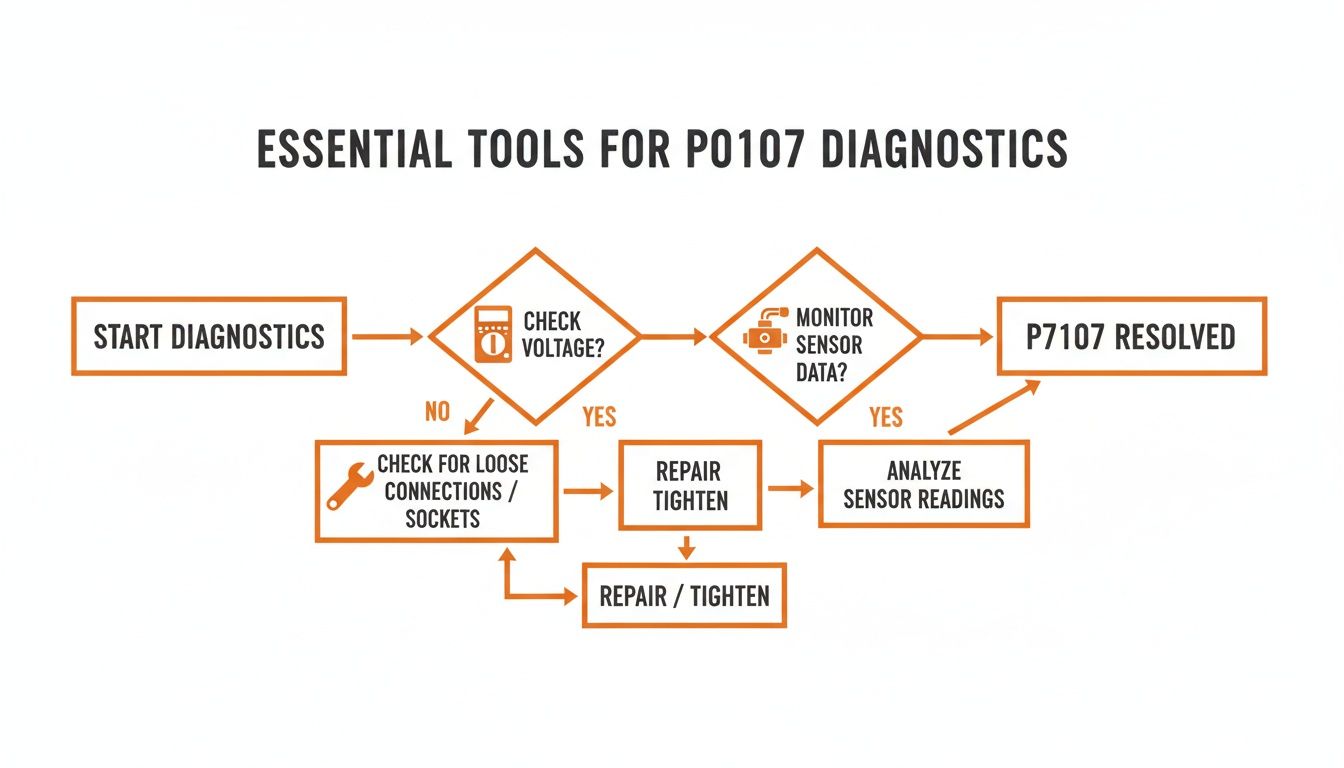
Following this methodical approach ensures you're not just guessing. You're confirming the failure point with hard data from your multimeter.
Step Two: Checking Power and Ground
Now, grab your multimeter. Unplug the electrical connector from the sensor—sometimes a small pick helps to release the locking tab. Turn the key to the "ON" position but don't start the engine.
We need to confirm the sensor is getting what it needs from the ECU. This is a basic three-wire sensor, and the tests are simple:
- Check for 5-Volt Reference: Set your multimeter to DC Volts. Place the black probe on a good ground (a clean bolt on the engine block works well). Use the red probe to carefully touch each of the three terminals in the connector (the harness side, not the sensor side). One of them should read a steady 5 volts. If you don't have 5 volts, you have a bigger wiring problem or a rare ECU issue.
- Check for Ground: Leave the black probe on your engine ground. Switch your multimeter to the continuity setting (the one that beeps). Find the ground pin in the connector with your red probe. It should give you a solid beep, indicating a good connection to the machine's chassis ground. No beep means you have a broken ground wire.
If you’re missing either the 5-volt supply or the ground, the sensor can't work. The problem isn't the sensor itself; it's the wiring leading to it.
I’ve seen guys replace three sensors in a row only to find a broken ground wire that was costing them thousands in downtime. Never assume the wiring is good. Always verify.
Step Three: Testing the Signal Voltage
If you have a solid 5 volts and a good ground, the next move is to test the signal wire. This is the wire that sends the pressure reading back to the ECU.
Plug the connector back into the sensor. Now you'll need to "back-probe" the signal wire. Carefully slide your multimeter's red probe alongside the wire's seal at the back of the connector until it makes contact with the metal pin inside. Place your black probe on a good ground.
With the key on and engine off, a healthy sensor will output a specific voltage based on your altitude. Near sea level, you should see around 4.6 volts. As your altitude increases, that voltage will drop. What you're really looking for is a dead signal.
A reading of near-zero volts is the smoking gun. That tells you the sensor has internally shorted or completely failed, dragging the signal voltage down to nothing. This is exactly what the P0107 code is for—a circuit low input. Manufacturers typically set this fault when the sensor voltage remains below a certain minimum, usually ~0.5–0.6 V, for a few seconds. You can discover more insights about these OEM-specific guidance notes on Edmunds.
Step Four: The Old School Wiggle Test
If your voltage readings seem okay or are intermittent, it's time for the wiggle test. This is an old-school trick that finds problems the dealer's laptop will never catch.
With your multimeter still back-probed on that signal wire, start carefully wiggling the wiring harness. Begin at the connector and slowly work your way back along the harness as far as you can. Watch the voltage reading on your multimeter like a hawk.
If you see that voltage drop out, flicker, or jump around as you move a certain section of the harness, you’ve found your problem. It's a broken or chafed wire inside that loom. Those constant machine vibrations are hell on wiring, and it only takes one small break to shut you down completely. This test separates the real field techs from the parts changers.
Replacing the Sensor and Clearing the Fault Code for Good
You’ve done the hard part. Your multimeter confirmed what you already suspected—that little plastic sensor has finally given up the ghost. Now for the easy bit, a ten-minute job that gets the machine back to making you money.
Forget about hauling this thing to the shop. Swapping out the atmospheric pressure sensor is a classic field repair, about as simple as it gets. There are no special procedures, no programming, and no need to hook up a dealer laptop. This is just straightforward nuts-and-bolts work that anyone with a basic socket set can handle.
Making the Swap
First, a word of caution that should be second nature but is easy to overlook when you’re in a hurry: disconnect the battery. Just pull the negative terminal. It’s a simple move that prevents any accidental shorts that could turn a small job into a much bigger headache.
With that done, you can get to the sensor itself.
- Unplug the Electrical Connector: Press the release tab firmly and pull the connector straight off. Don't ever yank on the wires. If it's being stubborn, a small flathead screwdriver can help gently persuade the tab.
- Remove the Mounting Bolts: The sensor is usually held by one or two small bolts, typically 8mm or 10mm. A small ratchet with an extension is your best friend here. Keep track of these bolts—they love to disappear in the dirt.
- Pull the Old Sensor: With the bolts out, the sensor should pull straight from its port. The O-ring might make it a little snug, so a slight twist as you pull can help break it free.
Honestly, the whole process takes less time than you'd spend on hold trying to get a service writer on the phone.
A Pro Tip for a Perfect Seal
Here’s a small detail that separates a good fix from a great one. Before you slap the new sensor in, grab a clean, dry rag and wipe down the mounting surface on the intake manifold.
Check the port for any debris, old gasket material, or grit that could keep the new sensor’s O-ring from seating perfectly. A bad seal can create a small vacuum leak. It might not throw another P0107 code, but it could cause other nagging performance issues down the road. It’s a 30-second step that ensures you do the job right the first time.
Don't just install the new part; prepare its new home. A clean mounting surface is the key to a lasting, leak-free repair that you won't have to think about again.
Installing the New Sensor and Firing It Up
Now, grab your new sensor. A little bit of clean engine oil on the O-ring will help it slide in smoothly and prevent tearing.
Press the new sensor firmly into place, making sure it’s fully seated. Hand-start the mounting bolts to avoid cross-threading, then snug them down. Don't go crazy with the torque—just firm enough for a good seal.
Finally, plug the electrical connector back in until you hear that satisfying "click." Reconnect your battery terminal, and you're ready for the moment of truth.
Fire up the machine.
Clearing the Code Without the Dealer
Don't be alarmed if the check engine light is still on and the active P0107 fault code is still showing on the dash. That's perfectly normal.
On most JCBs, the ECU is smart enough to recognize when a problem has been fixed. Once it sees a stable, correct signal from the new sensor through a few run cycles, it will clear the active code on its own. Often, just starting it, letting it run for a minute, and shutting it off a couple of times is all it takes. The check engine light will go out, and the machine will be back to full power.
No "Service Master" software. No waiting for a field tech. Just a solid repair done right where the machine sits.
If you run into any trouble or need to get another part shipped out fast, the team at Flat Earth Equipment has techs who can actually help. You can easily get in touch with them through their contact page to speak with someone who knows this iron inside and out.
Comparing Your Costs: Dealer Repair vs. a DIY Fix
Let's talk brass tacks. That little P0107 code is more than just a light on your dash—it's a leak in your revenue stream. The minute you decide to call the dealer, the meter starts running, and it runs fast.
First, there's the cost to haul the machine to their yard. Then comes their non-negotiable "diagnostic fee," where a tech plugs in a laptop, charges you $175 an hour to read the same code your scanner already gave you, and tells you it needs a sensor.
Then you get hit with the parts markup. That atmospheric pressure sensor they quote you for $200? It's the same one you can get from a real-world supplier like Flat Earth Equipment for a fraction of that price.
Breaking Down the Dealer's Bill
When the dealer gets involved, the costs stack up in ways that have nothing to do with the actual repair. You’re not just paying for a sensor; you’re paying for their fancy showroom and the army of service writers standing between you and the actual technician.
A typical dealer invoice for a P0107 fault usually looks something like this:
- Hauling Fees (Round Trip): $300 - $600
- Diagnostic Labor (2 hours min.): $350+
- Part Cost (Sensor): $180 - $250
- Shop Supplies & Misc. Fees: $50
- The Real Killer - Downtime (3-7 days): Potentially thousands in lost revenue
You're easily looking at over a thousand dollars out of pocket before you even factor in the crippling cost of having your machine sit idle for a week while it "waits its turn."
The Hard Truth: The dealer’s business model depends on your downtime. They profit from every hour your machine sits in their yard waiting on a part they should have had on the shelf in the first place.
The DIY Fix: The Real Numbers
Now, let's look at the cost of fixing it yourself. You’ve followed this guide, used your multimeter, and confirmed it's either a bad sensor or a simple wiring issue.
Your investment here is about an hour of your own time. Your primary cost is the replacement sensor from Flat Earth Equipment, which you can get overnighted for far less than the dealer's price. If you find a chafed wire, you’re out a few bucks for a butt connector and some heat shrink. Simple.
Dealer Repair vs Field Fix Cost Breakdown
It’s one thing to talk about it, but seeing the numbers side-by-side really puts the dealer model into perspective. Here’s a realistic breakdown of what you can expect to spend.
| Cost Factor | Dealer Estimate | DIY Field Fix Estimate |
|---|---|---|
| Labor Cost | $350+ (2-hour minimum) | $0 (Your own time) |
| Part Cost | $180 - $250 | $40 - $90 |
| Hauling & Transport | $300 - $600 | $0 |
| Shop Supplies/Fees | $50 | ~$10 (Connectors, tape) |
| Total Out-of-Pocket | $880 - $1,250 | $50 - $100 |
| Downtime Cost | $1,000s (3-7 days) | Minimal (1-2 days max) |
As you can see, the choice is pretty clear. You can hand over a blank check to the dealer and wait, or you can spend an hour in the field, save over a thousand dollars, and get back to work the next day.
This approach isn't just about saving a few bucks on a part. It's about taking back control of your own equipment and your own schedule. If you want to know more about the kind of no-nonsense support we provide, you can learn about the team at Flat Earth Equipment and see why we're different.
Data from shops confirms that fixing a P0107 low-voltage fault is highly variable. A wiring fix might take up to two hours with under $40 in parts, while a full sensor replacement is usually a 1.5-hour job plus the part itself. The choice is yours.
Common Questions from the Field About the P0107 Code
You're not the first guy to stare at a P0107 code and wonder if it's tied to some other gremlin in the machine. Out in the field, you see how one small fault can domino into bigger problems. Here are the straight answers to the most common questions I hear from other techs trying to nail down this JCB atmospheric pressure sensor fault.
Can A Clogged Air Filter Cause A P0107 Code On My JCB?
It’s a good thought, but the answer is a hard no. A severely plugged air filter will absolutely choke your machine, cause black smoke, and trigger a host of other intake-related fault codes. However, the P0107 code is purely an electrical fault.
The ECU is specifically looking for a correct voltage signal from the atmospheric pressure sensor before the engine even turns over. A dirty air filter affects air flow when the engine is running, which is a completely different measurement. While you should always keep your filters clean, it’s not the root cause of this particular code.
Will Clearing The Code With A Handheld Scanner Fix The Problem?
Absolutely not. Clearing the code with a scanner is like putting a piece of tape over the check engine light—it ignores the problem but doesn't fix it. The P0107 is a hard fault, meaning the ECU will re-log it the instant it runs its self-check on the next key cycle.
If the root cause—the bad sensor or the shorted wire sending zero volts—isn't repaired, the code will come right back. You have to fix the actual electrical issue. Once the ECU sees a steady, correct voltage signal from the repaired circuit, the code will typically clear itself after a few successful run cycles anyway.
Think of it this way: erasing the code is just hitting the snooze button. The alarm is going to go off again in a few seconds because the underlying problem is still there. A real fix makes the alarm go away for good.
My Machine Is Stuck In Regen And Showing P0107. What's The Connection?
This is the classic JCB headache. The whole aftertreatment system, with its DPF and finicky AdBlue/DEF components, is a house of cards. It relies on a mountain of accurate data from sensors all over the engine to work correctly.
The atmospheric pressure sensor is a critical piece of that puzzle. It tells the ECU the density of the air it's breathing, which is essential for calculating the right fuel mixture for a successful DPF regeneration.
Here's the chain of events:
- The atmospheric pressure sensor fails, sending an impossible (low voltage) signal to the ECU.
- The ECU can't trust its own calculations for the regen cycle because it has bad data.
- As a safety measure to prevent damage, the ECU locks out the regeneration function until it gets a valid reading.
So, the P0107 fault is causing the regen lockout, not the other way around. Solve the sensor or wiring problem first. Once you do, the machine will almost always come out of its trance and allow a proper regen cycle to start. It’s another example of how fixing one small, cheap part can solve a massive, machine-stopping problem without ever calling the dealer.
When you're tired of dealer games and just need the right part to get back to work, Flat Earth Equipment has your back. We stock the sensors, solenoids, and filters you need and ship them fast. Get the right part and real support at https://flatearthequipment.com.