On any given job site, a DC to DC converter 48v to 12v is one of those small, anonymous boxes you probably never think about. That is, until it fries and leaves your machine dead in the mud. This humble device is the crucial link that takes the high-voltage muscle from your equipment's main 48V battery pack and steps it down to a manageable 12 volts for all the finicky electronics, especially those cursed AdBlue/DEF systems.
Without it, your JCB is just a dead hunk of yellow iron with a fully charged battery. It’s the translator between the brute force of the drive system and the brains of the control system—the same brains the dealer's laptop loves to hold hostage.
Why Your 48V Machine Needs a Solid 12V Converter
Let's paint a picture. You’re out on a muddy job site, trying to beat the rain, and the telehandler won't even crank. The main 48V battery gauge is pegged at full, but nothing happens. The machine is dead, and the regen cycle is looming. What gives?
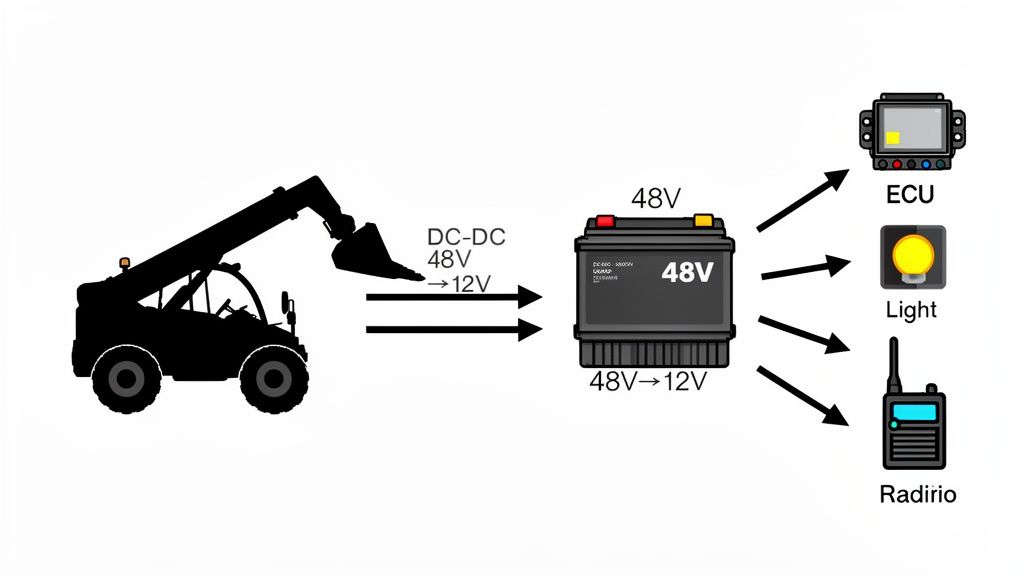
The problem isn't the raw power. The traction motors and main hydraulics run on the heavy-duty 48V system. But the machine's brain—the ECU, the finicky sensors, the lights, the radio, the dash cluster—all speak a different language. They run on 12V. They simply can't handle the raw voltage from the main power system.
That’s where the DC to DC converter 48v to 12v steps in. Think of it as a power transformer and a translator rolled into one. It takes the high-voltage "shout" from the 48V batteries and turns it into a stable 12V "whisper" that the sensitive electronics need to function.
Without this translator, your high-voltage muscle and low-voltage brain can’t communicate, leaving you stranded and waiting for a tow, or worse, a visit from the dealer with his laptop.
48V Power vs 12V Accessories: A Field Comparison
To really get a feel for what’s at stake, this table breaks down what runs on each voltage. It quickly becomes clear why a converter failure can shut down a machine just as fast as a dead main battery, stopping a regen cycle dead in its tracks.
| System Voltage | What It Powers | Field Consequence of Failure |
|---|---|---|
| 48V | - Main traction drive motors - Hydraulic pump motor - Heavy-duty actuators |
Machine won't move or lift. Complete loss of primary functions. |
| 12V | - Engine Control Unit (ECU) - All lights & indicators - Operator console & gauges - Radio & communication systems - AdBlue/DEF system sensors |
Machine won't start. No lights, no display, no diagnostics. Totally dead. Locked out. |
As you can see, the 12V system is just as critical. A failed converter doesn't just mean the radio goes out; it means the entire control system, including the parts that trigger a regen, is offline.
The Unsung Hero of Your Electrical System
This little box is the unsung hero of your machine's electrical architecture. A good one works silently in the background for years, but a cheap, poorly-made one will fail you faster than a forced regen cycle in high humidity. When it goes, you're dead in the water—locked out just as effectively as when the dealer's "Service Master" diagnostic laptop says no.
The shift to 48V systems is happening across the industry, with big names like JCB leading the charge. This isn't a niche market; the global demand for these converters is already worth around $861 million and climbing fast.
A quality unit with over 95% efficiency doesn't just power your accessories; it can extend your main battery life by up to 20% by minimizing wasted energy. That’s a real, tangible impact on your daily run time.
The real cost of a cheap converter isn't the part itself. It's the lost day of work, the rental fees, and the headache of troubleshooting an electrical gremlin that could have been prevented. Don't skimp on the heart of your low-voltage system just to save a few bucks the dealer wants to charge you triple for anyway.
This isn’t just about keeping the lights on. It’s about keeping the machine’s computer and critical safety systems online. When you're sourcing replacement electrical parts, from converters to the heavy-duty battery chargers that feed the whole system, reliability is everything.
How to Choose the Right Converter and Only Fix It Once
Picking a new dc to dc converter 48v to 12v isn't like grabbing a handful of bolts from a bin. The wrong choice will invite electrical gremlins into your machine that will haunt you for weeks, costing you serious time and money. This is how you bypass the dealer wait times and get the right part the first time.
This is your field checklist for selecting a converter that won’t quit, so you only have to do this job once.
Forget the dealer’s part number for a minute. You need to understand what actually matters on the job site. First up is amperage. Look at the total draw of your 12V system—lights, ECU, radio, everything. Then, add a safety margin of at least 25%.
If your systems pull 20 amps, don’t get a 20-amp converter; get a 30-amp unit. This buffer prevents it from running at its absolute limit, which is a one-way ticket to overheating and an early grave.
Key Specs the Dealer Won't Mention
Next, let's talk about the specs that separate a real workhorse from a paperweight. These are the details that prevent a simple part swap from turning into a nightmare of fried JCB electronics.
- Isolated vs. Non-Isolated: This is non-negotiable. An isolated converter creates a complete electrical barrier between the 48V and 12V sides. A voltage spike from the drive motors can't cross over and brick your ECU. A cheaper, non-isolated unit shares a ground and offers zero protection. Don't even consider it.
- IP Rating: Your equipment lives in dirt, dust, and water. An IP rating like IP67 means the converter is sealed tight against the elements. A unit without a proper rating will corrode from the inside out the first time it gets hit with a pressure washer.
- Heat Dissipation: Look for a converter with a beefy, finned aluminum housing. That isn't for looks; it's a heat sink. It pulls damaging heat away from the internal components, extending the life of the unit.
A cheap converter is the most expensive part you can buy. The initial savings are nothing compared to the cost of a fried ECU and a machine that's down for a week while you wait for the dealer to ship another overpriced, under-specced replacement.
Don't Get Left Behind
The industry is moving this way for a reason. The demand for reliable converters is exploding, with the market projected to grow from $37.23 billion to over $106.67 billion by 2035.
That growth is driven by the need for stable power in modern equipment. Choosing the right components isn't just about repair; it's about upgrading your machine's reliability so you don't get stuck waiting on a regen cycle.
It’s about building a machine that can handle the power demands of modern electronics, like those found in advanced systems that often require a robust 48V 100A charger to keep the main batteries topped off. By focusing on amperage, isolation, and durability, you source a part you can install with confidence, knowing it will outlast anything the dealer has on backorder.
Wiring It Up Without Starting a Fire
Alright, you’ve got the right dc to dc converter 48v to 12v in your hand from Flat Earth Equipment, and you’re ready to get this machine back to work. Now for the most important part: installing it without creating a new, bigger, and much smokier problem. This isn't a textbook procedure; this is how we do it in the field so it lasts.
First things first, let's talk about wire. Using wire that's too thin is like trying to put out a fire with a squirt gun—it’s a guaranteed recipe for a meltdown. Don't just guess. Check the converter's spec sheet for its max amp draw and use a wire gauge chart to pick the right size for the length you’re running. Skimping here will absolutely come back to bite you.
Fuses Are Not Optional
This next part is non-negotiable. You must install a fuse on both the 48V input and the 12V output.
An inline fuse on the positive wire, as close to the battery as possible, protects the entire system from a catastrophic short. Another fuse on the 12V output protects your accessories and keeps a shorted-out light from frying your brand-new converter.
Think of it this way: a few bucks for fuses is cheap insurance against a fire or a fried ECU. You can learn more about job site best practices and why shortcuts are never worth it by reviewing our essential guide on equipment safety.
A proper installation takes an extra ten minutes. A hack job can take your machine down for ten days while you wait for the dealer to ship you a new wiring harness and a replacement for the ECU you just cooked. Do it right, do it once.
Mounting and Connections That Last
Where you mount the converter matters just as much as how you wire it. Find a spot on the chassis away from extreme engine heat and heavy vibration. These things need to breathe. The fins on the casing are there for a reason—they dissipate heat. Bolting it down in a sealed compartment with no airflow will kill it slowly.
This flowchart breaks down the core decisions you need to make to ensure you select a durable converter that's built for the job.
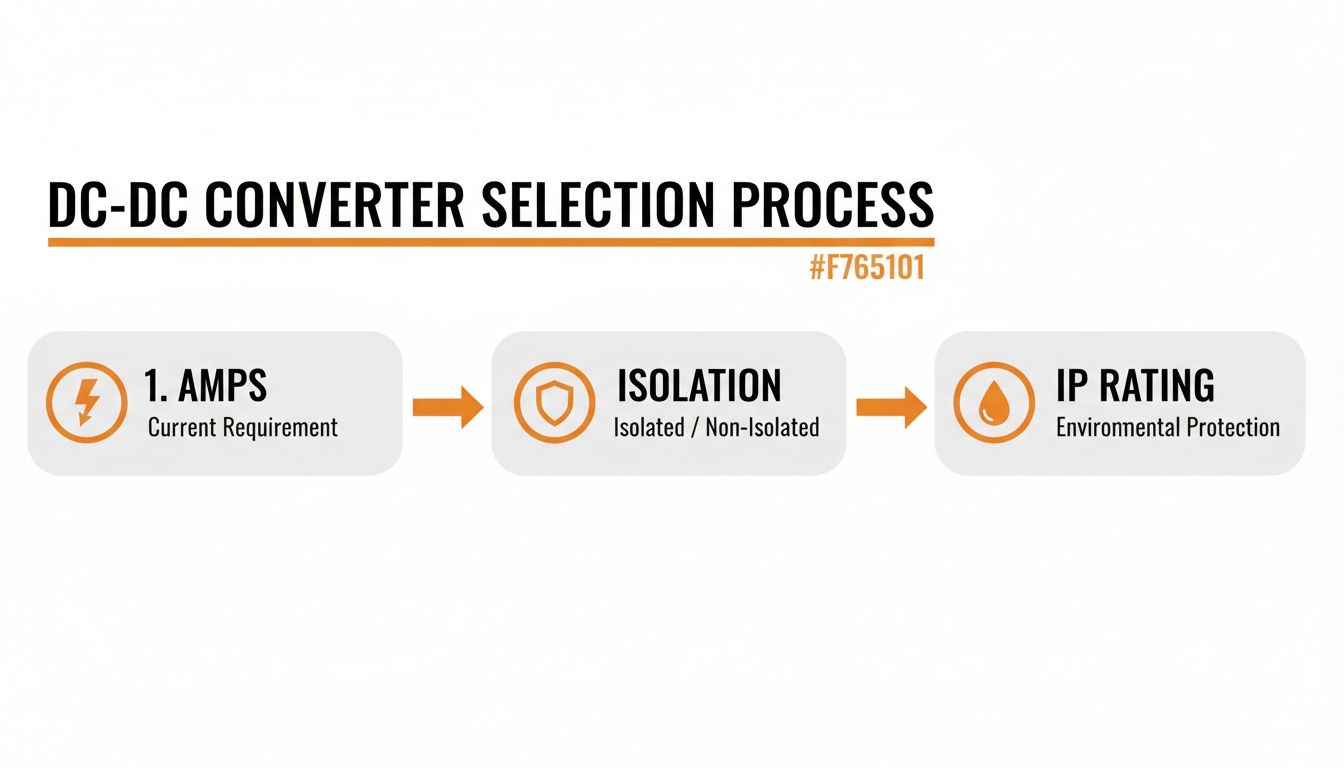
The process shown—verifying amps, ensuring isolation, and checking the IP rating—directly informs where and how you install it for maximum reliability.
Finally, make your connections weatherproof. Use heat-shrink connectors or terminals with dielectric grease. Bare crimp connectors will corrode and fail, leaving you to chase electrical gremlins in a few months. Secure the converter to a solid chassis ground, scraping away any paint to get a clean metal-to-metal contact. It’s these small details that separate a professional field repair from a temporary patch job.
Spotting a Failing Converter Before It Strands You
A DC to DC converter 48V to 12V rarely just drops dead. It usually gives you hints it’s getting weak, kind of like an engine that starts running rough long before it throws a rod. If you know what to look for, you can catch it during routine service instead of when a machine is bogged down a mile from the shop.
These things tend to die a slow death, and the symptoms are classic electrical gremlins. They can send you chasing your tail for hours if you don't recognize the root cause. Learn the warning signs, and you’ll spot the real problem before it leaves an operator stranded.
Telltale Signs From the Cab
The first clues almost always show up right in the cab. The machine’s 12V system starts acting flaky because the power it’s being fed is unstable. Keep an eye out for these classic symptoms of a slow failure:
- Flickering Lights: Headlights or dash lights that dim and brighten on their own, especially when you hit another switch, are a dead giveaway.
- Radio Cutting Out: If the radio or any other 12V accessory intermittently cuts out or resets, it’s screaming for attention.
- Erratic Sensor Readings: When the ECU gets inconsistent voltage, it can’t trust its sensors. This leads to phantom error codes that have you second-guessing perfectly good parts, especially those cursed AdBlue/DEF sensors.
- Weak Battery: If the 12V battery (if the machine has one) won't stay charged even with a healthy charging system, the converter is likely the weak link in the chain.
These symptoms all point to a converter that can no longer handle its rated load. It’s working, but it’s struggling. It’s only a matter of time before it quits for good.
The Only Test That Matters: A Voltage Drop Test
Don't trust a simple voltage reading at the terminals. A dying converter can still show a perfect 12–13 volts with no load on it. That reading is completely useless.
The only way to truly assess its health is to put it under stress with a voltage drop test.
Here’s how to do it right:
- Connect your multimeter to the 12V output terminals of the converter.
- Turn on every 12V accessory you can—all the lights, the beacon, the radio, the wipers. Put a real-world load on the system.
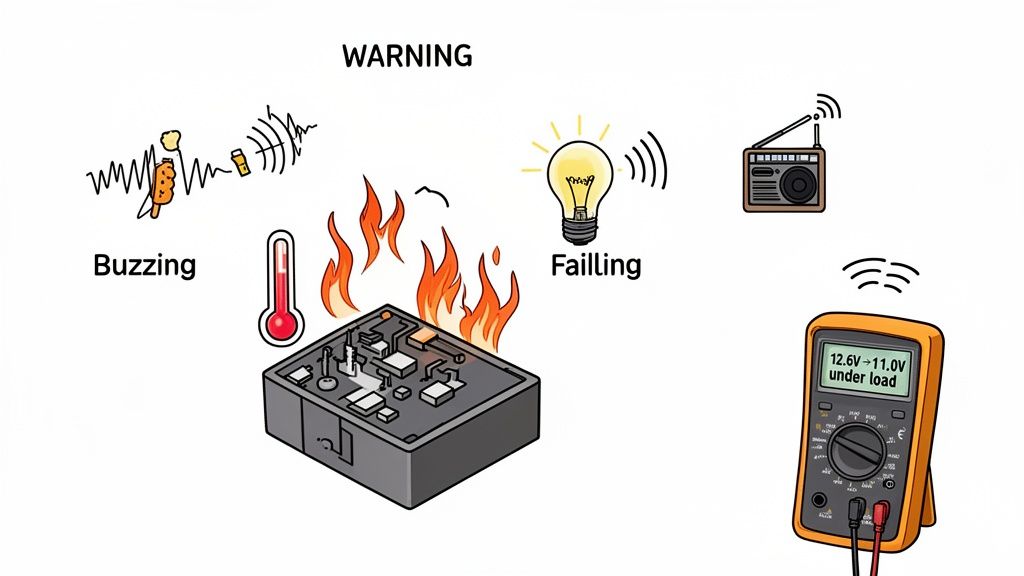
- Watch your multimeter. A healthy converter’s voltage should stay solid, maybe dropping slightly to 12.5V. If you see it plummet to 10V or fluctuate wildly, you've found your problem.
A no-load voltage reading is a lie. It tells you nothing about how the converter performs when it's actually doing its job. Load it up, make it sweat, and then you’ll see the truth.
While you're at it, get your hands on the unit (carefully!). A converter that’s too hot to touch is working way too hard and is on its last legs. You might even hear a high-pitched buzzing or whining sound, which is another clear sign of internal components failing. Don't ignore these warnings; they are your final notice before a total shutdown.
Stop Waiting on the Dealer and Get Back to Work
On any job site, the real enemy isn't a broken part—it's downtime. Every minute you wait for a dealer to ship a specific OEM converter, your expensive yellow iron is just a giant paperweight bleeding money. It's time to get ahead of the game and take back control from the guys with the laptops.
The dealer's parts monopoly is built on keeping you in the dark. They want you to think their overpriced, rebranded converter is the only one that will possibly work. That’s a convenient story designed to protect their profit margins, not your uptime. The reality is, that OEM box has a spec sheet just like any other, and you can absolutely match it.
This is about breaking free from their system. It means ending the cycle of waiting forever on a part, only to have to plug in a dreaded "Service Master" laptop to clear codes that a reliable aftermarket part would have never triggered in the first place.
Cross-Referencing Like a Pro
The first step is simple: get the part number off the old DC to DC converter 48v to 12v. With that number in hand, you can start cross-referencing. Don’t just look for an identical part number; look for the critical specs that actually matter:
- Input Voltage Range: Make sure it can handle the full swing of your 48V system, from a full charge right down to nearly depleted.
- Output Voltage: This needs to be a steady 12V. Most are regulated to around 13.8V to mimic a vehicle's alternator.
- Continuous Amperage: The new unit's amp rating must meet or exceed the original. Going a little higher is a smart upgrade, not a risk.
- Physical Footprint: Check the dimensions and mounting hole pattern. You want it to bolt right back into the original spot without any modifications.
With these four data points, you can easily find a superior aftermarket converter from a supplier like Flat Earth Equipment. You'll often get a part that's better built, with a higher IP rating and superior heat dissipation, for a fraction of what the dealer charges.
You don't need the dealer’s blessing or their expensive laptop to fix your own machine. All you need is the right information and a supplier who understands that a technician's time is money.
The Smartest Investment You'll Make All Year
Here’s the simplest math you’ll do all week. A quality aftermarket converter might cost you a couple hundred dollars. Now, how much does one day of machine downtime cost your operation? A thousand? Two thousand? The numbers aren't even in the same ballpark.
Keeping a spare converter on your service truck or in the shop is the cheapest insurance policy against lost productivity. When a unit fails in the field, you're not making panicked calls to a parts counter that closes at 5 PM. You’re grabbing the spare from your truck and turning a week of downtime into a 30-minute fix. This is how you win the war against the regen cycle and the dealer lockout.
Answering Your Questions from the Field
Out in the trenches, there's no time for fluff. You need straight answers to the real problems you're facing. Here are the questions I get asked most often about swapping a dc to dc converter 48v to 12v when you're miles from the shop and the pressure is on.
Can I Use a Converter with a Higher Amp Rating?
Absolutely, and it's one of the smartest upgrades you can make on a machine. A higher amp rating means the converter is built tougher and won't be redlining just to keep up with demand. It’s got power in reserve.
Think of it like grabbing a 3/4-inch breaker bar for a job that only calls for a 1/2-inch drive. You’re not straining the tool one bit, and it’s ready for anything. Just make sure your wiring and fuses are sized for the machine's actual load, not the converter's max rating. The goal is to match the voltage (48V in, 12V out) and get an amp capacity at least 25% higher than the original for a rock-solid safety margin.
What Is the Difference Between Isolated and Non-Isolated?
This is the one that separates a professional repair from a catastrophic failure. A cheap, non-isolated converter shares a common ground between the 48V and 12V sides. It’s a direct electrical path for disaster.
A big voltage spike from the 48V drive motors can travel straight across that shared ground and instantly fry your 12V ECU, sensors, and displays. It’s a ticking time bomb.
An isolated converter creates a protective electrical barrier—like an air gap—between the high- and low-voltage circuits. For any modern JCB or piece of yellow iron with a computer, which is everything these days, you must use an isolated unit. It’s the cheapest insurance you can buy against a multi-thousand-dollar electronics failure caused by a cheap part.
Don’t even think about using a non-isolated converter unless you enjoy watching circuit boards smoke.
My New Converter Gets Hot. Is That Normal?
Warm is normal; too hot to touch is a big red flag. No converter is 100% efficient, and that wasted energy escapes as heat. A good converter with a proper heat sink will feel warm under a heavy load, but it should never be scorching.
If it’s alarmingly hot, you’ve probably got one of three problems:
- It's Undersized: The converter can't handle the amp draw and is overworking itself to death.
- There’s a Short: A short circuit on the 12V side is forcing the converter to dump out maximum current constantly.
- It’s Suffocating: You mounted it in a spot with zero airflow, and it can't cool itself down.
Grab your multimeter, check the actual amp draw on the 12V output side, and compare it to the converter’s rating. The numbers don't lie, and they'll point you straight to the problem.
Stop letting dealer backorders and electronic gremlins dictate your uptime. Flat Earth Equipment has the heavy-duty converters, sensors, solenoids, and filters you need to get the job done right the first time. Get the parts you can trust, shipped today, and bypass the dealer wait times.
Find your solution at https://flatearthequipment.com