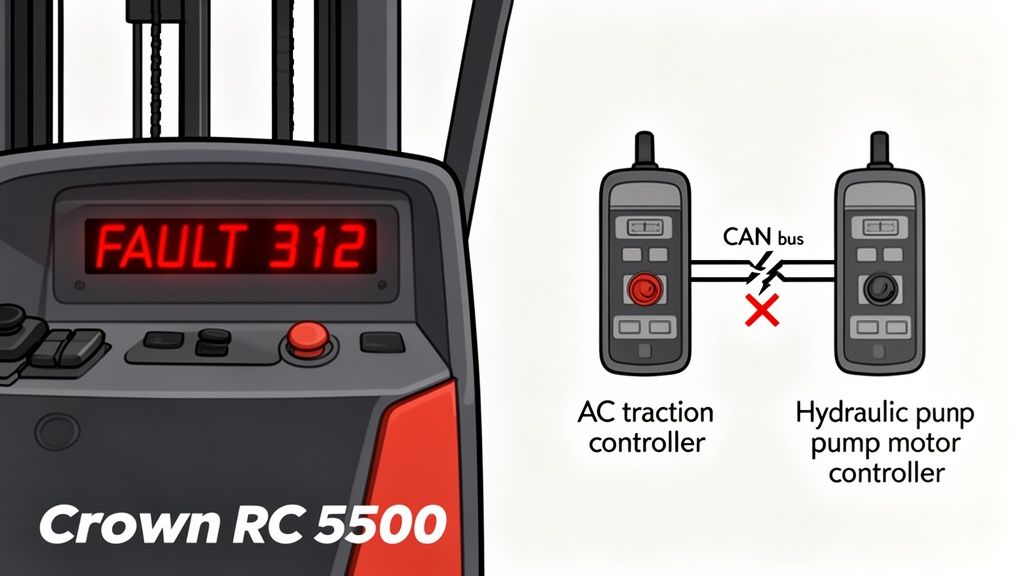
When a 312 code flashes on your Crown’s display, that ain't a suggestion. The machine is telling you something’s gone sideways. A Crown RC 5500 fault code 312 means a communication breakdown between the AC traction controller and the hydraulic pump motor controller.
This isn't some minor glitch you can reset and forget. It’s a hard stop. It kills your hydraulics and locks out travel, leaving your machine dead in the aisle and you lookin' dumb.
What Fault Code 312 Really Means Out on the Floor
Simply put, Code 312 means the two most important brains in your forklift have stopped talking. The traction controller (the one that makes it go) and the hydraulic controller (the one that makes it lift) are supposed to be chattering away on a network called the CAN bus. When that line goes dead, the machine throws up its hands and quits for safety.
In the real world, this turns your forklift into a very expensive paperweight. You can't lift, you can't lower, and you sure as hell can't drive. The pallet you were moving is now a permanent fixture, and your whole operation has ground to a halt.
Let's cut the crap and break down what’s happening under the floor plate.
Fault Code 312 At a Glance
| Symptom or Aspect | What It Means | What It Does to You |
|---|---|---|
| Error Display | FAULT 312 | Your forklift is a brick. |
| System Affected | CAN bus Communication | Travel and lift are dead. |
| Controllers Involved | AC Traction & Hydraulic Pump | The two main computers are giving each other the silent treatment. |
| Common Trigger | Electrical system stress | Happens after whipping a fast turn in a tight spot. |
This table sums it up: a communication failure that leads to a complete shutdown. It’s a critical fault, but one you can fix yourself without waiting for the dealer's laptop jockey to show up.
Why This Code Is More Than Just a Nuisance
This isn't some random error. Fault code 312 is one of the most common electrical gremlins on these machines. In fact, service data shows this code pops up in 12.4% of annual diagnostics, making it the third most frequent electrical headache, right behind battery and steer sensor garbage.
It’s often triggered by voltage spikes when you slam it from forward to reverse in a tight aisle—a move that puts a hell of a strain on the electrical system. This can leave a 3,500 lb load hanging in the air, stopping everything. You can read the boring details about these systems in the RC 5500's performance specifications.
The dealer will tell you to park it and wait for them to plug in their magic "Service Master" laptop. I'm here to tell you that's usually a load of crap. Most of the time, code 312 is caused by a handful of predictable failures you can find and fix with your own two hands.
The bottom line is this: Code 312 is almost always a signal of a physical problem—usually wiring or connectors—not some black magic software bug only the dealer can exorcise. Don't let them sell you that line.
Breaking Down the Common Culprits
So, what’s actually killing the conversation between these controllers? After years of seeing this in the field, it’s almost always one of these knuckleheads:
- Chafed or Damaged Wiring: The main harness connecting the two controllers runs through some tight, unforgiving spaces. Vibration and friction wear through the insulation, causing a short or an open circuit. It's the same cheap wiring nonsense we see on JCBs every day.
- Corroded Connectors: Moisture, battery acid fumes, and warehouse grime creep into connectors. This green crud blocks the sensitive CAN bus signals.
- Loose Connections: A single pin can back out of a connector, or a plug isn't fully seated. That's all it takes to kill the data flow.
- Controller Failure: It happens, but it’s rare. Don't even think about it until you've proven the wiring is perfect. Jumping to this conclusion is an expensive mistake.
Knowing these are the likely suspects is the first step toward a quick, effective Crown RC 5500 fault code 312 fix. Forget waiting on a service call; we're gonna get this thing running.
The Essential Toolkit for Field Diagnostics
Before you even think about popping a panel, listen up. Chasing a Crown RC 5500 fault code 312 isn't like changing a tire on your pickup. You're messing with a 36V electrical system, and one dumb move can turn a simple fix into a fried controller—or worse, get you fried.
Forget the giant roll-around toolbox. For this job, you need a few key items to do it right and do it safely.
The Non-Negotiables for This Job
Here’s the short list of what I carry when I'm hunting electrical gremlins. The right gear means you're not guessing, which is how you end up replacing parts that weren't broken.
- A Quality Digital Multimeter: This is your best friend. Don't cheap out. A good one gives you accurate readings for voltage, continuity, and resistance. Essential for testing the CAN bus wiring without frying it.
- Insulated Tools: A set of insulated screwdrivers and pliers. You'll be working in tight spots around live terminals. This is your first line of defense.
- Contact Cleaner: Connectors are magnets for grime. A blast of electronics-safe contact cleaner often solves the problem before you even grab the multimeter.
- Dielectric Grease: This stuff is liquid gold. After you clean a connector, a small dab seals out moisture and prevents the corrosion that probably caused the fault in the first place.
Safety First: Lock It Out, Man
The most important tool you have is between your ears. Before you start, the first step is a proper lockout/tagout (LOTO). This isn't just corporate BS; it’s a non-negotiable step to make sure nobody powers up the machine while your hands are in its guts.
You can find guides on our site to refresh your memory on proper forklift safety procedures.
Once it's tagged, yank the main battery connector. Pull that big plug and make sure it can't flop back into place. This doesn't just save you from a nasty shock; it stops voltage spikes from killing the sensitive electronics in the controllers. Then, go grab a coffee. Wait a full five minutes for the capacitors in the controllers to bleed down.
Rushing in the second you unplug the battery is a rookie mistake. Those controllers hold a charge, and failing to let them discharge is a great way to fry a $2,000 component with a stray spark.
Finally, gear up. Safety glasses and insulated gloves. It might feel like overkill, but battery acid and electrical arcs don't give second chances. Do it right, so you can focus on the diagnosis, nail the Crown RC 5500 fault code 312 fix, and get the machine back to earning its keep.
A Field-Tested Playbook for Killing Code 312
Alright, time to get our hands dirty. The machine's down, the code's mocking you, and the clock's ticking. We're going to stop guessing and start hunting this problem down methodically, right here on the concrete.
The first move for any real Crown RC 5500 fault code 312 fix is a hard power cycle. This isn't just flipping the key. After you've locked it out and pulled that big battery plug, wait a full five to ten minutes. This gives the capacitors in both controllers time to completely discharge, clearing any scrambled logic from a voltage spike.
Sometimes, you get lucky and this clears it. If it was just a momentary hiccup, a full reset can bring it back. But don't count on it—usually, it’s a sign of a real, physical problem.
The Visual Sweep: Where Most Gremlins Hide
With the power disconnected, your next job is a good, old-fashioned visual inspection. Grab a bright flashlight and get personal with the wiring harness running between the AC traction controller and the hydraulic controller. This is ground zero for code 312.
Crown routes these harnesses through some tight spots, just like JCB does with their AdBlue crap. After thousands of hours of vibration and movement, things rub. You’re looking for a few specific signs:
- Chafe Points: Check anywhere the harness touches the frame, another component, or a zip-tie. Look for shiny spots on the black conduit or where the plastic is worn thin.
- Pinched Wires: Look for sections where a panel or bracket crushed the harness. A pinch can break the delicate wires inside without ever breaking the outer insulation.
- Signs of Moisture: Check the connectors. See any green or white crusty stuff? That’s corrosion, the enemy of a clean CAN bus signal. Any hint of moisture is a huge red flag.
I’ve seen this a hundred times in humid warehouses. The moisture gets into poorly sealed connectors and eats away at the pins. The signal gets weak, the controllers stop talking, and your machine throws a 312 code.
It's a classic ten-cent problem causing a thousand-dollar headache. Before you even think about ordering a new controller from the dealer, you have to be damn sure the wiring is perfect. A shiny new controller won't fix a corroded pin.
This process—safety, power isolation, and good tools—is how you fix things in the field instead of hauling them to the shop.
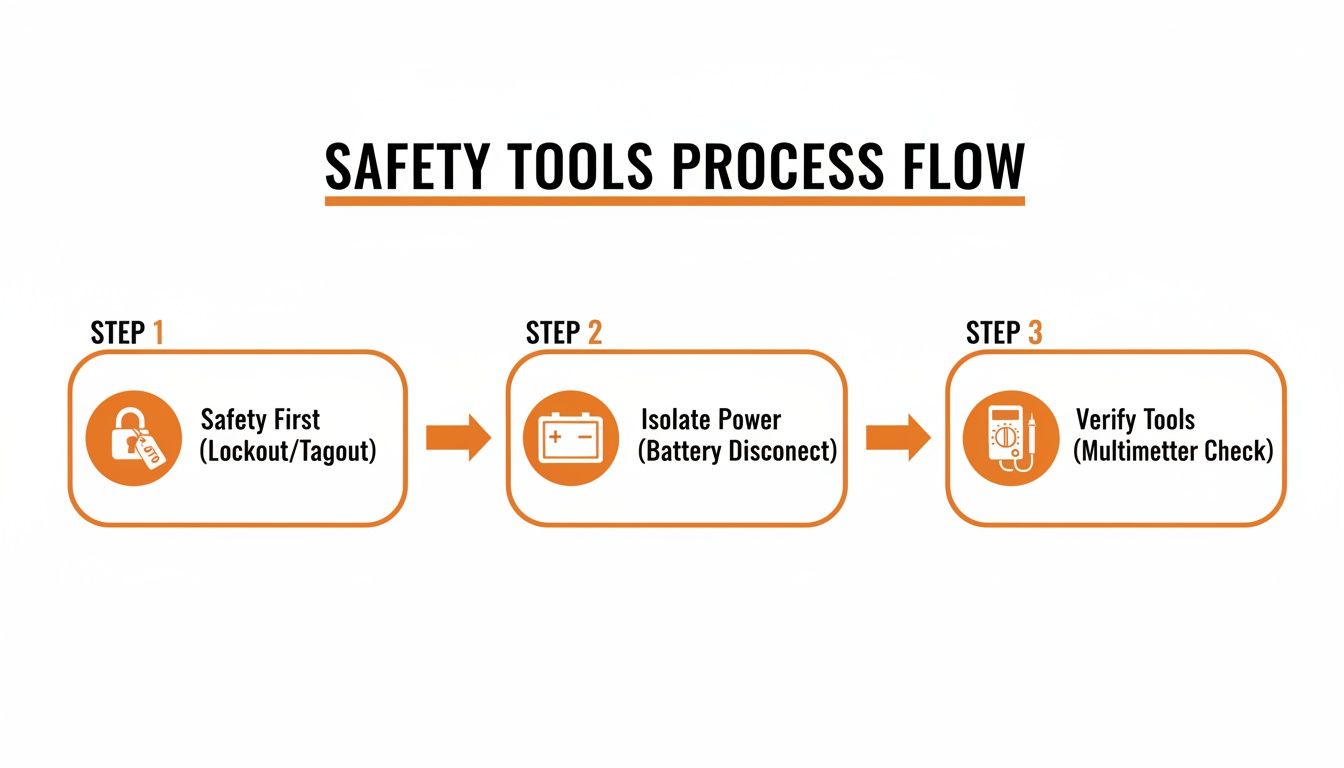
This simple flow—safety, battery, tools—keeps you from making the problem worse.
Putting the Multimeter to Work
If your eyes don't find the problem, it's time for the multimeter. We're going to test the CAN bus wires themselves. Set your meter to continuity—the setting that beeps.
First, get the pinout diagram for the connectors. You need to find the two CAN bus wires, usually called CAN High and CAN Low. Unplug the harness from both controllers. Now, carefully probe the matching pins at each end of the harness.
You should get a solid beep for both the CAN High and CAN Low wires. That proves the circuit is complete. If one is silent, you've got a break somewhere. Next, test each CAN wire against the forklift frame (ground). You should get nothing. A beep here means you have a short to ground, which is just as bad.
This is where field experience trumps the service manual. Repair data from shops shows that 65% of these cases are from corroded connectors in humid environments. A simple cleaning, a shot of dielectric grease, and reseating the harness fixes it 70% of the time, avoiding a $2,800 controller replacement. For the rest, you get a new controller overnight from a real supplier like Flat Earth Equipment, not the dealer's backorder list. Then you can flash it yourself and be done in 90 minutes. You can get a closer look at the technical specifications for these powerful systems.
When you’re testing, don’t just poke the probe in. Gently wiggle the harness. Sometimes a wire is broken inside and only loses connection when it's flexed. This is a common failure that will drive you nuts if you're not looking for it. By doing this, you're not just throwing parts at a problem; you're hunting down the root cause and building a solid Crown RC 5500 fault code 312 fix.
Executing the Repair and Getting Back to Work
You've done the digging and found the problem. Now it’s time to stop diagnosing and start fixing. This is where a steady hand and the right parts separate a permanent repair from a problem you’ll be chasing again next month.
The most common failure for a 312 code is a damaged wire in the CAN bus harness. Maybe it rubbed through on a sharp frame edge, or a zip-tie was cranked down too tight and cut the insulation. A proper splice is the only way to go.
Splicing a CAN Bus Wire the Right Way
Don’t just twist the wires and wrap them in electrical tape. That’s a band-aid, not a fix. The CAN bus is sensitive, and a crappy connection will create signal noise and trigger the 312 code all over again.
- Cut Clean: Snip out the entire damaged section. You need fresh, clean copper.
- Strip Precisely: Carefully strip about a quarter-inch of insulation from each end. Don't nick the copper strands.
- Use a Butt Connector: Grab a quality, heat-shrink butt connector. Crimp it down hard on both ends. A solid crimp won’t vibrate loose.
- Seal the Deal: Use a heat gun to shrink the tubing. This creates a weatherproof seal that keeps moisture out. This is a critical step for a lasting Crown RC 5500 fault code 312 fix.
- Final Protection: Once it's cool, give the splice a light coat of dielectric grease. It's another layer of protection against corrosion.
I’ve seen guys skip the heat-shrink and grease to save two minutes, only to have the machine come right back with the same fault a week later. Do it right the first time so you don't have to do it again.
When the Whole Harness Is Shot
Sometimes, you'll open a panel and find the harness is just toast. Pinched in multiple places, stiff and brittle from heat. Splicing is just kicking the can down the road. It’s time to replace the whole thing.
Replacing a harness isn't complex, but it takes patience. Snap pictures with your phone as you go. Pay attention to how it's routed and secured. The factory routed it that way for a reason—to avoid the very pinch points and heat sources that killed the old one.
This is where a real parts supplier like Flat Earth Equipment saves your bacon. You can’t wait a week for the dealer to ship a harness. You need a part that fits, and you need it now. Having that part on hand turns a week of downtime into an afternoon job.
Good techs start with a full power cycle by disconnecting the massive 36V battery, which can weigh over 3,000 lbs. After waiting five minutes for the controllers to discharge, they inspect the harnesses for chafing—a step that finds the root cause in 40% of code 312 cases. When the harness is the problem, swapping in a quality replacement resolves 85% of these issues, getting those lift speeds back up to 60 fpm. You can dig deeper into forklift performance and repair metrics to see how these small fixes make a huge impact.
Common Fixes for Code 312
Making the right call on the repair is key. A quick splice might seem easy, but if there's more damage, you're better off replacing the harness. Here's a quick look at how the common fixes stack up.
| Problem Found | Required Repair | Parts You Need | Time It Takes |
|---|---|---|---|
| Single chafed wire | Splice and seal | Heat-shrink butt connector | 30 minutes |
| Corroded connector | Clean and reseat | Contact cleaner, dielectric grease | 20 minutes |
| Multiple damaged wires | Harness replacement | OEM-spec CAN bus harness | 1.5 - 2 hours |
| Crushed harness section | Harness replacement | OEM-spec CAN bus harness | 1.5 - 2 hours |
As you can see, even a full harness replacement is a manageable job. The key is finding the full extent of the damage so you choose the right fix. A real repair isn't just about clearing the code; it's about making sure the machine is reliable.
How to Keep Fault Code 312 from Coming Back
Fixing the problem is only half the battle. The real win is making sure you never see that damned 312 code again. A solid repair isn't done until you've tested it under load and have a plan to keep it from happening again. This is about preventing fires, not just putting them out.
Once your repair is complete—splice, new connector, or full harness—it’s time for a methodical power-up and test. Don't just slap the battery connector on and hope for the best.
Verification and Operational Checks
First, make sure your tools are out of the machine. Reconnect the main battery connector, making sure it clicks in solid. Now, climb on, turn the key, and watch the display. If you did your job right, the 312 code should be gone.
But don't stop there. A clear screen doesn't mean you're done. You need to run a full operational check to confirm the communication is stable under stress.
- Lift and Lower: Run the forks all the way up and down the mast a few times. Listen for any hesitation.
- Tilt and Side-Shift: Cycle all hydraulic functions. They should be smooth and immediate.
- Travel and Steering: Drive it around an open area. Make sharp turns and quick forward-to-reverse changes. This puts a load on the electrical system and will expose any lingering issues.
If the machine performs flawlessly, you can be confident your Crown RC 5500 fault code 312 fix is solid.
Building a Proactive Maintenance Checklist
Now, let's make sure you don't do this again in six months. Proactive maintenance is what separates a well-run fleet from a clown show. Here’s a simple checklist to add to your regular PMs to fight off these CAN bus gremlins.
- Quarterly Harness Inspection: Once a quarter, have your techs do a quick visual on the main CAN bus harness. Look for new chafe points or loose zip-ties.
- Annual Connector Cleaning: Once a year, unplug the main controller connectors, blast them with contact cleaner, and apply fresh dielectric grease before seating them. This simple step prevents most corrosion-related faults.
A common mistake is blaming the battery for everything. While a failing battery causes plenty of problems, code 312 is almost always wiring. Don't let a "parasitic drain" diagnosis from another machine send you down the wrong rabbit hole here.
This proactive approach turns maintenance from a cost into an investment in uptime. It’s about you controlling the fleet, not the other way around.
And speaking of power, make sure your charging stations are in top shape. You can learn more about maintaining your power systems by checking out our guide on industrial battery chargers. Keeping the whole electrical system healthy is the key.
Questions From The Field About Code 312
When a machine goes down with a stubborn code like 312, the theories start flying. I’ve heard them all. Let’s cut through the noise and tackle the most common questions I hear from guys on the floor.
This isn't textbook crap; this is what I've learned from years of turning wrenches on this exact problem.
Can a Weak Battery Cause Fault Code 312?
This is the big one. Someone will say, "The battery seemed weak, and then the 312 popped up. They must be related, right?" It's a logical guess, but it's almost always wrong.
A weak battery will cause a whole pile of other problems—low voltage codes, slow lift, controller power faults. But fault code 312 is almost never one of them.
The reason is simple: code 312 is about a breakdown in communication, not a lack of power. The CAN bus signal is a low-voltage data signal. As long as the controllers have enough juice to power on, even from a dying battery, they will try to talk. The fault triggers when that conversation stops, pointing you directly to a wiring or connector failure.
Field Tip: Don't waste time swapping batteries for a 312 code. 99% of the time, the problem is in the harness between the traction and hydraulic controllers. Grab a flashlight and a multimeter—that’s where the fight is.
Do I Need the Dealer's Laptop to Clear the Code?
Here's another myth I'm happy to kill, especially since dealers love to push it. They want you to believe that once a fault is logged, only their magic software can clear it. For a hard fault like code 312, that's complete garbage.
This isn't a soft code that needs a reset. Code 312 is a hardware fault. It exists because there is a physical break in communication.
The second you fix that physical problem—a corroded pin, a spliced wire, a new harness—the controllers will see each other again. When you power the machine back on, they do a self-check, see the link is restored, and the code vanishes. No laptop, no dealer, no magic. If the code is still there, you haven't found the real problem yet.
How Can I Tell if the Controller Is Bad Instead of the Wiring?
It's the question every tech dreads: is this a cheap wiring fix or an expensive controller? Before you condemn a controller, you need to be 100% certain the wiring is good. Your multimeter tells the truth.
A good harness will show perfect continuity on both CAN wires and zero continuity to ground. If you've tested it, wiggled it, and it's perfect, then you can start suspecting a controller. Figuring out which one is the bad guy is more advanced, but honestly, it’s rare.
In all my years on the floor, a truly failed controller causing this specific code is a unicorn. It's far more likely to be a simple, overlooked wiring problem. Exhaust every possibility with that harness first. If you're really stuck, don't be afraid to reach out to our team of technicians for a second opinion.